THE NIBBLE BLOG: Products, Recipes & Trends In Specialty Foods


Also visit our main website, TheNibble.com.

TIP OF THE DAY: Homemade Chocolate Truffles, Honey Sweetened

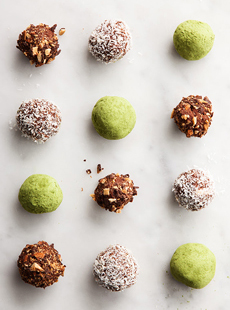
Don’t these truffles look delicious, the work of a skilled professional?

They are, the famous Force Noir* truffles from San Francisco chocolatier Michael Recchiuti (one of our favorites). He invites you to make them at home with the recipe below.

Truffles can cost $3 apiece at an artisan chocolate shop. Egad!

In truth, if you can roll a round ball and then roll it in evenly in the coatings, yours can look this good.

Why not make them for home entertaining or as gifts?

You can use whatever dark chocolate you like. Force Noir chocolate is only available in bulk, so pick whatever 70% or 72% cacao bars or discs/wafers you come across. And need we add: The finer the chocolate, the better-tasting the results.

What if you like prefer chocolate?

Most artisan chocolatiers stick to dark chocolate because, when combined with the butter and cream, it has a better chocolate flavor. But if you won’t eat anything but milk chocolate, look for high cacao milk chocolate bars or discs (38% cacao or higher, the higher the better).

Note: You have to start the day before, so the ganache can set overnight in the fridge.
 
 
RECIPE: CHOCOLATE TRUFFLES WITH HONEY

If you want to break up the work:

  • Day 1: Step 1
  • Day 2: Steps 2-5
  • Day 3: Steps 6-8
  •  
    Ingredients For 50 Truffles

  • ½ cup heavy whipping cream
  • ¼ cup plus 3 tablespoons mild honey or brown rice syrup
  • 1 vanilla bean, split horizontally
  • 3 tablespoons unsalted butter, softened
  • 1½ cups dark chocolate, finely chopped
  • For rolling: unsweetened cocoa powder, matcha, coconut flakes, chopped almonds
  •  
    Preparation

    1. COMBINE the cream and corn syrup in a medium saucepan. Scrape the vanilla bean seeds from the bean into the pan and then add the whole bean. Bring the mixture to a boil over medium heat.

    Once the mixture has reached a boil, remove from the heat and cover the top of the pan with plastic wrap. Allow the cream mixture to cool to room temperature, transfer it to a bowl, cover with plastic wrap, and refrigerate overnight.

    2. LINE the bottom and sides of an 8-inch square baking pan with plastic wrap and set aside. Put the chopped chocolate in a medium stainless-steel mixing bowl and set the bowl over a pot of simmering water. Heat, stirring occasionally, until the chocolate melts to 115°F. While the chocolate is melting…

    3. REMOVE the cream mixture from the refrigerator and strain it through a fine-mesh sieve into a small saucepan. Heat the cream mixture to 115°F, stirring occasionally. When both the chocolate and cream mixture have reached 115°F…

    4. REMOVE from the heat and pour both into a 1-quart clear vessel. Blend the chocolate and cream mixture with an immersion blender using a stirring motion. Make sure you reach the bottom of the vessel. The ganache will thicken, become slightly less shiny, and develop a pudding-like consistency. Add 3 tablespoons of the very soft butter and incorporate it with the immersion blender.

    5. POUR the ganache into the lined pan. Spread the ganache as evenly as possible with a small spatula. Allow the ganache to cool at room temperature until it has set, 2 to 4 hours. Next, cover the pan with plastic wrap and refrigerate until you are ready to roll your truffles.

    6. REMOVE the ganache from the pan and transfer it onto a work surface. Remove all plastic wrap. Cut the ganache into 1-inch squares with a knife dipped in hot water. Be sure to wipe the knife dry before and after each cut.

    7. LINE a sheet pan with parchment paper; place the truffle toppings in individual bowls, large enough to hold 6 truffles. Dust your palms with cocoa powder. One at a time, pick up a ganache square, roll it into a ball between your palms, and drop it into the toppings bowl of your choice.

      Chocolate Truffles
    [1] Make these truffles with Michael Recchiuti’s recipe (photo courtesy Good Eggs).

    Original Chocolate Truffles
    [2] Truffles rolled in chocolate powder (photo Rozmarina | 123rf).

    Box Of Chocolate Truffles
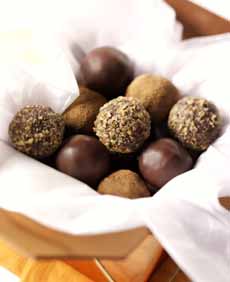
    [3] A box of homemade truffles (photo courtesy Wisconsin Milk Marketing Board). You’ll note that some have been dipped in dark chocolate: another step you can take, but more time-consuming than simply rolling the truffles in coatings.

    Tuber Melanosporum
    [4] The original truffle, related to the mushroom, which gave chocolate truffles their name (photo courtesy Because It Matters).

     
    After you have made about 6 truffles per bowl of ingredients, shake the bowl to cover the truffles completely. Using a spoon, transfer the truffles to the lined parchment pan.

    8. CONTINUE rolling until you have used all the ganache. Serve the truffles soon after rolling them at room temperature. If you’re not eating them immediately, you can store them in the fridge for up to 2 weeks, in a plastic bag or covered bowl.
     
     
    LOVE CHOCOLATE? LEARN MORE:

  • Glossary Of Chocolate Terms
  • What Is Ganache?
  • The Difference Between Truffles, Pralines & Ganache
  • The History Of Truffles
  • Truffles Vs. Truffles Vs. Truffles
  • ________________

    *Force Noir is a couverture from Cacao Barry, one of the world’s most presitgious couverture companies, made from West African Forastero beans. Its character is intensely dark, with a balanced cocoa taste and roundness in the mouth.


    Comments off

    TIP OF THE DAY: Bake Canapé Bread

    Star Shaped Bread Canapes
    [1] Star-shaped canapés are perfect for the holidays, Independence Day and any celebratory occasion. These are topped with caramelized onions and goat cheese. Here’s the recipe from King Arthur Flour.

    Canape Baking Tubes
    [2] The set of three canapé bread tubes from King Arthur Flour.

    Pumpernickel Canapes
    [3] A classic: pumpernickel topped with crème fraîche, smoked salmon and dill. Here’s the pumpernickel recipe from King Arthur Flour.

    Cranberry Canape Rounds
    [4] For the holidays, consider canapés made with cranberry bread or pumpkin bread. Both are delicious with cheese and toasted nuts.


    If your canapés sit upon everyday crackers, toast, baguette slices or mini pumpernickel squares, branch out this holiday season.

    Everything old is new again, and the old-fashioned canapé bread tubes our grandmother used to make party fare are now available at King Arthur Flour.

    Use them for canapés (photos #1 and #3), plus tiny tea sandwiches, festive crostini or decorative melba toast.

    On the sweet side, you can make dessert bites with banana bread, chocolate bread or pound cake.

    Bonus: You can also use the tubes to cut vegetable shapes.

    The set of three 9″ x 3″ bread tubes (photo #2) includes one each:

  • Star
  • Flower
  • Heart
  •  
    You simply fill each tube with the dough, let it rise, cap it, bake and cool.

    Then, slice the cooled loaves and top with anything you like.

    For the holidays, you can bake cranberry bread (photo #4), cranberry-orange bread or pumpkin bread.

    Get the canapé tube set at King Arthur Flour, $19.95. Instructions and recipes are included.
     
     
    WHAT’S A CANAPÉ?

    A canapé (can-uh-PAY) is a type of hors d’oeuvre: a small, savory bite on a base of bread, toast or pastry. It is a finger food, eaten in one or two bites.

    Canapé is the French word for sofa. The idea is that the toppings sit on a “sofa” of bread or pastry.

    Canapés are often served at cocktail parties. In the hands of a caterer, chef or creative home cook, they can be beautifully decorated works of edible art.

    Here are the differences among amuses bouche, appetizers, canapés and hors d’oeuvre.
     
     
    15 HOLIDAY CANAPÉ TOPPINGS

  • Brie and cranberry relish
  • Chicken liver mousse atop fresh sage, topped with a slice of grape tomato
  • Goat cheese with red onion jam or pickled red onions and diced sage
  • Green pea hummus or whipped guacamole with grape tomato half
  • Grilled protein of choice atop wasabi mayonnaise, garnished with red bell pepper bits and seaweed salad
  • Hummus topped with sliced mini cucumber and grape tomato
  • Mascarpone and cinnamon-roasted pear
  • Olive tapenade topped with julienned pimento and microgreens
  • Salmon mousse topped with salmon caviar and fresh dill
  • Shrimp, cucumber and curried cream cheese
  • Sliced baby beets, goat cheese and microgreens
  • Sliced steak and chimichurri with cotija garnish
  • Smoked salmon, crème fraîche and dill
  • Steak tartare topped with minced red bell pepper and microgreens
  • Whipped feta, sundried tomatoes and basil
  •  
    What’s your favorite holiday canapé? Let us know!


    Comments off

    TIP OF THE DAY: Tapioca Crepes

    Most of us know tapioca as a pudding filled with little tapioca “pearls.”

    But it’s so much more than that.
     
     
    WHAT IS TAPIOCA?

    Tapioca is a pure starch extracted from the root of the cassava (pronounced kuh-SAH-vuh, photo #1). The root is also called manioc, arrowroot and yuca. Not yucca, mind you: That’s a totally different plant and not typically eaten. The food, yuca, is similarly pronounced, but botanically unrelated.

    Cassava is a woody shrub native to northern Brazil. It has been grown for thousands of years, and it spread throughout South America. It grows well in poor soil, and its starchy, tuberous root is a major food source, cooked like potatoes.

    In the Tupi-Guarani* language of Brazil, the processed cassava is called tipioca; Spanish and Portuguese traders heard it as tapioca.

    Tipi means residue and oc means to squeeze out. This describes how the starch is produced: Crushed root fibers are steeped in water; then the liquid is squeezed out.

    Why all the effort?

    The milky, bitter liquid (yare) in the pulp contains cyanide—and was used to make poison darts.

    What’s left is the purified starch—tapioca—which is gluten-free, fat-free, cholesterol free, sodium-free and sugar-free. There are no added preservatives.

    You can find tapioca in a variety of formats: small pearls, large pearls, jumbo pearls (or boba, which are the large black, white or otherwise-colored pearls used for bubble tea), instant (granulated) tapioca, tapioca flour, flakes and sticks.
     
     
    USES FOR TAPIOCA

    Beyond masking the familiar tapioca pudding, use tapioca:

  • As a thickener for gravies, pies and soups.
  • In gluten-free flour mixes for baked goods.
  • As a fun drink garnish in bubble tea
  •  
    …and now, appearing for perhaps the first time in the U.S…

  • In gluten-free crêpes.
  •  
     
    TAP NYC: THE COUNTRY’s FIRST “TAPIOCA RESTAURANT”

    Tap NYC has opened in Manhattan, the first of what we hope will be a casual chain of tapioca-based crêperies.

    While tapioca crêpes are popular in Brazil, here they are unknown (and hey, Today Show, why didn’t you feature them in your Olympics coverage)?

    The crêpes are not like France’s soft, wheat-based crêpes. Instead, the tapioca flour cooks up firm (photo #3), so it can be held like a sandwich or a wrap (photo #4).

    Filling can be savory or sweet, for any meal of the day, snack or dessert.

    A tapioca crêpe is a the canvas waiting for whatever ingredients you wish to add. We think of them as tapioca sandwiches, analogous to pita sandwiches or wrap sandwiches. Some examples from the Tap NYC menu:

  • Caprese: mozzarella, tomatoes, basil pesto
  • Chicken, fresh mozzarella, tomatoes
  • Mashed avocado and eggs
  • Mushrooms, goat cheese, arugula, truffle oil
  • Prosciutto, muenster and arugula
  • Vegetable: avocado, tomato, zucchini
  • Dessert: dark chocolate or peanut butter with bananas and/or strawberries (photo #5)
  •  
    We are so addicted to these terrific crêpes, along with the juices and smoothies, that we haven’t begun to explore the rest of the menu: salads, bowls, teas and coffees galore.

    We have, however, enjoyed the gluten-free brigadeiros (truffles), cakes, cheese bread and tapioca pudding—a version far better than you’ve likely tasted before. And we’re not on a gluten-free diet; just a good-food diet.

    The first Tap NYC location is on Manhattan’s Upper West Side: 267 Columbus Avenue between 72nd and 73rd Streets.

    It’s open 7 days from 7:30 a.m. to 8 p.m. (6 p.m. on Mondays). Learn more at TapNYC.com.

    TAP NYC is the undertaking of two Brazilians living in Manhattan, who dearly missed their tapioca crêpes.

    Thank goodness for their desire to share this food not only with homesick Brazilians but all of us natives.

    And for those who live nowhere near Tap NYC: You can buy the tapioca (photo #2) and make your own. It couldn’t be easier!

    ________________

      Cassava Root
    [1] Cassava root, also called manioc and other names (photo David Monniaux | Wikipedia).

    Tap Tapioca Starch
    [2] A package of premium tapioca starch available from Tap NYC.

    Tapioca Crepe In The Pan
    [3] Just add water to the tapioca and cook it in an omelet pan. Top with the desired ingredients and flip over like an omelet (photos #2, #3, #4 and #5 courtesy Tap NYC).

    Tap Tapioca Crepe Sandwich
    [4] The finished sandwich.

    Strawberry Chocolate Tapioca Crepe
    [5] A sweet variation: strawberries and chocolate.

    *The Tupi-Guarani of the Amazon Rainforest are one of the main indigenous ethnic groups of Brazil. It is believed that they first settled in the Amazon rainforest, but gradually spread out some 2,900 years ago, to also occupy the Atlantic coast of what is now Brazil.


    Comments off


    © Copyright 2005-2026 Lifestyle Direct, Inc. All rights reserved. All images are copyrighted to their respective owners.