THE NIBBLE BLOG: Products, Recipes & Trends In Specialty Foods


Also visit our main website, TheNibble.com.


RECIPE: Crispy Fried Cauliflower (Lashooni Gobi)

Junoon is one of the most popular Indian restaurants among gourmand New Yorkers. The name, which means passion, interprets Indian cuisine with a modern spin. The space is large and comfortable, unusual for New York City. And the food: Well, it inspires passion.

While many American home cooks are wary of taking on Indian cuisine without the benefit of a class or an expert friend, here’s one of Junoon’s dishes that’s easy to make. The Indian name is Lahsooni Gobi, but Crispy Fried Cauliflower sounds so much more tempting.

We love cauliflower in all its forms, plain and fancy. But here, lightly battered and tossed in a tomato garlic sauce, this hearty appetizer or side will make even those who don’t typically crave cauliflower want more.

No eggs are used in the batter because in India, eggs are not part of a vegetarian diet (this recipe is actually vegan). This recipe is also gluten-free. Chef Vikas Khanna notes, “I use rice flour here, not just for its superior crisping quality but also for people who are gluten sensitive. It’s a warm and homey dish and can easily be adjusted in terms of heat and garlic to suit anyone’s palate.”


crispy-fried-cauliflower-junoon-worleygig-ps-230

Junoon’s delicious Crispy Fried Cauliflower. Photo courtesy Worleygig.

 
RECIPE: LAHSOONI GOBI, CRISPY CAULIFLOWER

Ingredients For 4 Servings

  • 1 medium sized head of cauliflower, cut into small florets
  • Vegetable oil for frying, plus 2 tablespoons to make the sauce
  • 2 teaspoons fine sea salt
  • ½ cup rice flour
  • ½ cup cold water
  • 2 teaspoons minced fresh ginger root
  • 2 cloves garlic, finely chopped, or more to taste
  • ¼ cup tomato purée
  • ¼ cup water
  • ¼ teaspoon cayenne pepper
  • Two pinches salt
  • Two pinches sugar
  • Two pinches ketjiap spice (recipe below)
  • Garnish: 2 sprigs cilantro
  •  

    cauliflower-beauty-goodeggs-230
    Turn an everyday cauliflower into something special. Photo courtesy GoodEggs.com.
     

    Preparation

    1. SPRINKLE 2 teaspoons of sea salt evenly over the cauliflower and let it sit at room temperature for 10 to 15 minutes.

    2. PREHEAT the oil to 350°F: Heat two tablespoons of oil in a heavy-bottomed skillet over medium heat. Add the chopped garlic and ginger, stirring constantly until golden brown, about 2-3 minutes.

    3. ADD the tomato purée, water, cayenne pepper, sugar, salt and ketjiap spice; mix well with a whisk until combined. Cook, stirring frequently, for 5 minutes. Taste for seasoning and adjust if necessary just before serving.

    4. PREPARE the batter by quickly blending the rice flour and water together in a large bowl. Coat the florets in the batter by placing all of the florets in the bowl. Toss gently and then carefully drop the florets into the hot oil. Fry the cauliflower until golden brown, about 5 minutes. Remove with a slotted spoon and drain on paper towels.

    5. BRING the sauce to a simmer over medium heat and then add the cauliflower to the pan. Stir and toss gently to coat the cauliflower with the sauce until well combined. Serve the cauliflower in a bowl garnished with cilantro.


    KETJIAP SPICE MIX

    Ketijap is a traditional Indonesian spice mix used for the many different sauces that are loosely called cat-siop and ketjiap (and other spellings*). A pinch or two livens up soups and sauces. You can keep the spice tightly covered in a cool, dark place for up to two months.

  • 1 tablespoon allspice berries
  • 1 tablespoon mace flakes†
  • 1 tablespoon whole black peppercorns, preferably tellicherry
  • 1 tablespoon cumin seeds
  • ½ teaspoon whole cloves
  • 1 tablespoon cinnamon powder
  •  
    Preparation

    1. LIGHTLY TOAST the whole spices in a small heavy bottomed skillet over medium heat for about one minute.

    2. COOL, then grind to a fine powder with the cinnamon in a spice grinder.
     
    *Yes, this is the origin of our word catsup/ketchup, although our familiar tomato ketchup was a New World invention. Here’s the history of ketchup.

    †It can be difficult to find mace flakes, also called mace blades, in consumer markets. Use ground mace instead.


    Comments off

    FOOD FUN: Mashed Potato Stuffed Burger Recipe

    You’re used to fries or potato chips with your burger. But how about mashed potatoes?

    For some food fun, executive chef Craig (Andy) Beardslee of Hash House A Go Go in San Diego suggests a layer of Parmesan mashed potatoes between two eight-ounce burgers. This one-pound burger with mashed potatoes is not quite Paula Deen (who famously sandwiched a burger, fried egg and bacon between Krispy Kreme donuts), but it’s fun.

    About the name: It’s not really a potato-stuffed burger. It’s more of a potato-layered burger; otherwise, the potatoes would be stuffed inside the burger patties. As in recipe ingredients, in naming, strive for accuracy!

    We like onion with our burger; so when we tried this recipe, we added thinly sliced green onions (scallions) to the mashed potatoes. We also mashed the potatoes with basil oil, and on another occasion with truffle oil. Both are inspired choices, with or without the Parmesan cheese.

    RECIPE: MASHED POTATO STUFFED BURGERS

    Ingredients For 1 Serving

      mashed-potatoStuffed-burger-IdahoPotCom-230

    Mashed potato stuffed burger: Just in time for Super Bowl supping. Photo courtesy Idaho Potato Commission.
  • 2 8-ounce ground prime beef patties
  • 6 ounces mashed potatoes with fresh shaved Parmesan cheese, griddled
  • 2 bread and butter plank pickles
  • 2 tomato slices
  • 2 romaine lettuce leaves
  • 1 red onion slices
  • 2 applewood-smoked bacon strips
  • 1 ciabatta or sesame bun
  •  

    Preparation

    1. PLACE the mashed potatoes on a griddle in a pancake shape. Brown and turn.

    2. LAYER the lettuce, tomato, onion and pickles on bottom bun. Top with one beef patty.

    3. LAY on a mound of griddled mashed potatoes and add 2 strips cooked bacon. Top with the second beef patty, then the top half of the bun.
      

    Comments off

    TIP OF THE DAY: Homemade Pork Ramen Soup

    ramen-soup-ws-230
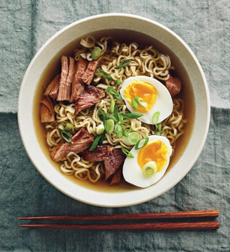
    Get out your slow cooker and create this
    delicious Japanese comfort food. Photo
    courtesy Williams-Sonoma.
      While many Americans think of ramen soup as one of the cheapest ways to feed oneself comfort food, in Japan the finest Japanese ramen soups take considerable culinary skill and many hours to create. Ramen is hearty enough to be a proper main course with some vegetable sides; but you can also use it as a soup course.

    The Williams Sonoma cookbook, “Quick Slow Cooking,” offers a simplified, yet still delicious, version that uses plenty of succulent braised pork. Another key to a glorious dish is high-quality, fresh ramen noodles, available at Asian markets. If you can’t find them, use fresh thin Chinese egg noodles or fresh linguine. If you can’t get any fresh pasta, you can default to packaged ramen noodles.

    Another point of differentiation from packaged ramen soups: yummy toppings. These can include baby corn, baby spinach, bean sprouts, boiled egg, kamaboko*, kimchi, nori (the dried seaweed used to make sushi rolls), sliced braised pork, sliced green onions or deep-fried green onions, soft-boiled eggs, toasted sesame seeds and wakame seaweed.

    When you make your own soup, you can customize the toppings as you wish, and offer other diners the option to customize their own bowls of soup. This recipe specifies green onions and soft boiled eggs, but you can switch them out or add other toppings.

     
    This recipe uses a slow cooker. For more inspiring slow cooker recipes, check out Quick Slow Cooking by Kim Laidlaw.

    April 4th is National Ramen Day.
     
     
    RECIPE: HOMEMADE PORK RAMEN SOUP

    Ingredients For 8 Servings

  • 3 pounds (1.5 kg) boneless pork shoulder, cut into 3 equal pieces
  • Kosher salt, to taste
  • 2 tablespoons canola oil
  • 1 yellow onion, coarsely chopped
  • 6 garlic cloves, chopped
  • 2-inch (5-cm) piece fresh ginger, peeled and chopped
  • 8 cups/64 ounces (2 l) low-sodium chicken broth
  • 1 leek, white and green parts, halved lengthwise and coarsely chopped
  • 4 ounces (125 g) cremini or button mushrooms, brushed clean and coarsely chopped
  • Low-sodium soy sauce for seasoning
  • Sesame or chile oil for seasoning
  • 1-1/2 pounds (750 g) fresh ramen noodles
  • Topping: 8 soft-boiled eggs
  • Topping: 4 green onions, white and pale green parts, finely chopped
  •  
    *Kamaboko is a type of surimi, a Japanese processed seafood product of which crab stick is another variety. To make surimi, white fish are pureed and mixed with flavor and color. Kamaboko is formed into a half moon-shaped loaf and the outside is colored pink over a white center.


    Preparation

    1. SEASON the pork with salt. Place a large sauté pan or the stove top–safe insert of a slow cooker on the stove top over medium-high heat. Add the oil and warm until hot. Working in batches if necessary to avoid crowding, add the pork pieces and sear them on the first side without moving them until well browned, 3 to 4 minutes. Turn the pieces and sear on the second side until well browned, 3 to 4 minutes longer. Transfer to a plate and set aside.

    2. POUR off all but 2 tablespoons of the fat from the insert or sauté pan and return the insert to medium-high heat. Add the yellow onion and sear, without stirring, until browned, about 5 minutes. Stir in the garlic, ginger, and 1 cup (250 ml) of the broth. Deglaze the sauté pan or insert, stirring and scraping up any browned bits from the insert bottom; then let simmer for 1 minute. If using a sauté pan…

    3. TRANSFER the contents of the pan to the insert of a slow cooker. Add the leek, mushrooms and the remaining 7 cups (1.75 l) of broth; stir to combine. Cover and cook on the low setting for 8 hours. The pork should be very tender and the broth should be fragrant.

      quick-slow-cooking-ws-230

    Make complex-flavored dishes in your slow cooker. Photo courtesy Williams-Sonoma.
     
    4. TRANSFER the pork to a cutting board. Using 2 forks, break the pork into bite-size chunks, removing and discarding any large pieces of fat. Strain the broth through a fine-mesh sieve into a bowl and discard the solids. Using a large spoon, skim off and discard any fat from the surface of the broth. Return the pork and broth to the slow cooker and season to taste with soy sauce and sesame or chile oil. Cover and cook on the low heat setting for about 30 minutes to warm through.

    5. COOK the ramen noodles according to the package directions. Put the eggs into boiling water and simmer for 5 to 6 minutes. Remove the eggs from the water, let cool until they can be handled and peel them. Cut each in half lengthwise.

    6. TO SERVE: Divide the noodles evenly among individual bowls. Ladle the broth and pork over the noodles, dividing them evenly, then sprinkle with the green onions. Top each bowl with two soft-boiled egg halves and serve immediately.
     
     
    THE HISTORY OF RAMEN

    Ramen is a dish of noodles in meat broth—chicken or pork—that originated in China. It differs from native Japanese noodle soup dishes, in that until ramen appeared, Japanese broth was based on either vegetables or seafood.

    The type of noodles and toppings used in ramen also came from China. It is believed that “ramen” is the Japanese pronunciation of the Chinese word “lamian,” meaning “hand-pulled noodles” (as opposed to noodles that are sliced with a knife).

    While some ramen dishes began to appear in Japan in the late 1600s, they didn’t become widespread until the Meiji Era (1868 through 1912), when Japan moved from being an isolated feudal society to a modern nation. Foreign relations and the introduction of meat-based American and European cuisines led to increased production of meat, and played a large role in the growing popularity of ramen. Almost every locality or prefecture in Japan created its own variation of the dish, served at restaurants.

    The growth of ramen dishes continued after World War II, but was still a special occasion that required going out.

    In 1958, instant noodles were invented by Momofuku Ando, founder and chairman of Nissin Foods. Named the greatest Japanese invention of the 20th century in a Japanese poll, instant ramen allowed anyone to make this dish simply by adding boiling water. Exported, these ramen soup packages soon became a pop culture sensation across the globe.

    Soup recipes and methods of preparation are closely-guarded secrets in many restaurants. Beyond regional variations, innovative Japanese chefs continue to push the boundaries of ramen cuisine. Curry ramen, invented in the Hokkaido region, became a national favorite, as has ramen based on the Chinese dish of shrimp in chili sauce. Non-Japanese ingredients such as black pepper and butter have found their way into recipes.

    Check out this article, which details the different type of ramen by region.
     
     
    RAMEN IN JAPAN PRE- AND POST- WORLD WAR II


    Comments off

    PRODUCT: belVita Breakfast Bites

    belvita-breakfast-bites-230
    Belvita Breakfast Bites: crunchy nuggets that are good for you. Photo courtesy Mondelez Global.
      In 2013 year, belVita Breakfast Biscuits were a favorite at THE NIBBLE.

    What makes something a favorite? We not only love it at first bite, but we continue to buy it and enjoy it on a regular basis.

    belVita has expanded the concept with a new grab-and-go option, belVita Breakfast Bites. The nutritious, pre-portioned packages are portable and poppable. They’re available in two flavors, Chocolate and Mixed Berry. Each 50g package contains 230 calories, 20g of whole grain and 4g fiber.

    Pair belVita Breakfast Bites with a yogurt or piece of fruit for a more complete breakfast. Or at the very least, try it instead of the not-so-good-for-you breakfast pastry, donut, bagel, etc.

    Personally, we’ll stick with the larger belVita biscuits, a.k.a. cookies. But if you like to nibble, try belVita Breakfast Bites.

     
    belVita Breakfast Bites are baked with high quality, wholesome and were developed to provide four 4 hours of nutritious steady energy when eaten as part of a complete breakfast. Each 50g serving (one pouch) includes:

  • 4g of fiber*
  • 20g of whole grain
  •  
    The line is certified kosher by OU. Discover more at belVitaBreakfast.com.

     
    *Contains 7-8g fat per serving, depending on flavor.
      

    Comments off

    TIP OF THE DAY: Heart Shaped Valentine Desserts

    You’ve got time to plan a special heart-shaped Valentine dessert. We cruised through Amazon.com and found these heart-shaped pans and molds for inspiration:

  • Heart-shaped bundt pan
  • Heart-shaped cakelet pan, three-tiered individual cakes and more
  • Heart-shaped 9″ cake pan
  • Heart-shaped 10″ cake pan
  • Heart-shaped donut pan
  • Heart-shaped foil baking cups for cupcakes or custard
  • Heart-shaped giant cookie pan
  • Heart-shaped mini muffin pan
  • Heart-shaped springform pan for cheesecake
  • Heart-shaped tube pan for angel food or sponge cakes
  • Heart-shaped whoopie pie pan
  •  
    HEART SHAPES FOR BREAKFAST

  • Heart-shaped egg poacher
  • Heart-shaped rings for fried eggs
  • Heart-shaped pancake pan
  •    
    heart-bundt-nordicware-230

    It’s easy to make this elaborately-shaped Valentine bundt cake: No decorating required! Photo courtesy Nordicware.


    heart-whoopie-pan-wilton-230
    Use a heart-shaped cookie cutter to make Valentine shortbread, or get a whoopie pie mold to create something even more special. Photo courtesy Wilton.
      Of course, you could simply grab the heart-shaped cookie cutter you already have, roll out cookie dough, and bake them plain. You could dip them in melted chocolate or add Valentine confetti or sprinkles.

    Or, you could yield to the temptation of whoopie pies, pick up this heart-shaped whoopie pie pan, and create memories.

    If you’re steering clear of desserts, even on Valentine’s Day, how about some heart-shaped ice cubes for your cocktail or glass of water? You can add some red food color to tint them pink.


    Comments off

    The Nibble Webzine Of Food Adventures
    RSS
    Follow by Email


    © Copyright 2005-2024 Lifestyle Direct, Inc. All rights reserved. All images are copyrighted to their respective owners.