|
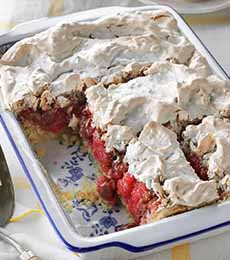
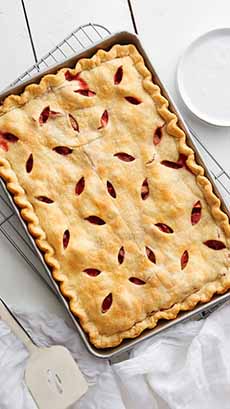
Here’s our weekend baking project, a cherry dessert for George Washington’s birthday, February 22nd.
This dessert has a tender crust and tart cherry filling, topped with melt-in-your-mouth meringue. Created by Kathryn Dawley of Gray, Maine, we present it here courtesy of Taste Of Home.
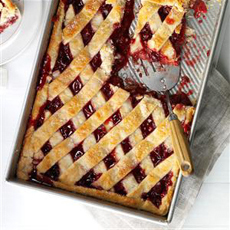
What’s a slab pie?
It’s a pie that has been sized to fit a rectangular pan instead of a round pie pan. It has been called the pie version of a sheet cake.
Cut into squares or rectangles instead of triangular slices, a slab pie creates more pieces than a standard round pie. It can typically serve twice as many people.
You follow all the same steps as you would to make a regular pie, but with more crust.
> George Washington’s favorite foods.
> Myths about George Washington (including the cherry tree, the silver dollar, and his false teeth), and how Presidents Day began.
> The history of cherries.
> The history of pie.
> The different types of pie and pastry: a photo glossary.
> More about slab pies and slab pie recipes.
> Check out more cherry recipes, below.
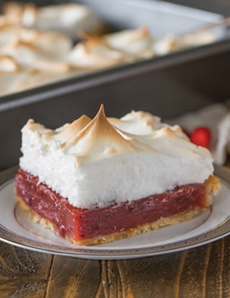
RECIPE: CHERRY MERINGUE SLAB PIE
You can add a bit of red food coloring to make the canned cherry filling brighter.
Prep time is 25 minutes and bake time is 25 minutes, plus 4+ hours cooling and chilling.
Makes 12 servings.
Ingredients For The Crust
2 cups all-purpose flour
1 teaspoon salt
1 cup shortening
1 large egg, room temperature, lightly beaten
Ingredients For The Filling & Topping
3 large eggs, separated
1 teaspoon vanilla extract
1/4 teaspoon cream of tartar
1-1/2 cups sugar, divided
3/4 cup finely chopped almonds
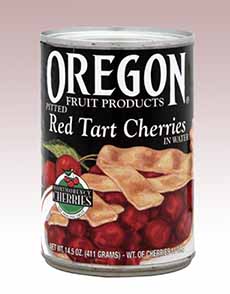
1 can (14-1/2 ounces) pitted tart cherries
3 tablespoons quick-cooking tapioca
2 teaspoons lemon juice
Optional: 6 to 8 drops red food coloring, optional
Preparation
1. PREHEAT the oven to 375°. Make the crust: In a small bowl, mix the flour and salt; cut in the shortening until crumbly. Add the egg, stirring with a fork.
2. PRESS the mixture onto bottom and up sides of a greased 11×7-inch baking dish. Bake until lightly browned, 20-22 minutes. Cool on a wire rack. Reduce the oven setting to 350°.
3. BEAT the egg whites, vanilla and cream of tartar in a small bowl on medium speed until soft peaks form. Gradually add 3/4 cup sugar, 1 tablespoon at a time, beating on high after each addition until the sugar is dissolved. Continue beating until stiff glossy peaks form. Fold in the almonds.
4. DRAIN the cherries, reserving the juice. Add enough water to juice to measure 1 cup; pour into a saucepan. Stir in the tapioca, egg yolks and remaining sugar; let stand 5 minutes.
5. BRING to a boil over medium heat, stirring constantly; cook and stir until thickened, about 2 minutes. Stir in the cherries, lemon juice and, if desired, the food coloring.
6. POUR into the crust. Immediately spread meringue over top, up to the edges of the crust. Bake until the meringue is golden brown, 22-25 minutes.
7. COOL for 1 hour on a wire rack. Refrigerate at least 3 hours before serving.
MORE CHERRY HOLIDAYS
January 3rd is National Chocolate Covered Cherry Day.
February is National Cherry Month.
February 20th is National Cherry Pie Day.
February 22nd is George Washington’s Birthday.
April 23rd is National Cherry Cheesecake Day.
May 17th is National Cherry Cobbler Day.
May 26th is National Cherry Dessert Day.
July 11th is National Rainer Cherry Day.
July 16th is National Cherry Day.
August 26th is National Cherry Popsicle Day.
August 28th is National Cherry Turnover Day.
September 1st is National Cherry Popover Day.
September 24th is National Cherries Jubilee Day.
|