|
Head to UrbanSpace Vanderbilt at Vanderbilt Avenue and 45th Street in Manhattan. It’s the block north of Grand Central Terminal, and our new favorite food hall.
Its parent company, Urbanspace, “cultivates creatively rich environments, places where local makers collaborate, exchange ideas, and showcase their wares.”
Why run all over New York City to find what’s hot and trending when here, in one space, some 20 food artisans sell their wares?
We were one of a group of lucky food writers who were invited to taste a sample from every boutique for weekend brunch.
And what a brunch it was: a memorable buffet of delicious, modern casual fare that can accommodate almost anyone’s diet (mainstream, Paleo, vegan and vegetarian).
In fact, if we were planning a wedding or other big party, we’d rent out the entire space and let our guests go from bay to bay, assembling their ideal feast.
Here’s what we had. We’re leaving out the adjectives because everything listed would get a superlative. Alas, we filled up to bursting before we could taste everything that was served, so apologies to those we didn’t get to. We shall return.
WHAT WE ATE…AND ATE…AND ATE
Asia Dog, hot dogs with Asian-inspired toppings, which also has stands at Brooklyn Flea, Madison Square Eats and Smorgasburg. For breakfast, though, they substituted banana yogurt with fresh fruit, gluten-free granola and almonds for a kimchi-topped dog.
Hong Kong Street Cart: assorted dumplings. These are a nice warm-up (no pun intended) to anything else you have.
La Palapa Taco, an outpost of a Mexican restaurant in the West Village. Hibiscus Rose Sangria Slushy and a Chilquiles Verdes Taco with grilled steak, tomatillo salsa, queso fresco and crema.
Maiden Lane from the East Village, specializing in creative casual fare with fine European tinned seafood. For breakfast/brunch we had the Lower Eastsider: cured salmon, cream cheese, pickled red onion and fresh dill on an “everything” bagel. We can’t wait to go back for the whitefish salad and the rest.
AND MORE
|
|
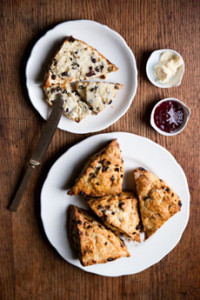

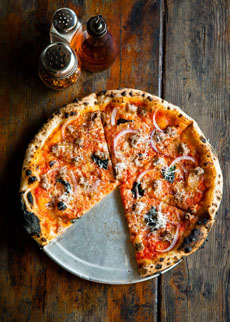
TOP PHOTO: Scones from Ovenly. BOTTOM PHOTO: Tomato, Sausage & Sage Pizza from Roberta’s. Photo by Deirdre Schoo. |
|
Mayhem & Stout, a sandwich spot in Murray Hill that specializes in creative braised meat combinations with house-made condiments. We had the Apple Cider Mimosa and the Featured Mashup (see below).
Ovenly, a coffee shop and bakery in Greenpoint, Brooklyn that we’ve always wanted to go to. We had Currant-Rosemary and Cheddar-Mustard Scones with butter and jam; and gluten-free honey granola with local-made yogurt. We bought a piece of Blackout Cake to take home.
Red Hook Lobster Pound, a casual seafood restaurant in the Red Hook area of Brooklyn, with other locations plus food truck. We downed the Lobster Bloody Mary, garnished with a ready-to-eat lobster claw; but by the time the Lobster Cheese Fries arrived, we couldn’t eat another bite of anything. We’ll go back for them, along with a lobster roll.
Roberta’s Pizza, headquartered in East Williamsburg, served a Speck & Egg Pizza with mozzarella, mushrooms, speck (a type of prosciutto), onions and oregano; the egg was baked on top. We’ll be back for the L’il Stinker and the Cheeses Christ pizzas.
Sips & Bites, a Brooklyn café that serves American favorites with flare, dished up a Buttermilk Biscuit Sandwich with fresh ricotta, truffle honey, bacon and pink peppercorns.
Takumi Taco, Japanese-inspired Mexican food in the Chelsea neighborhood of Manhattan, served a breakfast burrito: scrambled eggs, black and pinto beans, chorizo, avocado, cheese and tomatillo salsa. We can’t wait to go back for the spicy tuna tacos.
Toby’s Estate, a coffee boutique in the West Village and Brooklyn, served up the best cup of coffee I’ve had in a long time: Single Origin Kenya Chania, brewed to order. Other single origins and blends are available, including decaf.
Two Tbsp, a vegetarian, vegan and gluten-free street food vendor currently in the midst of a Kickstarter campaign to fund its first permanent location.
AND MORE
There’s also a Featured Mashup, when two vendors collaborate on a dish. This month, Dough Donuts and Mayhem & Stout created a Pulled Pork Glazed Doughnut, the hefty glazed donut generously topped with pulled pork and served with a house-made barbecue sauce and maple brown sugar hot sauce.
Here we have to use an adjective: memorable.
|

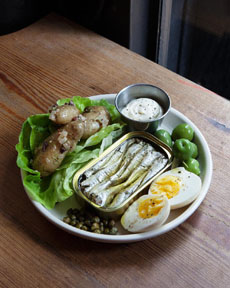
TOP PHOTO: Pulled Pork Glazed Donut. Photo
courtesy Mayhem & Stout. BOTTOM PHOTO:
Deconstructed Niçoise Salad. Photo courtesy
Maiden Lane.
|
|
WHERE & WHEN TO GO
UrbanSpace Vanderbilt is open for breakfast, lunch and dinner daily:
8 a.m. to 9 p.m. Monday through Friday.
11 a.m to 5 p.m. Saturday and Sunday.
The address is 230 Park Avenue (the Helmsley Building), but don’t look for an entrance there. The entrance is on Vanderbilt Avenue between 45th and 46th Street.
Go to 45th or 46th Street and head to Vanderbilt, which is east of Madison Avenue and west of Lexington Avenue. Lost? Call 212-529-9262.
This is part of the annoying New York real estate developer habit of using the most prestigious address allowable by the Buildings Department, even though there’s no entrance at that address (it’s around the corner on a less-prestigiously-named street). You won’t find any door to the Helmsley Building on Park Avenue, either. The entrance is on East 45th Street.
In a neighborhood where premium casual fare is hard to find, UrbanSpace Vanderbilt is a welcome addition:
For everyone who works in the area.
For people who need to meet around Grand Central.
For guests at all the local hotels.
For foodies looking for a cornucopia of riches.
The place was packed!
|
|
|
|