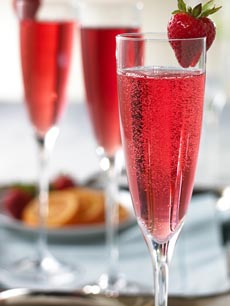
THE NIBBLE BLOG: Products, Recipes & Trends In Specialty Foods


Also visit our main website, TheNibble.com.

RECIPE: Peppermint Crunch Marshmallows

Peppermint Crunch Marshmallows

Peppermint Crunch

TOP PHOTOS: Minty marshmallow marvels for Christmas snacking. BOTTOM PHOTO: Buying peppermint candy crunch saves you the time of trying to evenly crush whole peppermints or candy canes. Photo courtesy King Arthur Flour. Photos courtesy King Arthur Flour.


To bring to a party or for homemade gifts, marshmallows are a delightful alternative to cookies. This holiday, from King Arthur Flour, pack lots of peppermint in every bite.

For a milder peppermint flavor, simply omit the optional peppermint oil. (Personally, we love lots of mintiness. We also recommend the optional red gel paste to get the beautiful color in the photo.)

Prep time is 20 minutes to 30 minutes, cook time is 10 minutes to 15 minutes. Marshmallows are best made a day in advance, so they can set in the pan before cutting. Here are step-by-step photos.

Here’s another recipe for no-crunch Green Peppermint Marshmallows.
 
 
RECIPE: PEPPERMINT CRUNCH MARSHMALLOWS

Ingredients For 24 Marshmallows

  • 3 packets (1/4 ounce each) unflavored gelatin
  • 1 cup cool water, divided
  • 1-1/2 cups sugar
  • 1 cup light corn syrup
  • 1/8 teaspoon salt
  • Optional: 1/8 teaspoon peppermint oil for extra-strong peppermint flavor
  • 1/2 cup peppermint crunch, crushed hard peppermint candies or candy canes
  • Optional: 5 to 10 drops red gel paste for richer color
  • Glazing sugar or confectioners’ sugar, to sprinkle on top
  •  
    Ingredients

    1. COMBINE the gelatin and 1/2 cup of the cool water in the bowl of an electric mixer fitted with a whisk attachment. Set the bowl aside. Grease a 9″ x 13″ pan (glass or ceramic is best) and a dough scraper, and set both aside.

    2. COMBINE the sugar, corn syrup, salt and the remaining 1/2 cup cool water in a small, deep saucepan. Cook the mixture over medium heat, stirring until the sugar dissolves. Raise the heat to high and cook, without stirring, until the syrup reaches 238°F to 240°F on a candy or digital thermometer. Remove from the heat.

     
    3. TURN the mixer to low speed; slowly pour the sugar syrup into the softened gelatin. Increase the speed to high, and whip until the mixture is very thick and fluffy and and has cooled to lukewarm (3 to 10 minutes depending on the mixer and attachment you use; a stand mixer using the whisk attachment will work more quickly than a hand mixer equipped with beaters). The mixture should be cool enough that you can spread it into the pan without burning your fingers, about 95°F. Add the peppermint oil towards the end of the mixing time. NOTE: Don’t let the marshmallow get so thick that it forms a stiff ball inside the wire whisk; it shouldn’t be as stiff as meringue icing. When the marshmallow is fully whipped…

    4. ADD the peppermint crunch and red gel paste, and mix just until you can see swirls of red and white. Spread the marshmallow into the greased pan with the greased dough scraper.

    5. WET your fingers and use them to smooth and flatten the marshmallow in the pan. Sprinkle the glazing sugar or confectioners’ sugar over the top, and let sit for several hours (or overnight) before cutting.

    6. USE a greased knife or cookie cutters to make squares or other shapes. You can cut about two dozen 2″ marshmallows or eight dozen 1″ marshmallows (we prefer the larger size for visual impact).

    7. WRAP the marshmallows airtight in plastic. They can be stored for several days at room temperature.
      

    Comments off

    GIFTS: New For Coffee Lovers

    We were recently asked about what gift to give a college student who lives in a dorm. Our thoughts immediately went to the new Keurig 2.0 K200/K250 Brewing System.

    KEURIG 2.0 K200/K250 SINGLE SERVE BREWER

    Designed with a smaller, more compact footprint, the K200/K250 (the difference is extra accessories) is sized right for small kitchens, dorm rooms, small office spaces (we have one on our desk).

    The best small footprint single-serve machine we’ve tried, it takes up half the space of our Keurig 2.0 K450. The Keurig 2.0 series brews a single-serve cup or 4-cup carafe (the carafe is an extra purchase and uses a larger pod).

    It’s also good for homes that don’t brew a lot of single-serve coffee. If you just brew one or two cups in the morning and/or evening, why take up the space with a 70-ounce water reservoir?

    The SRP is $109.99. Learn more at Keurig.com.

     
    K-CUPS FOR THE HOLIDAYS

       
    Keurig K200 Single Serve

    Small footprint, big convenience: the Keurig 2.0 K200 series. Photo courtesy Keurig.

     
    Keurig offers an astounding 500 K-Cup varieties from more than 75 brands. For the holidays, you can give some of these to anyone who has a compatible brewer:

  • Green Mountain Coffee Holiday Blend
  • Green Mountain Coffee Gingerbread
  • Green Mountain Coffee Wicked Winter Blend
  • The Original Donut Shop Holiday Buzz
  • The Original Donut Shop Peppermint Bark
  • The Original Donut Shop Sweet & Creamy Maple Crème
  •  

    Kyocera Slim Adjustable Coffee Mill
    The ceramic grinder is better than a metal
    blade. Photo courtesy Kyocera.


    KYOCERA SLIM ADJUSTABLE COFFEE MILL

    Coffee purists won’t use K-cups. They want their beans freshly ground.

    There have long been single-cup coffee makers, but this is the first grinder we’ve personally that’s great for small brews. It’s sized to grind the beans for one or two cups, instead of an entire pot.

    It’s the right gift for the coffee lover who wants to brew freshly ground beans.

    The grinder has a highly durable ceramic grinding mechanism; the adjustable dial enables fine to coarse grinds. A nice addition is the non-slip silicon base that provides stability when grinding.

    It’s $44.95 at KyoceraAdvancedCeramics.com


    Comments off

    TIP OF THE DAY: Make A Wreath Cake

    You may not feel up to making a Bûche de Noël (Yule Log Cake), but you can certainly make a wreath cake.

    While there is trend to pull-apart cupcake wreath cakes, we decided to try a traditional one.

    This recipe was adapted by Audra, The Baker Chick from one on AllRecipes.com. It’s the third photo, requires no piping skills, and although it’s not as showy, it’s much easier to serve and eat.
     
     
    RECIPE: CRANBERRY BUTTERMILK UPSIDE DOWN WREATH CAKE

    Prep time is 15 minutes, bake time is 50 minutes.

    Ingredients For 10 Servings

  • ½ cup (1 stick) plus 6 tablespoons unsalted butter, separated
  • ¾ cup plus ½ cup white sugar, separated
  • 2 tablespoons water
  • 2 teaspoons vanilla extract or vanilla bean paste, separated
  • 1 teaspoon ground cinnamon
  • 1 bag (12 ounces) fresh or frozen cranberries
  • 1½ cups flour
  • ½ teaspoon baking soda
  • ½ teaspoon salt
  • ½ cup brown sugar
  • 2 eggs
  • 1 cup buttermilk*
  •  
    For The Decoration

  • Frosted grapes
  • Fresh rosemary sprigs (instead of the evergreen† shown)
  •  
    Preparation

    1. PREHEAT the oven to 350°F. Spray or grease a 10-inch ring pan thoroughly‡.

    2. COMBINE the half stick of butter, 3/4 cup white sugar, cinnamon and 1 teaspoon of vanilla in a medium saucepan over medium heat. Stir until the butter has melted; then add the cranberries, tossing until they are coated in the butter mixture. Pour into the bottom of the cake pan and set aside.

    3. CREAM together the 6 tablespoons of butter with the remaining ½ cup of white sugar and the brown sugar in a large mixing bowl fitted with a paddle attachment. Add the eggs, one at a time, the rest of the vanilla and the buttermilk.


    wreath-cake-frederickspastry-pastry.net-230w
    [1] A professional wreath cake from Frederick’s Pastry. Feel like practicing your piping skills?


    [2] A wreath of cupcakes from Beautiful Life.

    Cranberry Christmas Wreath Cake
    [3] An easier-to-make cranberry wreath cake. Here’s the recipe from The Baker Chick.

     
    4. WHISK together the dry ingredients and slowly add to the butter mixture, mixing on low speed until well combined. Pour/scoop the batter over the cranberry mixture and use the back of a spoon to smooth as needed.

    5. BAKE for 35-50 minutes, depending on your oven, or until a toothpick inserted into the center comes out clean.

    6. MAKE the frosted grapes. Garnish before serving.

    ____________________________
     
    *If you don’t have buttermilk, add 1 or 2 tablespoons of lemon juice or vinegar to enough milk to make 1 cup.

    †Fresh evergreen can impart strong sap or needles.

    ‡There is not enough batter to fully fill out a bundt pan.
      

    Comments off

    Holiday Oysters With Cranberry Cocktail Sauce & More Recipes


    [1] Make cranberry cocktail sauce for the holidays (photo courtesy Willapa Oysters, a NIBBLE Top Pick Of The Week).

    Shrimp Cocktail
    [2] A classic cocktail sauce with its favorite partner, shrimp (photo © Sheri Silver | Unsplash).

    Oysters On The Half Shell
    [3] Oysters on the half shell with mignonette sauce. The recipe is below (photo © Whole Foods Market).

    Crab Cocktail In A Stemmed Glass
    [4] A crab (crabmeat) cocktail. Here’s the recipe (photo © Cooking Mamas).

      The Pilgrims may well have had oysters at their first harvest feast. We know that mussels were easily picked from rocks along the shore, and oysters were native to the local estuaries, where rivers and streams flowed into the sea.

    Oysters are one of our favorite foods, and a very easy course to prepare. We often serve them as an appetizer at Thanksgiving, Christmas and New Year’s Eve dinners.

    Instead of cocktail sauce—ketchup with horseradish—make it seasonal by mixing cranberry sauce with the horseradish. In addition to oysters on the half shell, you can use it as a condiment with fried or roasted oysters.

    Below you’ll find:

    > A recipe for classic American cocktail sauce.

    > A recipe for French mignonette sauce.

    > The history of cocktail sauce.

    > The history of mignonette sauce.
     
     
    RECIPE #1: CRANBERRY COCKTAIL SAUCE

    You can use any cranberry sauce that you can measure in a cup (i.e., not a can of jelled cranberry sauce).

    For this particular recipe, we purchased store-bought cranberry sauce since the strong horseradish flavors covers over the flavor nuances of homemade sauce. We bought the fresh variety, although we could have saved money by purchasing their version in a jar.

    You can use either plain prepared horseradish (an off-white color) or beet horseradish (red). We tend to buy the red version for both color and a bit more flavor.

    Ingredients

  • 1 cup cranberry sauce
  • 2 tablespoons prepared horseradish
  • Optional: splash of vinegar*
  • Optional: lemon zest
  • Plate garnish: whole raw cranberries, baby arugula or baby spinach
  •  
    Preparation

    1. PULSE the cranberry sauce and horseradish to combine. Taste and add more horseradish or a splash of vinegar as desired.

    2. TOP the plated oysters with the cocktail sauce. Garnish with lemon zest.

    3. GARNISH the entire platter with whole cranberries and greens (we like spinach leaves for a holiday look), and serve.
     
     
    RECIPE #2: CLASSIC COCKTAIL SAUCE

    The history of cocktail sauce follows.

    Ingredients

  • ½ cup ketchup or chili sauce
  • 2 tablespoons prepared horseradish (or to taste)
  • 1 tablespoon fresh lemon juice
  • 1 teaspoon Worcestershire sauce
  • ½ teaspoon hot sauce (e.g., Tabasco)
  • Optional: finely minced shallot extra texture/flavor
  • Optional: pinch of salt or a few grinds of black pepper
  •  
    Preparation

    1. COMBINE all ingredients in a small bowl until smooth.

    2. TASTE and adjust: more horseradish for heat, more lemon for brightness, more hot sauce for a kick.

    3. CHILL for at least 15–30 minutes before serving to let flavors meld.


    RECIPE #3: MIGNONETTE SAUCE

    You can vary the vinegar (champagne, cider, herb, malt, sherry) or using a different allium (leeks, red onion, scallions). A squeeze of lemon or lime juice and snipped mint or tarragon will make an already wonderful sauce truly wonderful.

    The sauce will keep in the refrigerator for a 1 month or so.

    The history mignonette sauce follows.

    Ingredients For 2/3 Cup

  • 1/4 cup finely minced shallots (1 to 2 shallots)
  • 1/3 cup red wine or white wine vinegar
  • 1 teaspoon coarsely ground black or white peppercorns
  • Pinch of sea salt
  •  
    Preparation

    1. COMBINE the ingredients in a small bowl and stir until well blended (you can also use a small jar and shake).

    2. COVER and chill for at least 30 minutes or overnight. The longer you let the ingredients infuse, the better the infusion of flavor.
     
     
    THE HISTORY OF COCKTAIL SAUCE

    The history of cocktail sauce dates to the early 20th century, with the rise of shrimp cocktail in American restaurants.

    “Cocktail,” of course, was the term used for alcoholic mixed drinks. But by the late 1800s, restaurants began to serve cold seafood appetizers like shrimp cocktail in a stemmed glass. Thus “cocktail sauce” was a play on the seafood “cocktail” served in the glass.

    Early seafood cocktails were often dressed with spicy vinegar-based sauces like the classic mignonette sauce for oysters. Sometimes horseradish was added for spicy heat.

    But by the 1920s, a tomato ketchup-based sauce spiked with horseradish, Worcestershire sauce, lemon juice, and hot sauce—what we now call cocktail sauce—spicy and tangy with a bit of sweetness from the ketchup, emerged as the favorite.

    Commercial brands like Heinz helped to popularize recipes for the home in ads starting in the 1930s.

    By the mid-20th century, shrimp cocktail became a staple of upscale American dining.

    The 1950s and 1960s were the heyday of cocktail sauce, mostly via the shrimp or crab cocktail that was such a popular first course.

    Cocktail sauce remains a classic condiment in the U.S. and U.K., especially for shrimp, oysters, crab, and clams, as well as fried seafood.

    It has even found its way onto sandwiches, especially roast beef, and as a spicy meatloaf glaze.

    Mix it with mayonnaise, sour cream, or yogurt and you have a dip for crudités!
     
     
    THE HISTORY MIGNONETTE SAUCE

    Mignonette sauce—the classic French condiment of vinegar, shallots, and cracked pepper—evolved in the 19th century as a condiment for raw oysters, along with lemon wedges (photo #3).

    In the 17th and 18th centuries, the word mignonnette referred to a cloth sachet of crushed peppercorns and spices that was dropped in the pot to flavor stocks and broths. Over time, the word came to mean coarsely ground pepper.

    By the 19th century, French chefs began using the term for a simple vinegar-shallot-pepper condiment for oysters. The earliest English-language references to modern mignonette sauce date to the late 1800s.

    By the early 20th-century, the recipe was standard in French and other European cookbooks. It gained spread to the U.S., U.K., and elsewhere with French chefs.

    __________________

    *You can use any vinegar, but balsamic or flavored vinegar (balsamic, fruit or herb vinegar) will add another nuance to the cocktail sauce.


    CHECK OUT WHAT’S HAPPENING ON OUR HOME PAGE, THENIBBLE.COM.


    Comments off

    RECIPE: Peppermint White Hot Chocolate & Chocolate Peppermint Brownies

    Christmas season is a bonanza for peppermint lovers, from candy canes to peppermint bark to chocolate-peppermint everything.

    Now, have a cup of peppermint white hot chocolate with a dark chocolate peppermint brownie. Both recipes are from McCormick.

    While together they create a chocolate-peppermint symphony, they can be split up and paired with non-peppermint, non-chocolate beverages and cookies.
     
     
    RECIPE: PEPPERMINT WHITE HOT CHOCOLATE

    Ingredients For 6 One-Cup Servings

  • 1 cup heavy cream
  • 8 ounces white chocolate*, coarsely chopped
  • 4 cups half-and-half
  • 1/4 teaspoon McCormick Pure Peppermint Extract
  • Optional garnish: whipped cream
  •  
    ________________
    *We chop up white chocolate bars from Green & Black’s or Lindt.
     
    Preparation


    white-hot-choc-peppermint-bars-mccormick-230

    [1] If you’re of peppermint lover, this dessert is for you: white peppermint hot chocolate with chocolate peppermint bars (photo © McCormick).


    1. PLACE the heavy cream and chocolate in medium saucepan. Cook and stir on medium heat until chocolate is melted.

    2. STIR in half-and-half and peppermint extract. Cook and stir until heated through. Pour into serving cups. Garnish with whipped cream if desired.
     
     
    25+ HOT CHOCOLATE VARIATIONS

    There’s a recipe for every day of the month. See all the hot chocolate ideas.

    Here’s the difference between hot chocolate and cocoa.


    peppermint-cream-brownies-mccormick-a-kitchen-addiction-230
    [2] Top chocolate brownies with peppermint cream and chocolate ganache. Here’s the recipe from A Kitchen Addiction (photo © A Kitchen Addiction).
      RECIPE: CHOCOLATE PEPPERMINT BROWNIE BARS

    This fudgy brownie is layered with peppermint frosting and a rich chocolate glaze.

    Prep time is 15 minutes, bake time is 15 minutes.

    Ingredients For 36 Bars

  • 1 package (family-size) fudge brownie mix or your own brownie recipe
  •  
    For The Frosting

  • 2-1/2 cups confectioners’ sugar
  • 1/2 cup (1 stick) plus 7 tablespoons butter, divided
  • 1-1/2 tablespoons heavy cream
  • 1 teaspoon pure peppermint extract
  • 12 ounces semi-sweet baking chocolate, coarsely chopped
  • Crushed peppermint candies
  •  
    Preparation

    1. PREHEAT the oven to 350°F. Prepare the brownie mix as directed on the package. Spread in greased foil-lined 15x10x1-inch baking pan. Bake 15 minutes or until a toothpick inserted into the center comes out almost clean. Cool in the pan on wire rack. Meanwhile…

    2. BEAT the confectioners’ sugar, 7 tablespoons of the butter (melted), cream and peppermint extract in large bowl with electric mixer on medium speed until well blended and smooth. Spread evenly over the cooled pan of brownies. Refrigerate for 30 minutes.

    3. MICROWAVE the chocolate and the remaining 1/2 cup (1 stick) of butter in large microwavable bowl on HIGH, for 2 minutes or until the butter is melted. Stir until chocolate is completely melted. Spread over top of chilled brownie.

    4. SPRINKLE with the crushed peppermint candies. Cut into bars.


    Comments off

    The Nibble Webzine Of Food Adventures
    RSS
    Follow by Email


    © Copyright 2005-2025 Lifestyle Direct, Inc. All rights reserved. All images are copyrighted to their respective owners.