|
Overnight oats are trending. According to Pinterest, there were 5 million overnight oats pins in 2015, a whopping 211% increase over 2014.
If your goal is to eat a better breakfast and more whole grains, here’s how it can be ready for you to eat each morning. You can eat the oats at home or grab the jar on your way out the door. It’s that easy!
Check out the recipe below.
WHAT ARE OVERNIGHT OATS?
Overnight oats are a way of preparing oatmeal by soaking the oats overnight, instead of cooking them. Raw oats are soaked overnight in your choice of liquid: drinkable yogurt or kefir, milk or nondairy milk (almond milk is splendid), water, yogurt/water mix, or whatever.
The soaking turns oatmeal into a cold breakfast cereal, although you can certainly heat it.
You can use rolled oats, steel-cut oats, and even instant oatmeal; although given that the latter is ready in a minute in the microwave, we’d focus on the first two.
The mixture sits in a lidded jar overnight (or for at least 6 hours) as the oats absorb the liquid. When it’s time for breakfast the next morning, the oats are plumped up, soft, and ready to eat, cold or heated, plain or with the toppings of your choice.
RECIPE: OVERNIGHT OATS
There is no right or wrong ingredient or proportion: It’s how you like your oats. Here’s a guide for your first batch; you take it from here.
Ingredients For 1 Serving
1/2 cup oats
1 cup liquid, or 1/2 cup each water and yogurt
Optional: peanut butter or other “custom ingredient,” e.g.
1 tablespoon cocoa powder
Optional: 1 teaspoon flaxseed meal or protein powder
Optional flavoring: cinnamon, cocoa, coffee, vanilla extract
Sweetener: agave, brown sugar, honey, maple syrup, noncaloric sweetener, etc.
Toppings of choice: dried or fresh fruit, nuts and/or seeds, granola, or other crunchy dry cereal
Lidded jar or other container
Preparation
1. MIX the oats and liquid in the jar with the optional peanut butter. Tamp down with a rubber spatula or a spoon so that all the oats get moistened.
2. PLACE the jar in the refrigerator overnight. It’s ready to eat in the morning. If using peanut butter or other nut butter…
3. BLEND the peanut butter briefly before refrigerating, just enough so that you’ll have swirls of it the next day. (We whisked it briefly.) When you’re ready to eat…
4. ADD the sweetener, microwave if desired, and add your toppings of choice.
|
|

[1] One of our favorites: strawberry overnight oats. Here’s the recipe from A Pumpkin And A Princess.
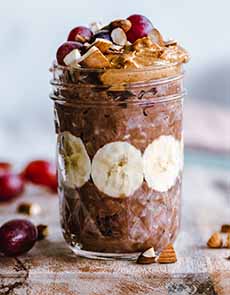
[2] Chocolate overnight oats (photo © Ella Olsson | Unsplash).

[3] Blackberry overnight oats (photo © Micheile Dot Com | Unsplash)
|
|
Add Your Own Touches
You can customize the flavors with your favorite ingredients, by adding anything from nut butter to fruit purée to the jar. For example:
Apple Cinnamon overnight oats, add 1/4 cup unsweetened applesauce plus 1/4 teaspoon cinnamon.
Banana French Toast overnight oats, add ½ mashed banana ½ teaspoon cinnamon, ½ teaspoon vanilla extra and 1 tablespoon maple syrup.
Almond Joy overnight oats, with coconut, chocolate chips, and almonds.
Just About Anything Sweet. We’ve seen recipes for Brownie, Carrot Cake, Cinnamon Roll, Chocolate Chip Cookie Dough, Mocha, Moose Tracks, Peanut Butter Cup, Peanut Butter & Jelly…and on and on. If it gets the kids to eat their oatmeal, go for it!
Don’t like sweet foods? Experiment with savory recipes, from caraway seeds to red chili flakes.
|