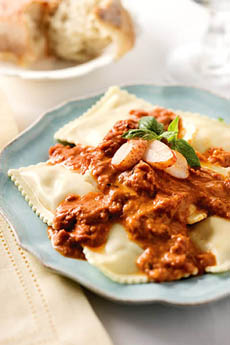
[1] A classic dish of ravioli with tomato sauce (photo © CB Crabcakes).

[2] An illustration of why ravioli is also called “pillow pasta” (photos #2 and #3 © Osteria Morini).
[3] Fazzoletti, meaning “handkerchiefs,” at Osteria Morini | NYC.

[4] Casoncelli, the twisted shape of Liguria. Here’s the recipe from La Cucina Italiana (photo © La Cucina Italiana).

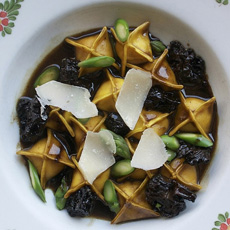
[5] Culurgioni, Sardinian stuffed pasta with a wheat motif. Here’s the recipe from Chef Adam Leonti (photo © Chef Adam Leonti).
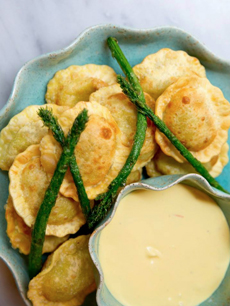
[6] Ravioli can be fried and served with a dipping sauce, at Giovanni Rana in New York City (photo © Giovanni Rana).
[7] Lobster and crab ravioli in duo-tone pasta sheets (at Nuovo Pasta).

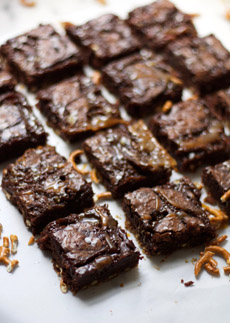
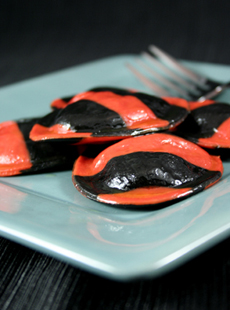
[8] Chocolate ravioli for dessert. Here’s a recipe (photo © Chocolate Princess and More).
|
|
When we were growing up, our mom had access to an Italian restaurant supply store, from which she purchased copious amounts of ravioli: in pinked but uncut sheets, four layers to a cardboard carton.
When tossed into boiling water and they’d magically separate for an brief swim, until ready to drain and sauce.
Each week we had Ravioli Night. In those days it was meat or cheese with Mom’s homemade pasta sauce. Lobster ravioli, pumpkin ravioli, and even spinach ravioli were still in the future. She did, however, have a wedge of Parmesan cheese, which she grated over our dishes.
There has always been ravioli in our life. But who invented ravioli?
Below:
> The history of ravioli.
> How pasta got to Italy.
> Regional ravioli styles.
Elsewhere on The Nibble:
> The different types of pasta: a photo glossary.
> The history of pasta.
> The year’s 20+ pasta holidays.
THE HISTORY OF RAVIOLI
China gets the credit for inventing not only strand pasta—thin chow mein noodles like Italian angel hair, thin wonton noodles like Italian linguine, lo mein noodles like Italian pappardelle, and wide wonton noodles like Italian fettuccine—but filled pasta.
Those stuffed wontons (boiled in soup or steamed separately) or pot stickers (pan-fried) wrapped wheat dough around a filling. Other Asian countries followed suit, and also made pasta from rice and from mung bean threads.
When it arrived Italy, stuffed pasta was called ravioli (another name is pillow pasta). Some food historians believe the name derives from the old Italian word riavvolgere, to wrap.
Others believe that the dish was named after a renowned 13th-century chef by that name, who lived in what is now the Italian region of Liguria), who is credited with the invention of the dumpling composed of two layers of thin pasta dough with a filling sealed between them.
Today, you can find pasta shaped in circles, novelty shapes (fish, hearts, stars, etc.), rectangles, squares, triangles and other shapes. But let’s start at the beginning.
WHEN DID PASTA GET TO ITALY?
Many have credited Marco Polo, who returned from China in 1295 after 17 years of service in Kublai Khan’s court. He brought a form of what is now called pillow pasta, like stuffed wontons.
But more recent archeological discoveries in Southern Italy have uncovered examples of square ravioli dating to the 9th century.
Pasta initially arrived in Italy during the Arab conquests of Sicily in the 9th century. Traders brought pasta back from China.
The form of pasta they brought back was what is now our iconic Italian food (via Arabia via China), spaghetti.
Of course, in those days communications weren’t great over large distances, and it could be that the Venetians didn’t know about stuffed pasta until Marco Polo returned.
Like the Chinese, Italians served ravioli (singular: raviolo) in broth, or with a pasta sauce—oil- or cream-based. Tomatoes, which arrived from the New World in the late 16th century, were used as houseplants, believed to be poisonous, and not eaten in Italy until the 18th century.
THE CREATIVITY BEGINS
By the 14th century, all kinds of pasta ripiena (filled pasta) began to appear throughout Italy. Each region would fill them with local ingredients and give them local names.
The creative chefs of wealthy families expanded on the square ravioli idea shape to circles, half-moons, hats and other shapes, creating agnolotti, cappelletti, tortelli, tortellini, tortelloni and a host of other shapes.
Affordable by all economic classes, stuffed pasta grew in popularity during the Middle Ages.
Whatever the shape, stuffed pasta was made from very thin layers of a dough consisting of wheat flour, water and sometimes eggs (egg pasta was popular in the north and central regions, less so in the southern regions).
A bottom sheet of dough was dotted with filling, the top sheet added and the individual pillows scored and crimped.
Fillings could include:
Eggs
Cheese: Parmigiano and related cheeses (Asiago, Gran Padano), ricotta, sheep’s milk (pecorino) and other soft cheeses
Fish or seafood
Fruits, nuts, breadcrumbs
Herbs: borage, garlic, marjoram, parsley
Meat: boar and other game, beef, chicken, cured meats, deer, lamb, pork, sausage
Vegetables: mushrooms, pumpkin or other squash
REGIONAL SPECIALTIES
Emilia-Romagna, called “the capital of filled pasta” by some, served tortellini (also called cappelletti or tortelli) in beef or capon broth. Other preparations included meat sauce (ragù alla Bolognese) and fresh cream with Parmigiano-Reggiano. Traditional fillings were mortadella or prosciutto with Parmigiano, nutmeg and pepper.
Here are some of the numerous specialties from other regions:
In Abruzzo, tortelli abruzzesi di carnevale was served on the last Sunday of Carnival and other occasions. With a filling of sheep ricotta, eggs and cinnamon, they were cooked in a meat broth and served with grated pecorino cheese.
In Piemonte (Piedmont), agnolotti, stuffed, bite-size squares, were served in beef broth, sauced with the juices from roasted meats or tossed with browned butter with sage. The pasta was topped with Parmigiano-Reggiano.
In Liguria, casoncelli (a twisted shape reminiscent of Jewish kreplach—photo #4) and pansotti (triangular ravioli) were popular shapes, served in beef broth.
In Lombardia (Lombardy), casoncelli were served with butter and sage. A famous dish from the region, tortelli di zucca [pumpkin] mantovani [from Mantua], was filled with pumpkin, crumbled amaretti biscotti and mostarda (fruit mustard).
In Molise, a traditional filled pasta was ravioli scapolesi (after a village called Scapoli). The egg dough filling was complex: chopped chard, roasted ground meat, sausage, beaten eggs, ricotta and pecorino cheese. These large ravioli were first boiled, then topped with a pork and sausage ragù, then baked.
In Sardinia, culurgioni (photo #5) were filled with fresh goat or sheep ricotta, eggs and saffron. Sometimes, pecorino cheese, chard or spinach were added. And then, something unique:
They were molded to resemble the tip of a stalk of wheat (photo #5), boiled and served—these days, with a fresh tomato and basil sauce. In Sardinia, the local aged pecorino is shaved on top instead of the Parmigiano of the continent. A variation of the filling uses fresh (day old) pecorino cheese, mashed potatoes and mint, onions or oregano.
In Toscana (Tuscany), tortelli alla lastra was originally cooked on a sheet of sandstone (lastra) over a fire. Large squares were filled with mashed potatoes, sometimes with added pancetta, and topped with a sauce made of braised carrots, celery, onions, tomatoes, garlic and sage.
Today, the different shapes, fillings and sauces are available throughout Italy.
SWEET ACCENTS
Until the 16th century, pasta of all types was customarily served with a sweet accent—crumbled amaretti biscotti, currants, marmalade and/or sweet spices (cinnamon, ginger, nutmeg).
These ingredients could also be added to the filling (see photo #8 for a chocolate ravioli recipe).
While cooking in broth was a common preparation, the ravioli could be fried and served with spices, sugar or honey.
But today, full-fledged dessert ravioli is available, from chocolate and vanilla dough to fillings of chestnut, chocolate, fruit and tiramisu. We even have a recipe for peanut butter and jelly ravioli.
And there’s no end in sight.
Many thanks to Piergiorgio and Amy Nicoletti for their scholarship on the history of ravioli.
|