THE NIBBLE BLOG: Products, Recipes & Trends In Specialty Foods


Also visit our main website, TheNibble.com.

COCKTAIL RECIPE: Pumpkin Martini

Pumpkin-tini

Pumpkin Vodka
[1] Pumpkin Pie-tini. Photo courtesy SandAndSisal, which uses a different recipe from ours, with whipped cream vodka, pumpkin eggnog and a rim of brown sugar and pumpkin pie spice. [2] Pinnacle is one of the brands of pumpkin-flavored vodka on the market. Pumpkin is a seasonal offering.


Today is National Vodka Day, and it’s fall. So what better than a pumpkin martini?

To make a true pumpkin martini, you’ll need a bottle of clear, pumpkin-flavored vodka and the other ingredients for your favorite martini recipe. We picked up a bottle of Pinnacle Pumpkin Pie Vodka, which gave a pumpkin-pie-spice accent to a standard martini. For garnish, we floated a star anise on top.

Otherwise, you can make a Pumpkin Pie-tini with vanilla vodka and real pumpkin purée (top photo). If you want a spicier drink, use pumpkin pie filling instead of purée; pie filling includes the pumpkin pie spices.

 
RECIPE: PUMPKIN PIE-TINI

Make one of these as a test drink. You can then decide to vary the ingredients—more or less of something, pumpkin vodka, etc.

Ingredients Per Drink

  • 1 ounce cream, milk or eggnog
  • 2 tablespoons pumpkin purée or pumpkin pie filling
  • ½ ounces vanilla vodka
  • 1½ ounces crème de cacao or vanilla liqueur
  • Ice and shaker
  • Optional glass rim: maple syrup, honey or water plus crushed biscotti, graham crackers or vanilla wafer crumbs
  • Optional garnish: sprinkle of pumpkin pie spice with or without whipped cream, or a cocktail pick with candy corn
  •  
    Preparation

    1. PURÉE the purée. Why? Pumpkin purée can be slightly grainy. For a smooth cocktail, run the pumpkin through a food processor or use an immersion blender in the can.

    2. CREATE the glass rimmer. Using a small amount of maple syrup, honey or water on the rim of the glass, place the rim on a plate of cookie crumbs and twist until the rim is coated.

    3. SHAKE the cream/milk and pumpkin puree with ice to combine. Add the remaining ingredients and shake well. Strain into the martini glass.


    RECIPE: MAKE YOUR OWN VANILLA VODKA

    All you need are vanilla beans and vodka…and 10 days to let them infuse.

    If you’ve had the vanilla beans for a while, check to see that they’re not dried out. If they are, get new beans and stick the old ones in a sugar jar, where they’ll lightly scent the sugar.

    If you don’t need an entire bottle of vanilla vodka, make half a bottle.
     
    Ingredients

  • 2 vanilla beans
  • 750 ml vodka
  • Empty glass quart jar with cap
  •  
    Preparation

    1. CUT the vanilla beans in half lengthwise to expose the interior as possible (that’s where the flavor is).

    2. POUR the vodka into the glass jar, retaining the original bottle for the final product.

    3. PLACE the vanilla beans in the jar, cap it tightly and shake gently. With a quart jar, the top 20% should be empty. Then put the bottle in a cool, dark place to infuse.

    4. STRAIN the vodka after 10 days. Use a funnel and a fine sieve, coffee filter or cheesecloth to strain the vanilla vodka into its original vodka bottle. You’re ready to go!


    Comments off

    Breakfast Taco Recipe, Taco History & National Taco Day

    The first Tuesday in October is National Taco Day, and this year it coincides with Taco Tuesday. What does that mean?

    Tacos for breakfast? Definitely. We have a breakfast taco recipe for you (below). If you’re a taco lover, you’ve already had tacos for lunch and dinner. How about tacos for dessert?

    To put them all in one list, the year’s four taco holidays are:

  • January 25: National Fish Taco
  • March 21: National Crunchy Taco Day
  • March 31: Día del Taco (in Mexico)
  • October, 1st Tuesday: National Taco Day
  •  
    Below:

    > The recipe for breakfast tacos.

    > More taco recipes: beyond the tried-and-true.

    > The history of the breakfast taco.

    > A brief taco history.

    > The history of Taco Tuesday.

    Elsewhere on The Nibble:

    > Bake hard taco shells from corn tortillas (so easy!).

    > The history of tacos.

    > Taco party menu.

    > DIY taco bar.

    > 20+ hard taco recipes.

    > Ice cream tacos recipe.

    > The year’s 25+ Mexican and Tex-Mex food holidays.

    Elsewhere on The Nibble:

    > Bake hard taco shells from corn tortillas (so easy!).

    > Taco party menu.

    > DIY taco bar.

    > 20+ hard taco recipes.

    > Ice cream tacos recipe.

    > The year’s 25+ Mexican and Tex-Mex food holidays.
     
     
    A BRIEF TACO HISTORY

    Surprisingly, the Aztecs did not invent the taco; nor did anyone else, until the 18th century.

    According to Professor Jeffrey M. Pilcher, author of Planet Taco: A Global History of Mexican Food, tacos are not an ancient food.

    Rather, as he discusses in an article in Smithsonian Magazine, Mexican silver miners in the 18th century likely invented the taco as a hand-held convenience food.

    Deriving its name from the “tacos” of gunpowder used to blast through rock, the humble miner’s fare was followed by taco carts and taquerías in the working-class neighborhoods of Mexico.

    As the taco spread throughout Mexico, each region added its own touches: meats, spices, salsas, and garnishes.

    Mexican Americans in the Southwest reinvented it. As late as the 1960s, tacos were virtually unknown outside Mexico and the American Southwest.

    In 1962, businessman Glen Bell founded Taco Bell as a drive-up with a few outdoor tables. It grew into a mass-marketing powerhouse, serving an Anglo version with a hard shell at quick-service restaurants nationwide.

    This hard pre-fried corn tortilla shell (photo #2) is not authentic. Like the burrito, a larger wheat flour tortilla, it was born in the U.S.A.

    Yet within 50 years the United States had shipped its hard taco shells worldwide, from Australia to Mongolia—redefining the taco in the eyes of millions, if not billions.

    Today the taco is an internationally beloved snack and meal, with an abundance of styles and varieties. You can invent your own “signature” taco. Ours is Japanese-style spicy tuna in a hard corn tortilla shell with a drizzle of wasabi mayonnaise.

    Along with diced onions, instead of diced tomatoes, we add diced mango.

    We make the mayo ourselves, to make it have more wasabi and less mayo. The process is the same: Just blend wasabi into mayonnaise until you reach your preferred degree of wasabi heat.

    See more creative spins below.
     
     
    And Taco Tuesday?

    This American event was begun in 1982 as a successful promotion by Taco John’s.

    It encouraged people to go out for tacos on Tuesday nights and offered specials like $1 fish tacos.

    Since tacos are easy to make at home and popular with the whole family, Taco Tuesdays are also a frequent event in home kitchens.

    While Taco John’s trademarked the name, other venues use the trademark but can receive “cease and desist” letters.

    Taco Tuesday has become such a part of American culture that we think Papa John’s should allow Taco Tuesdays for everyone!

    The history of the breakfast taco follows.


    Mole Tacos
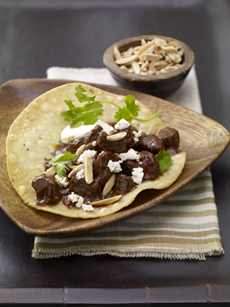
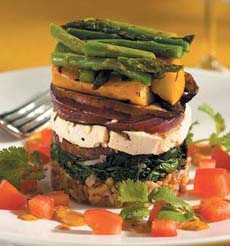
    [1] An upscale taco in the classic mold. This one includes braised beef and mole sauce, with cottage cheese Here’s the recipe (photo © McCormick).

    Pre-Fried Taco Shells
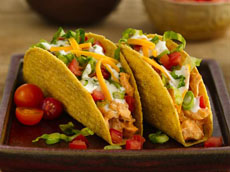
    [2] Fried hard taco shells are an American invention. They stand up on their own (photo © Old El Paso)!


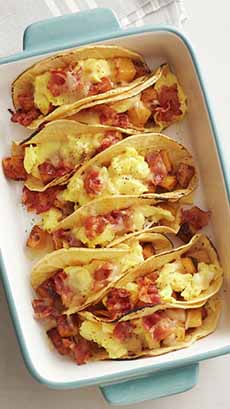
    [3] Baked breakfast tacos. Here’s the recipe (photo © Pillsbury).

    Breakfast Taco
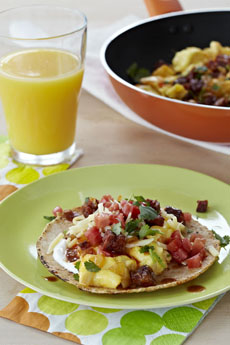
    [4] Breakfast taco with scrambled eggs and sausage (photo © Imusa, recipe below).

    Breakfast Burrito
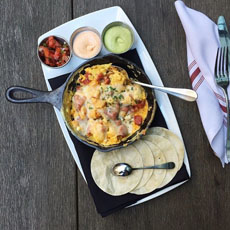
    [5] A DIY set-up from David Burke at Fabrick | NYC (photo © David Burke).

    Dessert Taco
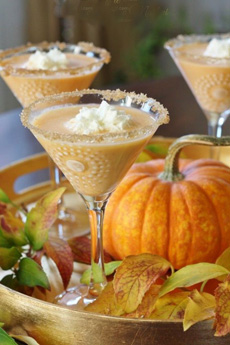
    [6] A simple dessert taco in a waffle cone shell (photo © We Heart It). Add as many toppings as you like. You can use a waffle maker to make a soft waffle shell.

     
    Fried Egg Breakfast Taco
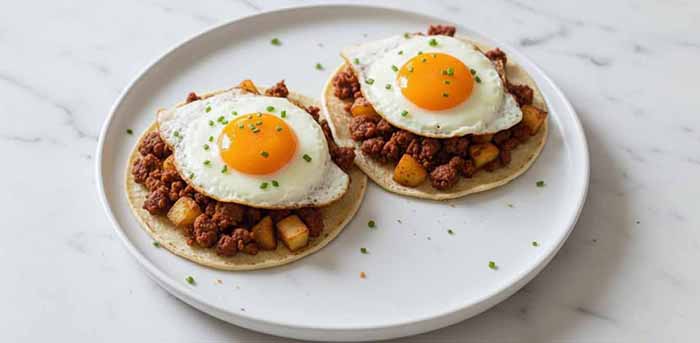
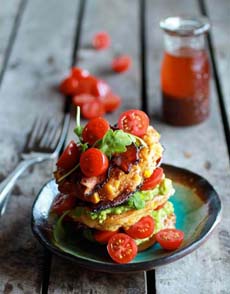
    [7] Fried egg and chorizo breakfast taco. Here’s the recipe (Abacus Photo).
     
     
    THE HISTORY OF THE BREAKFAST TACO
    While the term “breakfast taco” is relatively modern, its roots go back 2,500 to 3,000 years when the indigenous people of Mesoamerica—Aztecs, Mayans, and others—wrapped food in thin, flat corn cakes called tlaxcalli. (The cultivation of the corn itself goes back much further*.)

    When the Spanish arrived in the 1500s, they renamed them tortillas (“little cakes”).

    Eventually, wheat was introduced to Northern Mexico and Texas. According to legend (and some historical records), Juan Garrido, an African conquistador and former slave of Hernán Cortés, found three grains of wheat in a bag of rice. Because wheat grew better in those arid climates than corn, the flour tortilla became the standard vessel for food in the borderlands.

    The “Pre-” Breakfast Taco Evolves In Northern Mexico & South Texas

    For centuries, families in Northern Mexico and South Texas ate eggs, beans, and leftover meats wrapped in tortillas for breakfast. It was portable, cheap, and filling.

    In the early 20th century, these “breakfasts” were mostly sold by “Chili Queens,” who made them at home. They weren’t called “breakfast tacos”; they were just breakfast. You’d simply ask for a “taco de huevo con chorizo” (egg and chorizo taco).

    The Breakfast Taco Arrives

    The modern breakfast taco exploded in the 1970s and 1980s when it transitioned from a home-cooked staple to a restaurant phenomenon. This led to a famous contention over bragging rights:

  • San Antonio, Texas: Most historians agree that San Antonio (and the Rio Grande Valley) is the true birthplace of the breakfast taco. In the 1950s, small cafés in the area begin listing “egg tacos”” on menus. The first documented use of the term “breakfast taco” appeared in a 1975 newspaper article in The Arizona Republic.
  • In 1978, Taco Cabana opened in San Antonio, helping to mass-market the concept of a 24-hour patio taco spot.
  • Austin, Texas: Austin didn’t invent the dish, but they marketed it through festivals like SXSW, which turned the breakfast taco into a globally “cool” food.
  • This controversy erupted in culminated in a 2016, when an article claimed that Austin was the home of the breakfast taco. This sparked a petition from San Antonians to exile the author from the city for “taco negligence.”
  • That year, the mayors of Austin and San Antonio signed a “Peace Treaty” to end the Taco War, agreeing that the taco belongs to all of Texas.
  • Fun Fact: If you travel to the Rio Grande Valley (Deep South Texas), they often refer to breakfast tacos as mariachis, after the Mariachi Bus Line. These buses would stop at local roadside stands and small cafés for passenger breaks. The most popular “to-go” item was a flour tortilla filled with eggs, beans, or meat. Over time, the name of the bus became the name of the food itself.
  •  
    Breakfast Taco With Scrambled Eggs & Avocado
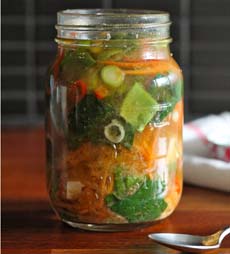
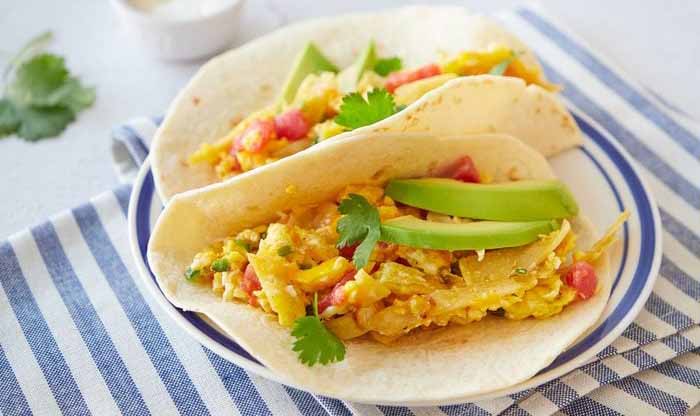
    [8] Scrambled eggs, avocado, scallions, and corn kernels (photo © Quinciple).
     
     
    RECIPE: DIY BREAKFAST TACOS

    Unlike the American-invented breakfast burrito, essentially an egg-and-sausage wrap sandwich, this recipe is truer to Mexican preparations.

    There’s a fight between Austin and San Antonio over the origin of the breakfast taco.

    At first, it was a breakfast made at home: eggs, sausage, or other pork and cheese, rolled in a warm tortilla. In Mexican kitchens, tortillas are a staple, like a loaf of bread.

    The concept then migrated to breakfast stands and restaurants, as far back as the 1950s.

    Thanks to IMUSA USA, a maker of kitchenware for global recipes—for this breakfast taco recipe. You can find more recipes on their website.
     
    Ingredients

  • 6 eggs
  • 1 tablespoon olive oil
  • 2 chorizo links (about 7 ounces), diced
  • 1 medium onion
  • 1 cup cilantro, divided
  • 1 medium tomato, diced
  • 1 cup sour cream
  • 1 tablespoon fresh lime juice
  • 1 teaspoon salt
  • 1 cup sharp cheddar
  • 10-12 corn flour tortillas
  • Chipotle-flavored Tabasco or other hot sauce (substitute ketchup)
  •  
    Preparation

    1. MIX the sour cream, lime juice, and salt in a bowl; put aside.

    2. CHAR the tortillas over a gas flame or directly on an electric burner until blackened in spots, turning with tongs. Place in a tortilla warmer or aluminum foil and set aside.

    3. ADD the olive oil to a nonstick sauté pan and bring to medium-high heat. Sweat the onions for about one minute and add the diced chorizo. Cook for 5-6 minutes until chorizo is browned.

    5. ADD half of the cilantro and all of the cooked chorizo to the beaten eggs. Blend and pour into the pan. Cook on low heat, stirring from time to time.

    6. PLACE the cooked eggs, cheddar, tomatoes, and remaining cilantro in separate bowls and lay them out throughout the table with the warm tortillas. Let everyone build their own.

     
    Migas Breakfast Tacos
    [9] Migas breakfast tacos. Migas are a Tex-Mex dish with scrambled with eggs, tomatoes, onions, and jalapeños, often topped with cheese, salsa, and/or avocado. Here’s the recipe (photo © Taste Of Home).


    TACOS BEYOND THE TRIED-AND-TRUE

    You may think that National Taco Day is a day to celebrate the classics; but as you do, put on your thinking cap and invasion the next great taco combination you can make.

  • Sophisticated tacos. Chefs at better restaurants are pushing their creativity to transfer icon dishes to tacos. Try these braised beef tacos in mole sauce (photo #1).
  • Put your own spin on it. Ground beef tacos became cheeseburger tacos, for example. Grilled, sliced steak is popular in northern Mexico, and our tony friend Ordway wanted to try the concept with filet mignon. We made them for his birthday, with a sauce of melted gruyère, crème fraîche and salsa verde, a Mexican-French fusion. (May we say, it was a silly excess but very appreciated by the birthday boy. We’ve since gone with braised short ribs or lamb shank—DEE-licious.)
  • Trio of tacos. Our favorite dish at our neighborhood Tex-Mex restaurant is a trio of tacos, each with a different filling. Why choose just one?
  • Specialty tacos for every occasion, like these corned beef and cabbage tacos for St. Patrick’s Day.
  • Sashimi tacos. Fish tacos are great, but sushi lovers will adore these sashimi tacos as well. The shell is made from wonton wrappers. Fillings can be anything you like. Haru restaurant in New York City serves three full-size tacos: tuna with cherry tomato salsa, salmon with avocado and striped bass with apple yuzu ceviche sauce.
  • Dessert tacos. Whether they’re in a sideways waffle cone resembling a hard taco shell, or in a waffle from your waffle maker, this is fun food. How can you resist? Here’s the recipe. Warning: It’s not the neatest ice cream sandwich to eat. It’s best served on a plate at the table.
  • ________________
     
    *The origin of maize and the tortilla: Around 9,000–7,000 B.C.E., indigenous peoples in the Balsas River Valley of Mexico began domesticating teosinte, a wild grass, into what we now recognize as corn (Zea mays). A breakthrough came circa 1,500–1,200 B.C.E.: nixtamalization. Cooks discovered that soaking dried corn in an alkaline solution (usually water mixed with wood ash or lime/calcium hydroxide) softened the kernels. Nutritionally, it unlocked B vitamins and amino acids, but the ancients didn’t know that—they just benefitted from the nutrients. Without nixtamalization, the corn couldn’t be ground into a cohesive dough (masa).

    Around 500 B.C.E., archaeological evidence) shows that comales (flat clay griddles) were being used in regions like Oaxaca and Central Mexico, proving that people were flattening dough into thin discs and searing them over a fire.

    The oldest “tortilla” fossil dates to roughly 500 B.C.E. in the Valley of Tehuacán, but most anthropologists believe the practice was widespread long before it was captured in the fossil record.

    By the 14th-16th centuries C.E., the height of the Aztec (Mexica) Empire, the tlaxcalli (pronounced tlahsh-KAHL-lee), or corn tortilla, was an essential component of the Mesoamerican diet. It wasn’t just a side dish; it was a vessel and a utensil. In a society without metal forks or spoons, the tortilla was the “edible spoon.”

    Women spent hours every morning grinding nixtamalized corn on a stone tool called a metate. Bernal Díaz del Castillo, one of Hernan Cortez’ soldiers in the context of Mexico, wrote in his journals about the massive markets at Tlatelolco, describing dozens of varieties of tlaxcalli—some white, some yellow, some folded, and some filled with everything from beans and chili to turkey and small dogs!


    CHECK OUT WHAT’S HAPPENING ON OUR HOME PAGE, THENIBBLE.COM.


    Comments off

    FOOD FUN: Vertical Pear Salad

    Jessica, from The Novice Chef Blog, isn’t such a novice. She designed this elegant pear salad that is easy in its execution, yet dazzling on the table.

    You can vary the filling, the color of the pear, and/or the vinaigrette.

    If you prefer, you can make candied nuts instead of simply toasting them.

    For more vertical salads, see our vertical veggie ideas.
     
    RECIPE: VERTICAL PEAR SALAD

    Ingredients For 4 Servings

  • 4 smooth skinned pears)
  • 2-3 cups watercress, arugula or baby spinach
  • 1/2 cup toasted almond, pecan or walnut halves (how to toast nuts)
  • 1/4 cup crumbled blue cheese (substitute blue or goat cheese)
  • Lemon juice
  • Vinaigrette dressing
  • Optional plate garnish: pomegranate arils
  •  
    For The Vinaigrette

      Pear & Blue Cheese
    So elegant, so easy: a vertical pear salad from The Novice Chef Blog.
     
    This salad begs for a sweeter vinaigrette. Use champagne, raspberry, sherry or white balsamic vinegars. Walnut oil is heavenly in this type of vinaigrette, but good olive oil is fine.

    Another option is to add a tablespoon of honey or maple syrup (a nice fall touch) to your usual vinaigrette.

    Whichever you choose, choose a ratio of 3 parts oil to 1 part vinegar.

    Here’s the best technique to make a vinaigrette that holds together without separating.
     
    Preparation

    1. SLICE the pears horizontally into 3 or 4 slices depending on the size. Leave the stem on the top piece.

    2. USE a paring knife to remove the cores, creating a “donut hole” in the middle. Brush the cut sides with lemon juice to keep them from browning. When you’re ready to serve…

    3. MOISTEN the watercress, pecans and blue cheese with the vinaigrette and toss to coat.

    4. ASSEMBLE the pears on individual plates, with the watercress salad in between each slice.

    5. DRIZZLE the vinaigrette on the plate around the pear, and serve.
     
     
    Thanks, Jessica: You rock!
      

    Comments off

    TIP OF THE DAY: Stack Your Vegetables

    Vegetable Stacks

    Stacked Fritters

    Stacked In Rocks Glasses
    [1] Stacked vegetables as short or tall as you like (photo courtesy Citrine World Bistro, late of Redwood City). [2] Stack polenta or fritters, like these from Like It Short (website no longer up). [3] If you don’t want to deal with ring molds, stack your veggies in rocks glasses (photo courtesy The Whole Gang.


    These look fancy, don’t they?

    But you can easily make vegetable stacks at home, even with leftovers.

    While many people currently are focused on stacked salads in mason jars, we’re freeing the veggies from the jar today, and serving them cooked as well as raw. Even those who don’t like their vegetables will be happy.

  • Serve stacked veggies as a first course, with the cheese course. You can add wedges of cheese to the plate, or slice layers into the stack (blue, brie, chèvre, feta, mozzarella, etc).
  • Serve them as a luncheon or dinner salad with a layer of protein (chicken, fish, protein salads [egg, crab, tuna, etc.], tartare, tofu, veggie burgers, etc.)
  •  
    HOW TO STACK THE VEGETABLES

  • In ring molds. You want 3-4 inch rings, as tall as you can find so they can be used for short and tall stacks.
  • In rocks glasses.
  • In repurposed food cans, tops and bottoms removed*.
  • In lengths of PVC† plumbing pipes, cut to order at the hardware store.
  •  
    ________________
    *Don’t worry about PVC leaching into your food. You’re not cooking/heating the rings, and you’re only using them for a couple of minutes to assemble, as opposed to plastic bottles that can hold water for months or years.

    †One of the problems with using the time-honored empty can for stacking is that many cans now have “formed” bottoms that stack more easily, but can’t be removed with a can opener. So don’t throw away expired canned food without checking to see if you can use the empty can! Also, look for the older can bottoms with foods from Mexico and Asia, from packing plants that still use the old technology.
     
    RECIPE: VEGETABLE STACKS

    Ingredients

    Ingredients can be whatever you want or already have, and in whatever form: cooked, puréed, raw.

    Be sure to vary the colors (you don’t want a stack of beige ingredients) and include pops of color.

  • Canned: beets, corn, water chestnuts
  • Color: red, yellow or orange bell peppers, tomatoes and all of these
  • Eggs: hard-cooked or Japanese omelet (tamago)
  • Fruit: sliced or diced (apple, mango, pineapple, etc.)
  • Garnishes: fresh herbs (try a dill or rosemary plume), chip, spiraled beets
  • Grains and starches: polenta slices, potato (diced, mashed, sliced), rice, quinoa, etc.
  • Greens: arugula, avocado, cress, spinach, spinach, zucchini, etc.
  • Plate garnish: chopped nuts, infused olive oil, seeds, microgreens
  • Sides: gourmet chips or crackers, toasted baguette slices
  •  
    Pinterest has a page of lovely stacked vegetable ideas.

     
    For The Dressing

    You need just a light sauce on the side: ramekins of balsamic vinegar, a vinaigrette, infused oil‡ or a vegetable oil blended with dark sesame oil (a little goes a long way).

    Also consider dipping sauces from Asia, such as chili sauce or ponzu. Both can be purchased or made at home.

    We also love a yuzu vinaigrette.
     
    Preparation

    1. CHOOSE your ingredients. Try for contrasting colors and plan your layers. Stack heavier items at the bottom.

    2. SPRAY the inside of the molds, if using, so the food slides out more easily.

    3. SET each stack on a serving plate, and garnish the plate with droplets of olive oil (especially flavored oil!).
     
    ________________
    ‡A delicious alternative to a vinaigrette, infused oils are available in a score of flavors: basil, blood orange, chile (ancho, habanero, jalapeño), dill, garlic, Meyer lemon, lemon pepper, oregano, rosemary, truffle, scallion, wasabi, etc.


    Comments off

    TIP OF THE DAY: Start A Soup Club

    In 2011, four friendly neighbors who, among them, have four spouses, 10 kids and jobs, realized that they could benefit from each others’ home cooking.

    They simply had to make and share a bigger batch of something.

    They decided on tasty, nutritious, filling, relatively inexpensive, and easy to make and transport soup. And the first soup club was born.

    In the manner of holiday cookie swaps but once a month, they cooked and shared soup.

    The idea was a success, and three years later they produced The Soup Club Cookbook: Feed Your Friends, Feed Your Family, Feed Yourself.

    Once a month, each soup club member takes a turns cooking a big pot of soup, making enough to feed all four families. He or she then drops off the soup, along with garnishes and an optional salad or side, at the homes or workplaces of the three other members.
     
    A GREAT IDEA

    Share once a month and get the large part of a meal once a week? Sounds good to us! Several of us at THE NIBBLE enjoy soup for lunch, and a small container of quality takeout soup can cost $7.

    The Soup Club Cookbook includes 150 recipes for soups and sides, and storing tips for stretching those meals across the week. It’s also a guidebook for starting your own soup club: the logistics, the essential tools and stories to caution and inspire.

    Whether for family dinner or workplace lunch, give it a try. You can start by getting the book, available in paperback or Kindle.

    Cconsider it as a gift for someone you’d like in your club (or who could benefit by starting a club).
     
    A SOUP CLUB IS FOR EVERYONE!

    Co-workers, gym buddies, book club members, school friends, neighbors—everyone from students to seniors—can participate.

    All you need are four people who want more home-cooked food, and who like the same types of ingredients (vegetarians vs. omnivores, for example).

    The idea isn’t to eat together, although that could be a pleasant by-product sometimes.
     
    NO BOOK?

    If you prefer to wing it, start here:

  • Find three other co-workers, friends or neighbors who are like-minded.
  • Have a starter meeting and pick a day of the week when soup will be delivered (the “soup day”).
  • Decide on a soup philosophy. Do you want hearty soups that can be light meals? Low calorie? A different theme every month (vegetable, international, etc.)?
  • Establish preferences. Spicy? No garlic? No gluten?
  • Do you want to include some kind of salad as well?
  • Need a whole meal? Consider adding a casserole, wings, etc.
  •   Soup Club Cookbook

    Miso Soup

    Salad In Container
    [1] Start your own soup club (photo courtesy Clarkson Potter). [2] Miso vegetable soup, an interesting recipe from TheMuffinMyth.com. [3] Your club can choose to add a salad—green, bean, grain, pasta, etc.—or other side (photo courtesy EcoProductsStore.com).

  • Discuss the containers you’ll deliver the food in. If everyone has the same type, you don’t need to return the empties.
  • Be prepared to test and refine your process, so that it works for everyone.
  •  
    One day a week, when thinking about lunch or dinner, you’ll be able to say: Soup’s on!
      

    Comments off

    The Nibble Webzine Of Food Adventures


    © Copyright 2005-2026 Lifestyle Direct, Inc. All rights reserved. All images are copyrighted to their respective owners.