|

[1] A conventional stuffed squash recipe: half a squash, stuffed to the brim (photos #1 and #2 © Chef Eric Levine).

[2] Adding a rim of vegetables.

[3] Don’t want to serve large portions? Cut the squash into rings with this recipe from FoxesLoveLemons.com.
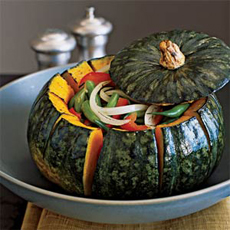
[4] Turn the entire kabocha squash into a filled “squash bowl.” Here’s the recipe from Sunset magazine.
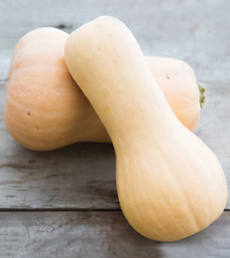
[5] Butternut squash (photo © GoodEggs.com).
|
|
Certainly, half of baked squash is attractive, not to mention delicious and good for you.
But you can elevate baked squash to a work of art.
The standard winter squashes in supermarkets are the acorn and the butternut. They have a similar flavor, but the acorn is round while the butternut is boat-shaped.
While the butternut can be cut into rings or halved into a “boat,” the round, ridged squash has a natural beauty benefit.
Numerous types of winter squash are available in the U.S., in natural food stores, and at farmers markets. But some species are particularly beautiful: acorn, blue Hubbard, carnival, kabocha (buttercup), lumina (white with white flesh), pattypan, sweet dumpling and others (see more types of squash).
> The history of squash is below.
STUFFING INGREDIENTS FOR SQUASH
Combine your palate and your personality into your stuffing.
Fruits: apples, dried fruits (apricots, cherries, cranberries, raisins), pears, pomegranate arils, quince
Grains: barley, breadcrumbs, croutons, quinoa, rice and wild rice, etc.
Herbs: parsley, rosemary, sage, tarragon, thyme
Nuts: halved, sliced or chopped as garnish
Proteins: bacon, mozzarella, tofu
Seasonings: cayenne, chipotle, coriander, cumin, flavored salt, nutmeg, pepper, ras-el-hanout, smoked paprika, za’atar
Vegetables: brussels sprouts, celery, carrots and other root vegetables, mushrooms
Binders: broth, butter, nut oil, olive oil
Garnishes: dried cranberries, fresh herbs, shredded cheese (cheddar, gruyère, parmesan)
Here’s a basic recipe that you can customize as you like.
THE HISTORY OF SQUASH
Squash is indigenous to Central and South America. It was introduced to the Spanish conquistadors in Mexico, spread via indigenous migration throughout North America, and was introduced by Native American populations to the English settlers in Virginia and Massachusetts.
Squash was easy to grow and hardy enough to store for months, providing a nutritious dietary staple throughout the winter (hence the name, winter squash). While there are many heirloom varieties, today the most commonly found in supermarkets are acorn and butternut squashes.
Acorn Squash Vs. Butternut Squash
Acorn squash (Curcubita pepo, var. turbinata) is so-called because its shape resembles an acorn. The most common variety is dark green in color, often with a splotch of orange on the side or top.
Some varieties are variegated (multi-color) and newer varieties include the yellow Golden Acorn squash and white-skinned varieties.
Like the other popular winter squash, butternut squash (Cucurbita moschata), the skin of acorn squash is thick and hard, and it is an effort to peel it. But either squash is easily cut in half with a large, sharp knife. It can then be baked, plain, or stuffed with grain, meat, or vegetable mixtures.
Acorn squash are smaller than butternut squash (an acorn is one to two pounds, four to seven inches long), and half of an acorn makes a convenient individual portion. It is similar in flavor to butternut.
Winter squash needs to be cooked.
All winter squash can be baked, microwaved, sautéed, or steamed.
Don’t hesitate to add the cooked flesh to green salads, mixed vegetables, grains, omelets, and anyplace you’d like another level of flavor and color.
The seeds of the squash are toasted and eaten. Initially, the seeds were eaten instead of the flesh until plumper-fleshed varieties were bred.
The yellow trumpet flowers that are produced before the squash is fully developed are also edible. They are stuffed and considered a delicacy.
The green tops, about three inches’ worth from the end of freshly-harvested squash, are also edible (but not the prickly stem). The squash greens are a popular vegetable in the Philippines. Unless you grow your own or your local farmer doesn’t remove them, you aren’t likely to see them for sale in the U.S.
Winter squash is a good source of dietary fiber and potassium, with smaller amounts of vitamins C and B, magnesium, and manganese. Surprisingly, because of the color of the flesh, it is not a good source of beta-carotene.
|
There are three species of squash, all native to the Americas.
Curcubita pepo includes acorn, butternut, pumpkin, summer squashes and others.
Curcubita moschata, represented by the Cushaw, Japanese Pie, Large Cheese Pumpkins and Winter Crookneck squashes, arose, like Curcubita pepo, in Mexico and Central America. Both were and are important food, ranking next to maize and beans.
Curcubita maxima includes Boston Marrow, Delicious, Hubbard, Marblehead and Turks Turban, and apparently originated near the Andes, or in Andean valleys.
SQUASH TRIVIA
The word “squash” comes from the Wampanoag Native American word, askutasquash, meaning “eaten raw or uncooked.” This may refer to the summer squash varieties, yellow squash and zucchini, which can be enjoyed raw.
Summer squash, which belong to the same genus and species as most winter squash, are small, quick-growing varieties that are eaten before the rinds and seeds begin to harden.
Before the arrival of Europeans, Curcubita pepo and Curcubita moschata had been carried to all parts of North America that were conducive to growth.
Many Native American tribes, particularly in the West, still grow a diversity of hardy squashes and pumpkins not to be found in mainstream markets.
Squash was unknown in the Old World until the 16th century, brought back by the returning conquistadors. The oldest known prin record of it is dated 1591.
Much of canned pumpkin consists of Curcubita moschata squash, not from the jack-o-lantern variety of pumpkin. The best commercially canned varieties are Boston Marrow and Delicious varieties. The flesh of these varieties is much richer and more nutritious than that of pumpkin.
CHECK OUT WHAT’S HAPPENING ON OUR HOME PAGE, THENIBBLE.COM.
|