|
Black currants have twice the antioxidants of blueberries, hitherto the uber-antioxidant fruit. The small, purple-black berries that grow in clusters on the Ribes nigrum bush have four times the vitamin C of oranges and significant amounts of calcium, magnesium, manganese, potassium, and riboflavin.
Should you be drinking currant juice? Of course, especially when it tastes so good, whether straight, in spritzers, or as a mixer. You can also add a splash to herbal tea.
The flavor is a bit grape-like (some call the taste a blueberry-cranberry blend), but currant juice is distinctive, bold, pleasantly tart, and sophisticated. It’s the kind of juice wine drinkers would choose if they couldn’t drink wine anymore
Why aren’t we all drinking currant juice? Growing black currants was banned for 100 years in the U.S. (more about that below), but now there is juice aplenty.
NUTRITION CURRENCY FROM CURRANT C
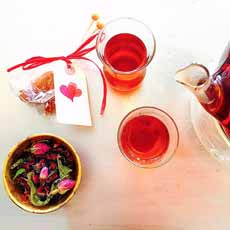
Currant C and Knudsen’s both sell black currant juice.
Currant C’s all-natural product, sold in 16-ounce bottles, is not pasteurized and needs to be refrigerated. The juice is made from concentrate with filtered water, and a bit of pure cane sugar is added to offset the tartness. Each 16-ounce bottle of Currant C contains two servings, at 130 calories each.
If you prefer a noncaloric sweetener or otherwise don’t want added sweetness, you can buy the concentrate. Knudsen’s 32-ounce bottle is unsweetened and shelf-stable.
Currant C, a pioneer grower in New York State, sells individual bottles of black currant juice and the concentrate to make your own; plus dried currants, currant vinegar, and currant seed oil, gift packages, and more. Check out the full line of currant products.
If you have a black currant bush at hand, it’s easy to make your own juice concentrate.
WHAT ARE CURRANTS?
Currants are berries that grow on a vine, The genus Ribes includes the edible currants (black currant, red currant, white currant), the gooseberry, and several hybrid varieties.
The genus comprises some 150 known species of flowering plants that are native to the temperate regions of the Northern Hemisphere. The black currant genus and species is Ribes nigrum.
Currants Versus Zante Currants/Raisins
Since currants only began to be grown recently in the U.S., what are those things we’ve been calling currants?
They are the so-called Zante Currants, which are actually raisins (dried grapes) that are not related to real currants.
They diverge in the botanical order: they’re not even cousins.
Currants: order Saxifragaceae, family Grossulariaceae, Genus Ribes.
Grapes: order Vitales, family Vitaceae, Genus Vitis.
Grapes grow on vines and are sweet. Currants grow on bushes and are quite tart.
More importantly, raisins have little or none of the black currant antioxidants studied in the research.
Zante currants are the dried form of an ancient Greek grape variety properly called the Black Corinth, Vitis vinifera, the smallest of the seedless grapes.
They come from the third largest Ionian Island called Zakýnthos, which is often called Zante. The variety is named for Corinth, the Greek city where they were grown more than 2,000 years ago.
The Cause Of The Confusion
After the commercial cultivation of currants was outlawed in 1911, currants dropped off the culinary radar screen. In the 1920s, Greece began to export small dried seedless grapes, one-fourth the size of the average raisin, from the area of Corinth.
On the arrival of the first shipment to the U.S., the Greek writing for the word “Corinth” was mistakenly translated at the pier into “currant.”
Since the growing of real currants had been banned for quite a few years at that point, the name stuck. Generations of Americans have become accustomed to cooking and baking with “currants” (often labeled “Zante currants”) which are really tiny raisins.
What About Red Currants?
Red currants are true currants. They are more tart than black currants, so are less desirable for juice.
But for baking and recipes where sugar is added, the two are interchangeable.
Fresh red currants are popular garnishes, adding a touch of scarlet to everything from cocktails to desserts.
|
|
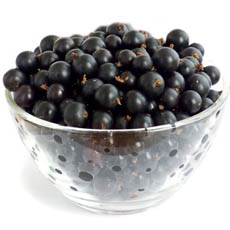
[1] Fresh-picked black currants (photos #1 and #3 © Currant C). .
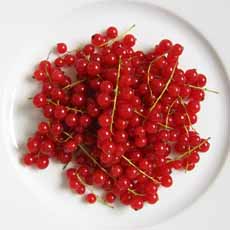
[2] Red currants are more tart than black, so less desirable for juice. (photo courtesy Rose Vita | Morguefile).).
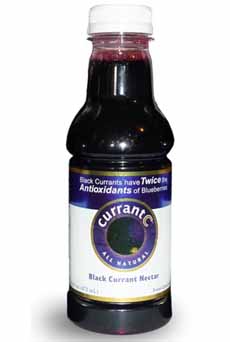
[3] Currant C, delicious black currant juice, needs no added sweetener. It can be bought as bulk concentrate, much more affordable per serving.

[4] Homemade blackcurrant jelly made from hand-picked wild currants (here’s the recipe from Made by Jayne).
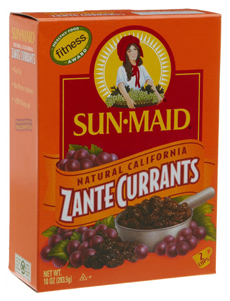
[5] Zante currants are not currants (photo © Sun-Maid).
|