THE NIBBLE BLOG: Products, Recipes & Trends In Specialty Foods


Also visit our main website, TheNibble.com.

TIP OF THE DAY: One-Pan Main & Side (Lamb & Zucchini)

Our pots and pans don’t go into the dishwasher: They need to be hand-washed.

While hot sudsy water and a Scrub Daddy do the job, we wouldn’t overlook the opportunity to save our manicure.

So we were all ears when Good Eggs sent us this recipe to cook the main and the side in one dish. Home cooks have been doing this for years—but not the cooks in our family.

With great enthusiasm we made this recipe, and then ordered a couple of books on one-pan cooking to see how we could make kitchen life easier (recommendations below).
 
 
RECIPE: LAMB & ZUCCHINI WITH GREEK ACCENTS

We love lamb and Greek cuisine with its accents of lemon and mint, so we didn’t wait to try it. In 30 minutes, we were ready to dig in.

Note that this is a skillet recipe for the stove top, not a sheet pan recipe for the oven.

Ingredients For 2 Servings

  • 2 lamb chops (we used two per person)
  • Salt and pepper
  • Olive oil
  • 1 pound zucchini, cut into 1-inch chunks
  • ½ cup plain yogurt
  • 1 garlic clove, ground to a paste
  • ½ lemon, juiced
  • 1 handful mint, roughly chopped (substitute basil)
  • 1 to 2 tablespoons red wine vinegar
  • Flaky salt
  •  
    Preparation

    1. SALT and pepper both sides of each lamb chop and set aside. Add about ½ cup olive oil to a cast iron pan and heat over high. When the oil is hot (almost to the point of smoking), carefully add the zucchini in one layer and cook on high heat until browned, flipping so both sides are crispy and deeply golden-brown.

    2. USE a slotted spoon to remove the zucchini from the pan; place on a plate and set aside.

    3. COMBINE the yogurt, garlic, lemon and a tablespoon of the mint in a clean bowl. Add salt and pepper to taste. Set aside.

    4. POUR off some of the oil from the zucchini pan, leaving a thin layer on the bottom. Turn the burner to high. When the oil is hot, add the chops and cook for about 4 to 5 minutes on each side. Check for doneness—you want it still a bit pink in the middle.

    If the chops sear before the meat cooks through, pop the pan into a 400°F oven until they are cooked to your liking. For medium-rare, the temperature should be 145°F on a meat thermometer.

    5. FINISH the zucchini: Sprinkle with the red wine vinegar, add the rest of the mint, and a few pinches of flaky salt to taste. Arrange the chops and the zucchini on a platter and serve with the yogurt sauce.

      One Pan Cooking
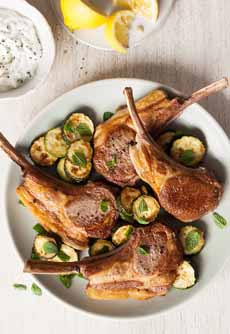
    [1] Lamb chops and zucchini, a one-pan dinner (photo © Good Eggs).

    One Pan & Done Cookbook
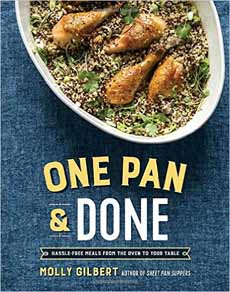
    [2] One Pan & Done, an oven-to-table cookbook (photo © Clarkson Potter).

    One Pan Wonders Cookbook
    [3] One-Pan Wonders for casserole, Dutch oven, pan, skillet and slow cooker (photo © Cook’s Country).


    ONE-PAN COOKBOOKS

  • One Pan & Done: Hassle-Free Meals from the Oven to Your Table
  • One Pan, Two Plates: More Than 70 Complete Weeknight Meals for Two
  • One-Pan Wonders: Fuss-Free Meals for Your Sheet Pan, Dutch Oven, Skillet, Roasting Pan, Casserole, and Slow Cooker
  • Sheet Pan Suppers: 120 Recipes for Simple, Surprising, Hands-Off Meals Straight from the Oven
  •   

    Comments off

    RECIPE: Carrot Cupcakes with Cream Cheese Frosting

    Mini Carrot Cupcakes
    [1] and [2] Mini carrot cupcakes are a lighter version of dense carrot cake. Here’s the recipe (photos © Kraft).


    [2] These carrot cupcakes have a pinch of ginger and spiced cream cheese frosting. Here’s the recipe.

    Carrots
    [3] Shred extra carrots and add them to a salad (photo © Stylepresso).

    Lactose Free Cream Cheese
    [4] Lactose intolerant? Use Green Valley Organics’ lactose-free cream cheese. You can also substitute ghee for butter, at a 1:1 ratio (photo © My Lilikoi Kitchen).


    Yesterday we made carrot cupcakes. Mini ones. With a recipe from Kraft.

    While we usually dig into a slice of dense loaf cake instead of airy cupcakes, we deemed these just right for Easter week.

    We don’t add pineapple to our carrot cake, but the fruitiness was just perfect in these cupcakes.

    Bring them to work, bring them to neighbors, or enjoy the entire batch at home.
     
     
    A BRIEF HISTORY OF CARROT CAKE

    According to the Carrot Museum in the U.K., food historians believe that modern carrot cake most likely descended from medieval carrot puddings.

    During the Middle Ages, sugar and other sweeteners were expensive and difficult to come by, and carrots had long been used for their sweetness.

    Printed recipes for carrot pudding have been found as far back as 1591, but no reference to carrot cake appears until the 19th century. Thus, we don’t know how cake got to here from there.

    In the New York Cookbook (1992), Molly O’Neill says that in 1783, George Washington was served a carrot tea cake at Fraunces Tavern in lower Manhattan.

    She notes that an adaptation of that early recipe, which was printed in The Thirteen Colonies Cookbook (1975), is quite close to the carrot cakes of today.

     
    RECIPE: MINI CARROT CUPCAKES

    Ingredients

    For The Cake

  • 3 eggs plus 1 egg white
  • 1-1/4 cups sugar
  • 1 cup vegetable or canola oil
  • 1/2 cup applesauce
  • 2 teaspoons ground cinnamon
  • 1/4 teaspoon ground nutmeg
  • 1/4 teaspoon salt
  • 1 teaspoon baking powder
  • 1 teaspoon baking soda
  • 2 cups all-purpose flour
  • 2 cups grated carrots
  • 1/2 cup crushed pineapple, including juice
  • Optional: 2/3 cup crushed pecans, plus more for optional garnish
  •  
    For The Cream Cheese Frosting

  • 1 package (8 ounces) cream cheese, softened
  • 1/2 cup (1 stick) butter, softened
  • 1 teaspoon vanilla extract
  • 4 cups powdered sugar
  • 2 to 3 tablespoons whole milk
  •  
    Preparation

    1. PREHEAT the oven to 350°F. Combine and mix the eggs, egg white, sugar, oil and applesauce in a mixing bowl.

    2. COMBINE all the dry ingredients in a separate bowl. Add the egg mixture to the dry ingredients and beat together. Add the carrots, pineapple, and pecans and mix again. Spoon into 24 lined muffin cups, filling about 2/3 full.

    3. PLACE the pan on the middle oven rack and bake for 20 minutes, until a toothpick inserted into the middle comes out clean. Remove from the oven and let cool for 5 minutes; then remove from the pan. Allow the cupcakes to cool completely on wire racks before frosting.

    4. MAKE the frosting. In a large mixing bowl cream together the butter, cream cheese and vanilla extract. Gradually beat in the powdered sugar. Add milk to the desired consistency. (Don’t make it too thin or the frosting will slide off the cupcakes.)

    5. FROST the cupcakes with a small spatula, or use a pastry and tip for a fancier presentation (you can use a plastic bag with no top, as shown in photo #2). Garnish with crushed pecans, if desired.


    Comments off

    Overnight Breakfast & Brunch Casseroles: Cinnamon Buns & Blueberry Muffins

    February 21st is National Sticky Bun Day. Sticky buns and cinnamon rolls were the biggest treat of our childhood breakfasts: Better than waffles or pancakes.

    The Horn & Hardart Automat, Americas’s first fast food chain, had such popular items that customers clamored to take them home. They set up a retail arm to package and sell some of them in retail stores.

    Our family devoured many boxes of the honey buns. Today, they’d be called pecan sticky buns.

    Below:

    > Cinnamon buns, honey buns, and sticky buns: the difference.

    > Recipe: The easiest way to make cinnamon buns is an overnight cinnamon bun casserole.

    > The difference between rolls and buns.

    > Recipe: overnight blueberry muffin casserole.

    > The history of sticky buns.

    Elsewhere on The Nibble:

    > The year’s 116 breakfast holidays.
     
     
    CINNAMON BUNS VS. STICKY BUNS: THE DIFFERENCE

    The terms are often used interchangeably, but there are two categories of sweet yeast buns: cinnamon buns and honey (now called sticky) buns. Other terms include cinnamon rolls, cinnamon swirls, honey buns, and sticky buns, among others (cinnamon pecan rolls, e.g.).

    All are made with a cinnamon swirl inside; they may have raisins as well.

    But a honey bun or sticky bun needs to have a sticky topping: caramel, honey, maple syrup, or sugar syrup. These typically have a garnish of nuts. Those topped with white icing fall into the cinnamon bun category.

    See a comparison of the two in photo #7, below.

    Only the sticky bun has its own holiday.

    Now: What if you could bake a pan of sticky buns or cinnamon buns with ease, and bring them to the table warm and fragrant?

    If this sounds like your kind of good time, McCormick has created the easiest recipe, an “overnight” casserole. But below we have recipes for:

  • Overnight Cinnamon Rolls Casserole
  • Overnight Lemon Blueberry Muffin Casserole
  •  
     
    THE EASIEST WAY TO MAKE “CINNAMON BUNS”

    Mix five ingredients together the night before—bread, milk, cinnamon, and vanilla—just 10 minutes of prep time.

    The next morning, just bake the casserole for 25 minutes until golden brown. It then gets a drizzle of cream cheese frosting: 30 minutes total.

    We served it yesterday, and a very good time was had by all—with some leftover for today.

    While the recipe is a casserole, you slice it into square, bun-size pieces. The difference:

  • Conventional buns are individually shaped and then baked together side-by-side in a pan, and then pulled apart.
  • The casserole has bread cubes like a bread pudding. It bakes as a whole and is then cut into pieces.
  •  
     
    RECIPE #1: OVERNIGHT CINNAMON ROLLS CASSEROLE

    Ingredients For 12 Servings

  • 12 eggs
  • 1-1/2 cups plus 3 tablespoons milk, divided
  • 2 tablespoons ground cinnamon, divided
  • 5 teaspoons pure vanilla extract, divided
  • 1/4 teaspoon baking powder
  • 1 loaf brioche or challah bread, cubed
  • 1/4 cup butter, melted
  • Cooking spray
  • 1/4 cup firmly packed brown sugar
  • 1/2 cup whipped cream cheese
  • 3 tablespoons confectioners sugar
  •  
    Preparation


    Cinnamon Roll Casserole
    [1] and [2] Overnight Cinnamon Roll Casserole. See the process step by step, from Gimme Some Oven (photos #1 and #2 © Gimme Some Oven).

    Cinnamon Roll Casserole
    [2] You can also serve the casserole as a dessert, with vanilla or cinnamon ice cream. You can even add a sprinkle of Grand Marnier.


    [3] Sticky buns have a honey or other sticky topping, with chopped nuts. You can get them from Wolferman’s (photo © Wolferman’s).

    Cinnamon Rolls
    [4] Conventional: A pan of cinnamon buns with their conventional glaze. Here’s the recipe from The Baker Chick (photo © The Baker Chick).

     
    1. WHISK the eggs, 1-1/2 cups of the milk, 1 tablespoon of the cinnamon, 3 teaspoons of the vanilla, and the baking powder in a large bowl until well blended. Add the bread cubes and toss to coat well.

    2. GENTLY POUR into a 13″ x 9″ baking dish, sprayed with no-stick cooking spray. Cover and refrigerate for at least 4 hours or overnight.

    3. PREHEAT the oven to 350°F. Remove casserole from the refrigerator. Mix the melted butter, brown sugar, and remaining 1 tablespoon of cinnamon in a small bowl until well blended. Drizzle the over casserole. Let stand 10 to 15 minutes.

    4. BAKE for 20 to 25 minutes or until golden brown. Meanwhile…

    5. MAKE the cream cheese topping. Mix the cream cheese, confectioners sugar, and remaining 2 teaspoons of vanilla in a small bowl until smooth. Slowly stir in the remaining 3 tablespoons of milk.

    6. REMOVE the casserole from the oven and let stand for 5 minutes. Drizzle over the casserole before serving.
     
     
    ROLL OR BUN: THE DIFFERENCE

    There are many Standards Of Identity defined by the USDA and the FDA, but buns and rolls are not among them.

    Thus, there is no official answer. According to the American Institute of Baking:

  • A roll is usually a hard-crusted small bread, such as French rolls and Kaiser-rolls. However, some hard-crusted individual breads are soft, like hot dog rolls.
  • A roll can also contain a filling, such as cinnamon rolls (which, in many areas, are sold as cinnamon buns) and Danish rolls.
  • A bun is generally more bread-like in shape (round or elongated) and soft. It typically does not contain a filling. An exception to this is hot-cross buns.
  •  
    So the answer is, there is no answer. Historic, regional, and family traditions often determine what is a bun and what is a roll.

    You may buy hot dog and hamburger rolls, for example; we buy buns.


    McCormick Blueberry Muffin Casserole
    [5] Lemon Blueberry Muffin Casserole (photo © McCormick).

    Blueberry Muffin Casserole
    [6] A conventional blueberry muffin (here’s the recipe from Unwritten Recipes).


    RECIPE #2: OVERNIGHT LEMON BLUEBERRY MUFFIN CASSEROLE

    If you prefer blueberry muffins to cinnamon buns, McCormick adapted the muffin concept as well.

    Prep time is 15 minutes the night before, and cook time is 30 minutes.

    Ingredients For 12 Servings

    For The Streusel Topping

  • 1/2 cup firmly packed light brown sugar
  • 1/2 cup flour
  • 2 teaspoons ground cinnamon
  • 1/4 cup (1/2 stick) cold butter, cut into chunks
  •  
    For The Casserole

  • 6 eggs
  • 1 cup plus 2 tablespoons milk, divided
  • 1/4 cup plus 2 tablespoons granulated sugar, divided
  • 1 teaspoon ground cinnamon
  • 1 loaf French or Italian bread, cut into 1-inch cubes (about 8 cups)
  • Cooking spray
  • 1 package (8 ounces) cream cheese, softened
  • 1 tablespoon pure lemon extract*
  • 2 cups blueberries, divided
  •  
    Preparation

    1. MAKE the streusel: Mix the brown sugar, flour, and cinnamon in a medium bowl. Cover and set aside until ready to assemble in the morning.

    2. MAKE the casserole: Whisk together the eggs, 1 cup of the milk, 1/4 cup of the granulated sugar and the cinnamon in a large bowl until well blended. Add bread cubes and toss gently to coat.

     
    3. POUR evenly into 13″ x 9″ baking dish sprayed with no-stick cooking spray.

    4. MIX the cream cheese, the remaining 2 tablespoons each of milk and sugar, and the lemon extract in a medium bowl, until well blended. Gently stir in 1 cup of the blueberries. Spread evenly on top of bread cubes. Top with the remaining 1 cup of blueberries. Cover and refrigerate overnight.

    5. PREHEAT the oven to 350°F. Remove the casserole from the refrigerator and let stand for 10 to 15 minutes. Meanwhile…

    6. CUT the butter into the streusel mixture with a pastry blender or 2 knives, until the mixture resembles coarse crumbs. Sprinkle over the casserole. Bake for 30 minutes or until golden brown. Let stand 5 minutes before serving.
     
     
    THE HISTORY OF STICKY BUNS

    Sticky buns have a Germanic origin, where they originated as yeast pastries called schnecken†. The breakfast pastry was brought to Philadelphia in the 18th century by German immigrants, who became known as Pennsylvania Dutch (a mishearing by English speakers of “Deutsch,” German).

    Schnecken were made from a rich yeast dough enriched with egg, sour cream, and butter. A pastry the size of a modern sticky bun or cinnamon roll (a normal one, not Cinnabon), they were filled with sugar, cinnamon, raisins, and ground pecans or walnuts or pecans.

    Many Germans arrived in the U.S., bringing their schnecken with them. Schnecken became popular among bakers in Germantown, a Philadelphia suburb, as early as the 1680s. They (and their subsequent name, sticky buns) are considered a Philadelphia specialty.

    There’s no record of exactly when English-speaking Philadelphians started calling them “sticky buns.” In some cities they were called honey buns, referencing the honey that created the stickiness.

    The sticky top is the result of an upside-down baking technique. Before the dough is placed in the baking pan, the pan is lined with the sticky ingredients—brown sugar, honey or both—as well as nuts and raisins. After the buns are baked, the pan is inverted so that the caramelized “bottom” becomes the top of the pastry. This is the original German schnecken technique.
     
    Sticky Bun-Cinnamon Bun Comparison
    [7] Sticky bun, front left, with pecans; and cinnamon bun, front right, with white icing (photo © Wolfermans).
     
    ________________

    *You can substitute twice as much lemon zest (2 tablespoons) for the lemon extract. You can also make your own lemon extract by soaking lemon zest in vodka for two weeks, and then straining out the zest.

    German schnecken are different from German-Jewish schnecken. The latter are rugelach (a cookie) rolled in a snail shape. Both yeast-pastry schnecken and Jewish cookie schnecken existed simultaneously in Germany. Immigrants to the U.S. from Eastern Europe (Poland, Russia and the Ukraine) called their version of schnecken—the same cookie dough, rolled in a different shape—rugelach.

    Jewish schnecken/rugelach are made with a cream cheese cookie dough, not a yeasted dough (although cream cheese, invented in the U.S., was not known in Europe). These rolled cookies can be filled with any types of jam or with chocolate; simply with cinnamon and raisins.


    CHECK OUT WHAT’S HAPPENING ON OUR HOME PAGE, THENIBBLE.COM.


    Comments off

    TIP OF THE DAY: Make Easter Eggs Filled With Cake!

    Steph of The Cupcake Project created a recipe called How to Make Cupcakes in Egg Shells.

    But, if you decorate the eggs before serving, you have Easter Egg Surprise: an egg with cake inside.

    It’s fun and memorable: Most people won’t have seen anything like it.

    Here’s the recipe.

    We took it one step further, using white eggs and decorating them.

    This protects everyone from any bacteria on the egg, and protects the eggshells from any oils on hands that may prevent the dye from adhering.
     
     
    HOW TO DECORATE CAKE EGGS AFTER THEY’RE COOKED

    We used a wide paintbrush and took the advice of Incredible Egg to use water warmer than the eggs.

    They also caution that hands should be washed in hot, soapy water before and after handling eggs—even if they’ve already been cooked or decorated.

    Because a hole has been punched into the top of the shells to insert the cake batter (photo #1), you can’t fully dip cooked cake eggs in dye (well…maybe if you use dark chocolate cake, a bit of color won’t show).

    Instead, you can try one of these three techniques.

  • Option 1: Try this if you have an exceedingly nimble grip, and can hold the eggs at the top while dipping them into the dye. We filled a juice glass with dye (diluted in water) that would not reach the top of the egg when the egg was added to the glass. The narrow glass held the egg upright. We could lift the egg out using doctors’ gloves and a spatula, but it wasn’t easy.
  • Option 2: We next moved to the hand-painted approach. Using wide hobby paintbrushes, we placed food coloring in ramekins, placed the egg upright on a nonslip mat and held it with one hand, as we painted swaths of color with the other.
  • Option 3: We didn’t try this one for lack of time, but we think it will work and could be the easiest. Dye the eggshells before adding the cake batter, and bake the cake in the colored shells. The cake eggs bake at 350°F for 23 minutes, so they should retain their colors.
  •  
    You can practice the first two techniques with the raw eggs in your fridge (and return them for subsequent cooking).

    Or, you can color whole eggs and then bake them in the oven to get hard boiled eggs.

    The hard boiled eggs look and taste the same.
     

    THE HISTORY OF EASTER EGGS

    The tradition of painting hard-boiled eggs during springtime pre-dates Christianity. Fertility and rebirth are fundamental to life—not just for people but for the crops and animals that sustain them.

    The most ancient known decorated eggs are 60,000 years old: engraved ostrich eggs found in Africa. Decorated eggs have also been found from prehistoric Egypt and the early cultures of Mesopotamia and Crete [source].

      Cake Easter Eggs
    [1 & 2] It’s an egg. No, it’s a little cake (photos © Cupcake Project). Use white eggs if you plan to color them.

    Cake Easter Eggs

    Dyed Easter Eggs
    [3] Here’s how to get these beautiful colors, from Urban Comfort (photo © Urban Comfort).

     
    Easter was a pagan holiday adopted by Christians; it has no relation to Christ.

    The Christian custom of Easter eggs began among the early Christians of Mesopotamia, who stained eggs with red dye in memory of the blood of Christ (more).

    The Easter holiday itself is named for the Germanic goddess Eostre (Eostra, Eostur, Ostara, Ostare, Ostern and other names), a fertility goddess. Her name derives from the ancient word for spring, eastre,

    She was very popular with Anglo-Saxon pagans in Brittania as well, many of whom were descended from Germanic tribes who migrated to the island.

    Eostre’s sacred animal is the rabbit, a symbol of fertility; and the egg is her symbol of fertile purity, both of which involve the spring and new birth.

    In Old German, the month of April was called Ostar-manod: Easter month, or month of the Goddess Eostre. In Old English, it became Easter-monab (pronounced eh-AH-ster moh-NATH).

    The English word April derives from the Latin aperire, to open (e.g. buds).


    Comments off

    FOOD FUN: Passover Matzoh

    Chopped Chicken Liver & Matzoh

    Chopped Chicken Liver & Matzoh

    Chopped Chicken Liver & Matzoh
    [1] Chopped chicken liver on matzoh: a classic. Here’s the recipe from Williams-Sonoma. [2] A deconstructed version from Chef Alex Guarnashelli at Butter restaurant. [3] Mr. Alpenglow created his recipe, inspired by Guarnashelli’s. Here’s the recipe.


    When is a piece of matzoh with chopped chicken liver (photo #1) greater than the sum of its parts?

    When creative chefs turn it into something spectacular.

    Here, the first idea (photo #2) inspired the second (photo #3).

    Chef Alex Guarnaschelli of Butter in New York City tops a board of matzoh with:

  • Chicken liver mousse
  • Crispy shallots
  • Concord grape jelly
  • Schmaltz vinaigrette
  • Parsley leaves
  •  
    As an alternative to the grape jelly and the crispy shallots, we made these honey-balsamic roasted red onions from Chef Tyler Florence:

    RECIPE: HONEY BALSAMIC ONIONS

    Ingredients

  • 6 tablespoons butter
  • 3 tablespoons balsamic vinegar
  • 1/2 cup honey
  • 1/2 bunch fresh thyme
  • Salt and freshly ground black pepper
  • 4 red onions, halved
  •  
    Preparation

    1. PREHEAT the oven to 350°F.

    2. COMBINE the butter, vinegar, honey, thyme, salt, and pepper in a small saucepan over medium heat. Bring to a boil, turn down to simmer and cook for 1 minute to reduce slightly.

    3. PLACE the onions, cut sides up, in a single layer on a baking pan. Drizzle with the honey butter mixture over and roast until soft and slightly caramelized, about 45 minutes.
     
    THE SECOND RECIPE

    Try this recipe (photo #3) from Mr. Alpenglow.
     
    CREATE YOUR OWN

    Schmaltz and gribenes, anyone? Or how about foie gras?

    Here are reciped for the first two, and the history of chopped chicken liver.


    Comments off

    The Nibble Webzine Of Food Adventures
    RSS
    Follow by Email


    © Copyright 2005-2026 Lifestyle Direct, Inc. All rights reserved. All images are copyrighted to their respective owners.