|
October 27th is National Potato Day. For your nibbling pleasure, we present a classic of French cuisine.
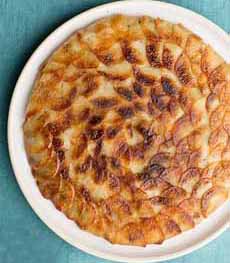
Pommes Anna (photo #1), sometimes known in English by the less melodic Anna Potatoes, is a French potato casserole beloved for its crispy edges. It is presented as a beautiful round, then served in slices.
It’s a special-occasion dish (think ahead to Thanksgiving and Christmas) that can also be served for a family dinner.
Slices of waxy potatoes are overlapped in a casserole dish, covered with clarified butter and baked. For maximum crispness, the entire contents are turned upside down three-fourths of the way through cooking (the recipe below skips this step but if you’re comfortable flipping the entire casserole, go for it).
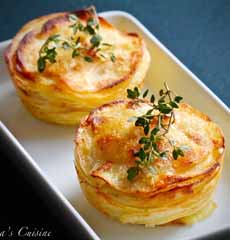
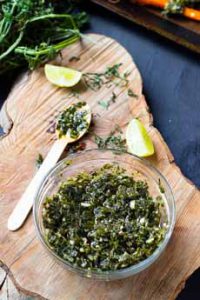
Some people season the dish with garlic and rosemary. In the recipe below, the folks at Castello Cheese cooked the potatoes in a rectangular dish to cut into “fingers” (photo #2), and added their specialty: blue cheese. You can substitute gruyère, or use half and half of two cheeses.
Today’s tip: Serve this rich, buttery potato dish as first course, placing a slice on a plate with a green salad tossed with Dijon vinaigrette.
The clean, crispness of the salad and acidity of the vinaigrette are a good counterpoint to the buttery, melt-in-your-mouth potatoes. Provide a peppermill for a spicy accent.
We like to put our food in historic context. So first…
THE HISTORY OF POMMES ANNA
Pommes Anna (pronounced PUM AH-nuh) was the creation of Adolf Dugléré, chef at a Parisian restaurant called Café Anglais.
The restaurant opened in 1802 at the corner of the Boulevard des Italiens and the Rue de Marivaux, in the 13th arrondissement. It was named in honor of the Treaty of Amiens, a peace accord signed between Britain and France.
Its early clientele were working folks: coachmen and domestic servants. It later became frequented by performers and patrons of the nearby opera house.
In 1822 the new proprietor, Paul Chevreuil, turned Café Anglais into a fashionable restaurant with a reputation for roasted and grilled meats. It was after the engagement of chef Adolphe Dugléré that the cuisine achieved high acclaim, and was then frequented by the wealthy and the aristocracy.
The interior of the building was elaborately decorated with furniture in mahogany and walnut woods, and mirrors with gold leaf patina. There were 22 private rooms and lounges.
One food historian noted that “…the Anglais was a great supping place, the little rabbit hutches of the entresol [mezzanine] being the scene of some of the wildest and most interesting parties given by the great men of the Second Empire” [source].
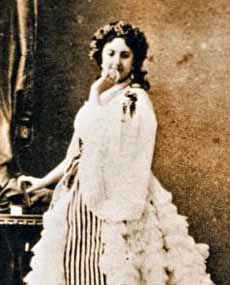
Pommes Anna is just one the chef’s enduring contributions to French gastronomy. The dish was named after Anna Deslions (photo #4), an actress and famed courtesan of the Second Empire (1852-1870), who held regular gatherings at the café. (One of her patrons was Prince Napoléon, cousin of Napoléon III [source].)
Anna is said to be the model for Emile Zola’s Nana. She was no elegant courtesan, though. She was rough, vulgar, very low-born…and made no apologies.
She was no beauty either: plain-looking and chunky, not talented as an actress but with “something that takes the place of everything else.” Thinly-veiled, Zola describes her as having “the deadly smile of a man-eater” [source].
What happened to her? She blew through a fortune in cash, gold and jewels, was dropped by millionaire after millionaire, and ultimately became yesterday’s news.
But in her heyday, she was a good customer of Café Anglais, and she ostensibly loved her potatoes and butter. Hence: Pommes Anna.
RECIPE: POMMES ANNA WITH EXTRA CREAMY DANISH BLUE CHEESE
With or without gruyère, this dish is has been called Scalloped Anna Potatoes in the U.S. Some restaurateurs also call it Anna Potato Pancake.
We prefer its more elegant given name: Pommes Anna (photo #2).
Ingredients for 4 servings
2.2 pounds waxy potatoes, washed, peeled, very thinly sliced and patted dry
2/3 cup butter, melted
1/3 cup Castello Extra Creamy Danish Blue cheese, cut into 1/2-inch cubes
Salt and freshly ground black pepper, to taste
Preparation
|