THE NIBBLE BLOG: Products, Recipes & Trends In Specialty Foods


Also visit our main website, TheNibble.com.


It’s National Sour Candy Day: What’s Your Favorite Sour Candy?

Tin Of Charms Sour Balls
[1] Sour balls: the original sour candy (photo © Tootsie Roll Inc.).

Bowl Of Lemon Heads Hard Candy
[2] Lemon Heads, a candy to pucker for (photo © Hampton Popcorn Company).

Bowl Of Sour Patch Kids Candy
[3] Sour Patch Kids combined sour with chewy (photo © Edelweiss).

Bag of Sour Belts Candy
[4] Sour Belts in the rainbow flavor (photo © First Choice Candy Store).


THE HISTORY OF SOUR CANDY

When we were growing up, in the pre-digital era, there was one type of sour candy: sour balls, hard round so-called “sucking candies.”

Hard sour candies can trace their lineage to the lozenges of the 1700s. Citric acid, a component of lemon juice, provided plenty of tartness.

Sour balls and other “penny candy” became popular in the mid-1800s [source].

Sour candy-making began in the 19th century. By the end of the 19th century, a love of hard sour candy had spread to the U.S.

By the 1980s, the hard candies were joined by chewy sour candies and gummy sour candies. Check out the Top 10 best-tasting sour candies, below.

But back to the beginning of America’s sour craze:

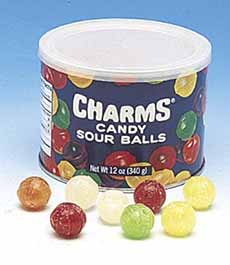
The 1950s had Charms Sour Balls, the best-known brand of the hard round hard candies. The then-standard flavors were orange, grape, lemon, and lime (photo #1). Today’s Charms Sourballs are made in Cherry, Lemon, Lime, Orange, Pineapple, and Raspberry.

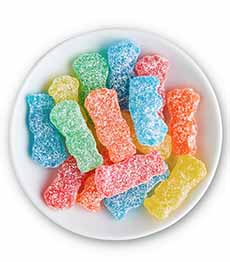
In 1962, Lemon Heads appeared: a hard, round ball made with real lemon juice, causing quite the pucker (photo #2). They were introduced by the Ferrara Candy Company, which also sells Nerds, Trolli, SweeTarts, Brach’s, and other popular candy brands.

America’s sugar-sweet palate was warming to embrace sour.

The 1970s and 1980s were big growth years for sour candy.

In the 1970s Sour Patch Kids were first introduced in Canada, making their way to the U.S. in the mid-1980s to the joy of hundreds of thousands of kids, and maybe a few adults.

Warheads were invented in Taiwan in 1975 and first imported to the United States in 1993.

The 1980s saw a great sour candy event: The Trolli brand of sour gummy worms was invented in Germany.

In the 1990s a new shape emerged: Sour Punch fruit-flavored straws.

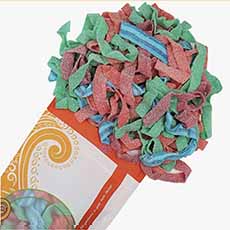
In 1921 the most recent entry, Sour Belts, was launched in Canada. It was ranked the #2 best-tasting sour candy (see the list below).
 
 
Who Invented National Sour Candy Day?

The American Licorice Company—which makes the Sour Punch and Sour Straws candy lines—founded National Sour Candy Day in founded in 2015.

National Sour Candy Day celebrates those mouth-puckering fruit flavors that we can’t get enough of.
 
 
TODAY’S TOP-TASTING SOUR CANDIES

Here’s a Top 10 ranking of sour candies by taste, conducted by Thrillist. Here’s the full article.

1. Trolli Sour Brite Crawlers
2. Sour Belts
3. Haribo Sour S’ghetti
4. Star Mix Twin Snakes
5. Haribo Sour Gummy Worms
6. Extreme Sour Sweet Tarts
7. Sour Punch
8. Sour Skittles
9. Sour Patch Kids
10.Airheads Xtremes

Pucker up, America!
And check out the 50 national candy holidays.


CHECK OUT WHAT’S HAPPENING ON OUR HOME PAGE, THENIBBLE.COM.


Comments off

Caviar Parfait & More Caviar Recipes For National Caviar Day

How about a Caviar Parfait for July 18th, National Caviar Day?

Here’s a recipe from California Caviar Company, which sells every type of caviar that makes our heart flutter.

> The different types of caviar: a glossary.

> Affordable caviar.

> See more caviar recipes below.
 
 
RECIPE: CAVIAR PARFAIT

California Caviar made this parfait with three different caviars/roes*: paddlefish sturgeon caviar, trout roe, and saffron-infused whitefish roe.

But you can use any type. We made it twice: once with salmon caviar (ikura) and once with flying fish roe (tobiko).

Prep time is 30 minutes.
 
Ingredients For 4 Servings

  • 2 whole eggs
  • ½ cup crème fraîche
  • 1 teaspoon lemon zest
  • 2 tablespoons chives, finely chopped
  • 3 tablespoon butter
  • 5 brioche slices, ½” thick
  • Kosher salt
  • Black pepper
  • 1 ounces trout roe
  • 1 ounces saffron-infused whitefish roe
  • 1 ounces paddlefish roe
  •  
    Preparation

    1. HARD-BOIL the eggs. Place them in a pot covered with cold water. Bring to a boil and cook for 5 minutes. Remove from the heat and let them sit in hot water for 10 minutes.

    2. TRANSFER the eggs to an ice bath to chill. Once cool, peel the eggs and press them through a sieve with a wooden spatula.

    3. MIX 1/4 cup of the crème fraîche with lemon zest and season with salt and pepper.

    4. TRIM the crusts from the brioche slices and cut them into four pieces to make the soldiers. In a skillet, melt butter over medium heat and toast brioche sticks until all sides are golden brown.

    5. DIVIDE the ingredients evenly among four small parfait cups or aperitif glasses. Layer them starting with trout roe, then crème fraiche, chives, saffron-infused whitefish roe, egg, another teaspoon of crème fraiche, and finally topping with paddlefish. Serve with toasted brioche sticks, a.k.a. toast fingers, or toast soldiers.
     
     
    MORE CAVIAR RECIPES

  • Baby Potato Bites With Salmon Caviar
  • Bacon-Infused Caviar
  • Beggar’s Purses
  • Caviar & Smoked Salmon Sandwich
  • Caviar Cigar
  • Caviar Cocktail Garnish
  • Caviar Ice Cream Cone
  • Chocolate Caviar Tartlet
  • Christmas Sushi & Sashimi With Caviar
  • Cocktail Omelets With Trout Roe
  • Corn Pancakes With Smoked Salmon & Caviar
  • Deluxe Deviled Eggs
  • Empty Crab Legs With Caviar
  • Lobster Roll With Caviar
  • Lobster-Topped Guacamole With Caviar
  • Oysters & Pearls
  • Raw Scallops & Caviar
  • Red Caviar Hearts
  • Salmon Caviar Bagel
  • Scallops, Beets & Caviar
  • 7-Layer Bites With Caviar & Smoked Salmon
  • Soft-Boiled Eggs With Caviar
  • Steak & “Eggs”
  • Tobiko Caviar Garnish
  • Quail Egg & Caviar Croustades
  •  

    Caviar Parfait As A First Course
    [1] Caviar parfait, an elegant first course (photos #1 and #2 © California Caviar Company).

    Six Different Colors Of Caviar (Infused Roes)
    [2] Different colored caviars can make an attractive presentation. From top left, clockwise: smoked trout roe, paddlefish roe, wasabi-infused whitefish roe, flying fish roe, salmon roe, whitefish roe.

    Toast Fingers or Toast Soldiers, Dipping Into A Soft-Boiled Egg
    [3] Toast soldiers can be enhanced with ham, cheese, smoked salmon, and other ingredients. See how here (photo © 30 Seconds).

    Salmon Caviar Creme Fraiche  Hors D'Oeuvre
    [4] An easy hors d’oeuvre: baby potato bites, bite-size boiled red jacket potatoes topped with crème fraîche and salmon caviar (photo © Fotolia).

     
    ________________

    *Caviar vs. roe: Roe are the eggs of a fish. They are also called berries, pearls, and grains. In addition to sturgeon roe, roe from several different species of fish are enjoyed by consumers: keta roe from the keta salmon; masago from the smelt, tobiko from the Icelandic flying fish, avruga from the Spanish herring, plus American roes from the bowfin, lumpfish, paddlefish, trout, and whitefish. In the caviar trade, once the roe has been removed from the fish and salted, it becomes caviar.

    †“Toast soldiers” is a British term that refers to strips of toast cut from a slice of toasted bread. In the U.S., we call them toast fingers or toast strips. The term “soldiers” arose because the strips are reminiscent of the formation of soldiers on parade. The toast is sliced in this manner so that it can be dipped into the opening of a soft-boiled egg that has had the top of its shell removed (see photo #3). However, it has found many other uses (see these snazzy toast soldiers). The first-known mention of the French term for toast soldiers, mouillettes (moo-YET, dip in English), is in an 1868 novel. The British term, “eggs with soldiers,” appears to date only from the 1960s, first appearing in a novel where it is used to eat soup. In 2005, The Daily Telegraph reported the invention of a device for cutting bread into soldiers. Shaped cutters that turn toast into human-like soldiers are also available [source].


    CHECK OUT WHAT’S HAPPENING ON OUR HOME PAGE, THENIBBLE.COM.


    Comments off

    Peach Frosé Ice Pops Recipe For National Peach Ice Cream Day

    Peach Frose Ice Pop
    [1] Strictly for grown-ups: Peach Frosé Ice Pops (photos #1 and #2 © Discover California Wines).

    Peach Frose Ice Pop Cocktail
    [2] Enjoy the pop straight or make a winetail (wine cocktail) by melting it into a glass of sparkling wine.

    Bowl Of Fresh Peaches
    [3] A summer bounty of fresh pieces (photo © Lum3M | Pexels).

    Bowl Of Sliced Peaches
    [4] While you’re slicing peaches for this recipe, slice a few more for fruit salad or an ice cream topping (photo © California Olive Ranch).

    Bowl Of Fresh Basil
    [5] Two leaves of fresh basil make an aromatic garnish for the cocktail (photo CO Public Domain).


    Peachy keen: July 17th is National Peach Ice Cream Day. It’s one of our favorite flavors, unfortunately, available only in summer months during peach season.

    But we’ve got recipes that can be made with fresh or year-round with frozen peaches:

  • Classic Peach Ice Cream
  • David Venable’s Peach Ice Cream With Sweetened Condensed Milk
  • Peach Ice Cream With Honey
  •  
    Today, we have a “relative of peach ice cream”: Peach Frosé Ice Pops.

    Frosé ice pops are great by themselves or as a fun addition to a glass of sparkling wine from California. As the ice pops melt, the flavors mix and mingle with the sparkling wine, creating a delightful cocktail experience.
     
     
    > The history of Frosé.

    > The history of ice cream.

    > The different types of ice cream and frozen desserts.

    > THe history of peaches.
     
     
    RECIPE: PEACH FROSÉ ICE POP & COCKTAIL

    These Peach Frosé Ice Pops use peaches (you can substitute canned cling peaches), peach nectar, and rosé wine, frozen in ice pop molds.

  • You’ll need 10 (2.5-ounce) freezer ice-pop molds and sticks, plus a blender.
  • Ice pops can be made 3 months ahead. Freeze until solid, then transfer to an airtight container and keep frozen.
  • If you can’t get fresh peaches, you can use frozen peach slices or 1 (24-ounce, 796 ml) jar of sliced cling peaches, drained, and divided.

    Thanks to Discover California Wines for the recipe. Check out all of their delicious recipes.
     
    Prep time is 15 minutes plus 8 hours of freezing (or overnight).
     
    Ingredients For 10 Ice Pops

  • 2 heaping cups (336 g) peeled and sliced ripe peaches, divided
  • 1-2/3 cups (425 ml) California dry rosé
  • 1/2 cup (150 ml) freshly squeezed orange juice
  • Optional: 2 tablespoons (30 g) granulated sugar
  •  
    For A Cocktail

  • Sparkling wine (we like sparkling rosé)
  • Garnish: slices of fresh peach or orange wheel
  • Garnish: 1-2 fresh basil leaves per cocktail
  •  
    Preparation

    1. PURÉE half of the sliced peaches, rosé, orange juice, and sugar on high speed in a blender until smooth. Strain through a fine-mesh sieve into a large measuring cup; discard any solids.

    2. DIVIDE the peach mixture among ice pop molds, leaving about 1″ space at the top. Freeze until slightly slushy, about 1 hour. Meanwhile…

    3. DICE the remaining peach slices into very small pieces. Stir the semi-frozen mixture with an ice pop stick or chopstick, then divide the remaining diced fresh peaches among the molds, stirring to incorporate well with the ice pop stick.

    4. COVER the molds, insert the sticks, and freeze until the ice pops are solid, at least 8 hours.

    To serve as a cocktail:

    1. PLACE the ice pop upside down into a wine glass. Pour 4 ounces (118 ml) of sparkling wine into the glass.

    2. GARNISH with fresh peach slices and/or an orange wheel.

    3. PLACE 1-2 basil leaves in the palm of your hand and slap your hands together to release the aroma of the basil. Drop the leaves into the glass and serve immediately.
     
     
    MORE FROSÉ COCKTAIL RECIPES (WINETAILS)

    A winetail is a wine cocktail, using wine instead of spirits. Of course, if you also want to add a splash of spirits to your winetail, we won’t tell.

  • Blueberry Frosé Cocktail
  • Classic Frosé Cocktail
  • Drinkable Frosé Sundae
  • Frosé Granita
  • Raspberry Frosé Cocktail
  •  


    CHECK OUT WHAT’S HAPPENING ON OUR HOME PAGE, THENIBBLE.COM.


    Comments off

    Cherry Chocolate Chip Ice Cream Recipe For National Cherry Day

    July 16th is both National Ice Cream Day and National Cherry Day. Combine the two and you get this delicious Cherry Chocolate Chip Ice Cream recipe.

    (July is National Ice Cream Month. National Chocolate Chip Day is May 15th.)

    Thanks to Gelson’s for the recipe. See more delicious Gelson’s recipes here.

    > The history of ice cream.

    > The different types of ice cream: a glossary.
     
     
    RECIPE: CHERRY CHOCOLATE CHIP ICE CREAM

    You can make this recipe up to three days in advance. You can create a depth of flavor in this sauce with the addition of bourbon (or substitute rum or cherry liqueur).
     
    Ingredients For The Cherry Sauce

  • 2 cups pitted, halved black cherries
  • ½ cup sugar
  • ¼ cup bourbon or water
  • 1 tablespoon lemon juice
  • Pinch salt
  •  
    Ingredients For The Ice Cream

  • 2 cups heavy cream
  • ¾ cup whole milk
  • ¾ teaspoon vanilla extract
  • 5 large egg yolks
  • ½ cup sugar
  • ¼ teaspoon salt
  • 2 ounces bittersweet chocolate, chopped
  • 1 teaspoon coconut oil (substitute olive oil)
     
    Preparation

    1. MAKE the cherry sauce: In a medium saucepan, combine all of the ingredients over medium heat and bring to a simmer for 20 minutes. Mash the cherries with a potato masher and simmer for another 10 minutes.

    2. ALLOW the sauce to cool for 10 minutes; then transfer it to a blender and purée. Transfer the sauce to an airtight container and refrigerate for 2 hours, or up to 3 days.

    3. MAKE the ice cream custard base: In a medium saucepan, combine the heavy cream, whole milk, and vanilla over medium heat. Bring the mixture to a simmer, whisking intermittently.

    Note: This can take up to 20 minutes. Try not to rush this process, or you’ll overheat the cream. While the cream is heating…

    4. COMBINE the egg yolks, sugar, and salt in a medium bowl and whisk vigorously until they have about doubled in size or become a little frothy and pale.

    5. REMOVE the simmering cream from the heat and allow it to cool for about 10 minutes. Pour the cream into the egg yolks in a slow, steady stream, whisking continuously, until they’re fully incorporated.

    6. TRANSFER the custard mixture back to the saucepan and warm it over medium-low heat, stirring gently, until the mixture thickens slightly and coats the back of a spoon.

    7. TRANSFER the custard to a clean bowl to cool. Once it has cooled to room temperature, cover the bowl with plastic wrap and put it in the refrigerator to cool for 1 hour, or up to 3 days.

    8. MAKE the ice cream: Combine the chopped chocolate and coconut oil in a double boiler over simmering water. Stir intermittently until the chocolate is melted. Set aside to cool.

    9. POUR the cold custard mixture into an ice cream machine and churn until it begins to thicken, 10 to 12 minutes.

    10. DRIZZLE in the melted chocolate and churn for an additional 2 minutes, or until the chocolate hardens. Drizzle in the cherry sauce and churn just until the sauce is swirled through the ice cream, but not fully combined.

    11. SERVE directly from the ice cream machine for soft serve, or put it in the freezer to firm up for about 6 hours.

  •  

    A Bowl Of Cherry Chocolate Chip Ice Cream
    [1] There is nothing better than homemade Cherry Chocolate Chip Ice Cream (photo © Gelson’s).

    Bowl Of Bing Cherries
    [2] This is the month to gather ye cherries while ye may (photo © Gaelle Marcel | Unsplash).

    Chopped Dark Chocolate Bar
    [3] Instead of chocolate chips or chunks, you can chop up a bar of fine dark chocolate (photo © Tetiana Bykovets | Unsplash).

    Heavy Cream Cartons
    [4] Heavy (whipping) cream does the trick. Do you know the different types of cream (photo © Wisconsin Dairy)?


    CHECK OUT WHAT’S HAPPENING ON OUR HOME PAGE, THENIBBLE.COM.


    Comments off

    Lobster Mac & Cheese Recipe For National Macaroni & Cheese Day


    [1] The recipe for this luxurious Mac & Cheese recipe is below photo © Cambria Style).


    [2] Don’t want to cook? Buy a good frozen mac & cheese (photo © Blake’s All Natural Foods).


    [3] A full-bodied white wine like Chardonnay pairs well with mac & cheese (photo © Tillamook Dairy Co-Op).


    [4] Some like it hot: This Lobster Mac & Cheese recipe includes cayenne chiles (photo © Melissa’s Produce).


    [5] Buy ramekins or small gratin dishes for individual presentations of mac & cheese (photo © DeLallo).


    July 14th is National Macaroni & Cheese Day. We love mac & cheese, and have published 19 recipes, including two for luxurious Lobster Mac & Cheese:

  • Lobster Mac & Cheese With Gnocchi
  • Lobster Mac & Cheese With Elbows & Havarti
  •  
    So why publish a third Lobster Mac & Cheese recipe?

    Because we love it! And each recipe varies: by the cheeses, seasonings, and macaroni shapes used.

    So join us in Lobster Mac & Cheese Recipe #3, and check out all of the other mac & cheese recipes.
     
     
    IS IT TIME FOR A MAC & CHEESE PARTY?

    Yes!

    Make four or five different recipes. Make one yourself and delegate the rest.

    Add a big salad with vinaigrette and lots of white wine and beer.

    After all that rich mac & cheese, serve a light dessert: fruit salad or sorbet. Or fruit salad topped with a scoop of sorbet!
     
     
    > The history of macaroni and cheese.
     
     
    RECIPE: LOBSTER MAC & CHEESE #3

    This recipe is from Cambria Style, a luxury lifestyle magazine from Cambria, the nation’s leading producer of elegant, American-made quartz surfaces.

    It differs from most mac & cheese recipes with the addition of fresh herbs. The Dijon mustard is also a flavorful touch.

    Serve this mac with a crisp Chardonnay.

    If you’re on a budget, you can use crumbled bacon instead of the lobster, adding it as a topping.

    Or, for a creative “surf and turf,” add the crumbled bacon on top of the recipe.

    Here are more modern surf and turf recipes.
     
    Ingredients

  • 3 tablespoons unsalted butter
  • 2 small or 1 medium shallot, minced
  • 3 tablespoons flour
  • 2 cups whole milk
  • ½ cup heavy cream
  • 2 tablespoons Dijon mustard
  • 2 cups white Cheddar
  • 1 cup Gruyère
  • 2 cups sharp Cheddar
  • Salt and freshly ground pepper, to taste
  • 1 teaspoon freshly ground nutmeg
  • 1 pound pasta, such as cavatappi or ziti, cooked according to package instructions
  • 1½ pounds lobster meat, cooked
  • 1 cup bread crumbs, homemade or store-bought, tossed in 2 Tbsp. melted butter
  • Fresh chives, snipped
  • Fresh Italian (flat) parsley leaves, shredded
  • Fresh dill, snipped
  •  
    Preparation

    1. PREHEAT the oven to 375°F. In a Dutch oven or a large pot, melt the butter, add shallots, and cook until translucent, 1–2 minutes. Add the flour and whisk until the shallots are coated, 1 minute.

    2. ADD the milk, whisking constantly, and bring it to a slight boil. Whisk until thickened and smooth. Add the heavy cream and Dijon mustard.

    3. TURN OFF the heat and add the cheeses, salt and pepper, and nutmeg; stir until melted. Add the cooked pasta and lobster.

    4. PLACE the mixture in one large or multiple individual oven-safe gratins. Top with buttered bread crumbs.

    5. BAKE for 30 minutes. Turn the oven to broil, and cook until the mac and cheese is bubbling and the topping is nicely browned, 4 minutes.

    6. TOP with freshly chopped chives, Italian parsley, and dill.
     
    Variation: Mix in some smoked Gouda for some of the Cheddar. It will add extra depth of flavor.


    CHECK OUT WHAT’S HAPPENING ON OUR HOME PAGE, THENIBBLE.COM.


    Comments off

    The Nibble Webzine Of Food Adventures
    RSS
    Follow by Email


    © Copyright 2005-2024 Lifestyle Direct, Inc. All rights reserved. All images are copyrighted to their respective owners.