|
Today’s tip comes via one of our favorite artisan tea blenders, Tay Tea.
It’s blue tea, an herbal tea from Thailand that made its way here a few years ago. It still remains largely under the radar, except at artisan tea shops and some spas.
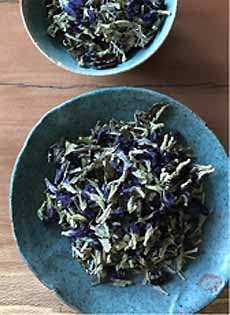
The blue tea is steeped from the butterfly pea flower (photos #6 and #7). It can be served hot or iced (we vote for iced tea—the recipe is below).
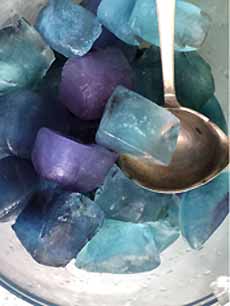
You can use the same blue tea to make colored ice cubes for clear soft drinks or spirits (photo #4) they will add the flavor of the tea). You can add citrus juice to color the tea purple (photos #4 and #5 ).
Blue tea is naturally caffeine free and tastes lightly floral, with a hint of earthiness.
Adding lemon, lime or orange juice turns the brew purple. Both blue and purple colors are completely natural.
For July 4th festivities, serve blue iced tea with regular (white) ice cubes and garnish with red raspberries. Or, swirl in some half-and-half to make the blue latte in photo #3.
WHAT IS BLUE TEA?
Blue tea has been used for centuries in Southeast Asia as a caffeine-free herbal beverage, as well as a plant-based food and clothing dye.
It is brewed from the flower of the butterfly pea plant, commonly known as blue pea or butterfly pea (photo #7).
The plant is native to equatorial Asia, and grows in India, Indonesia, Malaysia, Myanmar, the Philippines and Thailand (the sourcer of Tay Tea’s flowers).
It is also known as Asian pigeonwings, bluebell vine, blue pea, butterfly pea, cordofan pea and Darwin pea [source].
The plant species belongs to the Fabaceae family, commonly known as the legume, pea, or bean family. The family includes such familiar foods as beans, carob, chickpeas, licorice, peanuts and green peas.
Now for the racy part: The botanical name of the butterfly pea plant is Clitoria ternatea. The botanist who named it saw that the flower had the shape of female genitalia (photo #7), and gave the genus the Latin name Clitoria, from clitoris.
TAY TEA’S BLUE TEA
Tay Tea makes a blue tea blend called Azul (Spanish for blue), a fragrant, lemony blend of three botanicals that’s more flavorful than plain blue tea.
It includes:
Butterfly pea flowers from Thailand
Lemon verbena
Lemongrass
YOU CAN PURCHASE IT HERE.
Packed with antioxidants and vitamin C, blue tea is good for you and keeps you colorfully hydrated.
Here are the health benefits of blue tea.
Tay Tea’s recipe follows.
RECIPE: BLUE TEA OR PURPLE TEA, ICED OR HOT
Ingredients For 5 Cups
2 tablespoons blue tea/Azul tea blend
For purple tea: 1/2 cup lemon, lime or orange juice
Ice (you can make blue ice cubes [photo #5] with more tea)
Garnish: citrus wheels for a pitcher, or wedges for a glass
Preparation
1. BOIL five cups of water and add to a heat-proof pitcher—ideally glass, to show off the color. Add two teaspoons of tea and let stand 10 minutes.
2. STRAIN out the loose tea leaves and pour the tea back into the pitcher. Let it cool and refrigerate it, or try it hot.
3. FOR PURPLE TEA: Add the citrus juice and watch the tea turn from bright blue to violet. Add a few wheels of citrus to the pitcher, and/or garnish the glasses with individual wedges.
4. POUR over ice to serve.
TEA NAME TRIVIA
The tea plant, Camellia sinensis, originated in China. The word “tea” comes from there as well.
(Note that herbal teas are not Camellia sinensis, but bear the botanical names of each individual plant).
The Dutch traders who first brought tea to Europe in the early 1600s purchased it from tea traders in the port of Amoy (Xiamen) in the Fujian province.
There are many dialects in China. In the Amoy dialect, tea was translated as te, pronounced tay.
This pronunciation was used by the Dutch, and was the name by which the beverage was introduced to Europe.
The French called it thé (pronounced tay); and it became te, pronounced tay, in Danish, Hungarian, Italian, Norwegian and Spanish.
The “tee” pronunciation is found in English tea and the German thee.
In those countries where the tea trade was mainly via the caravan routes that traveled overland, from China to the West, it’s the Mandarin Chinese cha that is the common root:
Cha in Hindi, Japanese and Persian; ja in Tibetan, chai in Russian, chay in Turkish and shai in Arabic.
TEA HOLIDAYS
January is National Hot Tea Month
January 12th is National Hot Tea Day
June is National Iced Tea Month
June 10th is National Iced Tea Day
British National Tea Day is April 21st
> THE HISTORY OF TEA
> KNOW YOUR TEA: A GLOSSARY OF TEA TERMS
|