THE NIBBLE BLOG: Products, Recipes & Trends In Specialty Foods


Also visit our main website, TheNibble.com.

RECIPE: For Taco Tuesdays, A Taco Ring

Taco Ring Recipe
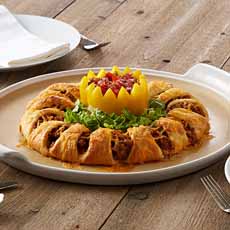
[1] Make a taco ring for Taco Tuesdays (photo courtesy Pampered Chef).

Tex-Mex Seasoning

[2] Buy Tex-Mex or taco seasoning, or make your own (recipe below—photo courtesy Pampered Chef.


October 4th is National Taco Day, but here’s some added fun for any Taco Tuesday: a taco ring, developed by Pampered Chef. You can save time with store-bought salsa fresca or pico de gallo.

For those who will miss a crispy corn taco shell: Serve a few tortilla chips with the salsa.
 
 
RECIPE #1: TURKEY TACO RING

Ingredients For 8 Servings (2 Rolls Per Person)

  • 1 small red onion, divided
  • 1-1/4 pounds 93% lean ground turkey
  • 2-1/2 tablespoons Tex-Mex rub (substitute taco seasoning or use the recipe below)
  • 6 ounces cheddar cheese (1-1/4 cups), grated
  • 2 packages (8 ounces each) reduced-fat refrigerated crescent rolls
  • 1 egg white, lightly beaten
  •  
    For The Salsa & Toppings

  • 1 small jalapeño pepper, seeded
  • 1/2 cup loosely packed fresh cilantro
  • 1 tablespoon fresh lime juice
  • 1 garlic clove, pressed
  • 1/4 teaspoon salt
  • 1 cup grape tomatoes
  • 2 cups thinly sliced romaine lettuce
  • Optional
  • Optional: bell pepper to hold the salsa, or for decoration (we used it to hold the sour cream, which is neater to scoop out than salsa)
  •  

     
    Preparation

    1. PREHEAT the oven to 375°F (190°C). Cut the onion in half and chop half of it (Pampered Chef used its Food Chopper). Set aside the remaining onion for the salsa.

    2. COOK the onion, turkey and spice rub in a 12-inch skillet over medium heat, for 10-12 minutes or until the turkey is no longer pink. Break the turkey into crumbles. Drain, if necessary, and transfer the turkey mixture to a bowl. Meanwhile…

    3. GRATE cheese. Stir 1 cup of the cheese into the turkey mixture.

    4. UNROLL the crescent dough and separate it into 16 triangles. Arrange the triangles, slightly overlapping, in a circle in a round baking pan (Pampered Chef used its White Large Round Stone with Handles. The wide ends of the crescents should be 4 inches from the edge of the stone or pan; the points will extend off of the edge of the stone/pan. Roll the wide ends of the dough toward the center to create a 5-inch opening. To create the opening, place the storage container for the Biscuit Cutters in the center of the stone.

    5. SCOOP the filling evenly over the dough. Bring the points of the triangles up over the filling and tuck them under the dough at the center, to form a ring. Brush the dough with the egg white. Sprinkle with the remaining cheese. Bake for 20-25 minutes or until golden brown.

    6. MAKE the salsa while the ring cooks. Cut the onion and jalapeño into chunks. Chop the remaining onion, jalapeño, cilantro, lime juice, garlic, and salt until coarsely chopped (Pampered Chef used its Manual Food Processor; we used a wooden bowl and a mezzaluna). Add the tomatoes; process until the mixture reaches the consistency of salsa.

    7. PREPARE the bell pepper if using it as a container. Otherwise, leave it whole as a decorative element, and use it in a subsequent meal. To prepare: Slice off the top, remove the seeds and white ribs and, if you like, use a paring knife to create the V-shaped rim.

    8. REMOVE the stone/pan from the oven when the ring is golden brown. Serve with salsa, shredded lettuce, and optional sour cream.

    Serve salsa in a bell pepper cup! Cut the top off of the pepper with V-Shape Cutter; scoop out seeds and veins with Scoop Loop™. Fill with salsa. Place in the center of Taco Ring and surround with lettuce
     
     
    RECIPE #2: TEX-MEX RUB & SEASONING

    Pampered Chef and other brands sell pre-mixed rubs and taco seasonings, but you can make your own by combining:

  • 1/2 teaspoon chili powder
  • 1-1/2 teaspoons ground cumin (or toast and grind the seeds from scratch)
  • 1-1/2 teaspoons minced garlic
  • 3/4 teaspoons salt
  • 1-1/2 teaspoons oregano
  • 1/8 teaspoon cayenne
  • Dash cinnamon
  •  
    Any extra will keep in a tightly-closed jar for a few weeks.


    CHECK OUT WHAT’S HAPPENING ON OUR HOME PAGE, THENIBBLE.COM.


    Comments off

    TIP OF THE DAY: A Perfect Fish Dinner

    We’re big fans of one-pan dinners: protein and veggies baked together in a 13” x 8” sheet pan*.

    Sheet pan dinners mean you don’t have to worry about coordinating the cooking of sides and main: They all bake together. For people who are timid about cooking fish, baking is as sure-fire as it gets.

    Here’s an easy recipe from Good Eggs.

    Dinner is ready in 15-20 minutes. And the fish comes out perfectly moist and tender, every time.

    Pick a fish and two vegetables, and a seasoning of choice. Vary the elements and you can use the recipe template over and over again.

    Good Eggs recommends a milder white fish like cod or halibut with this recipe. It will take on the flavors of what you cook the condiment.

    Varieties that are widely available include

  • Bass
  • Catfish
  • Cod
  • Grouper
  • Halibut
  • Seabass
  • Sole
  • Snapper
  • Tilapia
  • Trout
  •  
    Although it’s pink, we’d add Arctic char to this group. The flavor is mild enough for the recipe.

    We subscribe to the axiom that the best fish is the freshest fish. Plan to cook the fish the night or night after you buy it.

    Pick a peak-season vegetable that doesn’t take too long to roast: broccolini or leafy greens like chard, collards, kale, mustard greens. Make one veg green, and add another vegetable if you like.

    If you want root vegetables, cut them into thin slices, or roast thicker slices for an extra 10 minutes before putting the fish in the pan. You can also mix the vegetables.
     
     
    RECIPE: ONE-PAN DINNER WITH BAKED FISH FILLETS

    Ingredients Per Serving

  • 4 to 6 ounces fish fillets
  • Salt
  • 6+ ounces vegetable(s)
  • Condiment of choice: Dijon mustard, mayonnaise (plain or flavored*), teriyaki sauce – or-
  • Lemon, lime or orange slices to cover the tops of the fish
  •  
    Preparation

    1. PREHEAT the oven to 500°F, Coat a sheet pan or baking dish with some oil. Sprinkle the fillets with a pinch of salt on both sides, and arrange on the baking sheet.

    2. ARRANGE the vegetables around the fish fillets, drizzle with a bit of oil and sprinkle with salt and pepper.

    3. SPREAD the condiment or citrus over the fillets and place the pan in the oven.

    4. BAKE 8–10 minutes, or until the fish is tender, and breaks easily when you flake with a fork. If the fish finishes before the vegetables, transfer the fish to a plate until the vegetables are done.
     
    TIP: You don’t need to rinse fish, chicken or any other protein before cooking. Not only does does rising fail to get rid of all the bacteria; it spreads bacteria into the sink. The heat of cooking kills the bacteria.

      Raw Cod Fillets Sheet Pan Dinner
    [1] Ready to bake: a one-pan cod dinner with carrots and chard (photo courtesy Good Eggs).

    One Pan Baked Salmon Dinner
    [2] For salmon lovers: salmon teriyaki with green beans and carrots. Here’s the recipe from Damn Delicious.

    One Pan Baked Chicken Dinner
    [3] Prefer chicken? Try this rosemary chicken recipe with green beans and potatoes, from Eat Yourself Skinny .

     
    Just be sure to thoroughly wash the cutting board and utensils that come into contact with the raw protein.
    ________________

    *You can make your own flavored mayonnaise, simply by adding a spoonful (to taste) of whatever you like: chipotle, curry, garlic, horseradish, tomato paste, etc.
    ________________
     
     
    ABOUT SHEET PANS

    A sheet pan, also called a baking sheet or baking tray, is a flat, rectangular metal baking pan. It is usually aluminum or stainless steel.

    It is typically used for baking rolls, pastries and flat baked goods such as cookies, sheet cakes, swiss rolls (jelly rolls) and pizzas.

    Sheet pans comprise a group of baking pans with a variety of edge styles—curled rim (lip), rimless and professional variations like open bead and wire in rim. Professional chefs can further choose from non-perforated, fully perforated and partially perforated, which help make the baked good doughy or crispy.

    Some sheet pans have handles to aid in placing the pan in the oven and removing it.

  • A full-sheet pan is 18”x26”
  • A half-sheet pan is 18” x 13”
  • A quarter-sheet pan is 13” x 9.5”
  • Am eighth-sheet pan is 9.5” x 6.5”
  •  
    Rims are 1″ high.

    The half sheet is the pan most commonly available in supermarkets. There is also a two-thirds sheet or home ovens that is 16” x 22” or 15” X 21”.

    While rimless pans are fine for cookies, pizza and rolls, a rim is needed for recipes like the one above, so that juices from the food don’t drip into the oven.

    Buy a light-colored pan with a dull finish: It will absorb and conduct heat evenly. Dark metal pans (with coating) or glass pans necessitate reducing the oven temperature by 25° and checking for doneness early.

    If you’re tempted to buy a dark pan for its nonstick surface and easy clean-up, use parchment paper on a light pan instead.
      

    Comments off

    RECIPE: Pumpkin Bacon Grits With Poached Eggs

    Pumpkin Grits
    [1] Fall food: pumpkin grits topped with a poached egg and bacon (photo courtesy Running To The Kitchen).

    Egg Poacher

    Egg Poaching Pan
    [2] What’s your favorite way to poach eggs? We like the evenness that comes from a poaching mold (photo courtesy Home Shopping | IE).

    [3] A poacher for the stovetop (photo courtesy Cooks Standard).


    October marks the beginning of “pumpkin season,” and we’ve got everything from pumpkin milkshakes to pumpkin dinner rolls.

    This recipe, for pumpkin grits, was sent to us by Davidson’s Safest Choice Eggs—to whom it was sent by Gina of Running to the Kitchen.

    Says Gina: “These grits are filled with pumpkin spice flavor, studded with salty bacon and topped with a perfectly poached egg. When that runny yolk mixes with the grits, it’s pure fall deliciousness. No syrup is required.”

    Prep time is 5 minutes, total time is 20 minutes.

    If you don’t have grits, substitute Cream Of Wheat or Cream Of Rice.

    Serve your pumpkin grits with an assortment of pumpkin swirl toast, pumpkin English muffins and pumpkin bagels. It’s not too much pumpkin: It’s a pumpkin celebration.
     
    RECIPE: PUMPKIN BACON GRITS WITH POACHED EGGS

    Ingredients For 2 Servings

  • 1-1/2 cups water
  • 1-1/2 cups milk
  • Pinch kosher salt
  • 1/2 cup pumpkin purée (not pumpkin pie filling)
  • 1/8 teaspoon cinnamon
  • Pinch nutmeg
  • 2/3 cup grits
  • 1 tablespoon butter
  • 2 slices bacon, cooked and chopped
  • 2 pasteurized eggs
  •  
    Preparation

    1. COMBINE the water, milk, salt, pumpkin, cinnamon, and nutmeg in a medium sauce pan. Whisk together and bring to a low boil.

    2. ADD the grits and butter to the boiling mixture, reduce the heat to low, and whisk continuously for about 5-7 minutes, until thickened. While the grits cook, poach the eggs.

    3. TRANSFER the grits to two serving bowls; top with bacon and poached eggs.
     
     
    POACHED EGGS
    Not everyone has good technique for poaching eggs the classic way: in a pan of simmering water with a spoon of white vinegar or lemon juice to help to keep the whites from spreading.

    Ours spread more than we’d like. So purchased a pan specially fitted with poached egg inserts (photo #3). Works like a charm, although without the silky texture of water-poached eggs.

     
    We’ve also tried using a microwave poacher (photo #2) and an electric poacher, which creates boiled eggs rather than poached.

    Early on, we tried the individual silicone poaching cups, but found that they tip over too easily.

    What’s your favorite way to poach eggs?
      

    Comments off


    © Copyright 2005-2026 Lifestyle Direct, Inc. All rights reserved. All images are copyrighted to their respective owners.