THE NIBBLE BLOG: Products, Recipes & Trends In Specialty Foods


Also visit our main website, TheNibble.com.


RECIPE: Red Velvet Pancakes

red-velvet-pancakes-tasteofhome-230
Red velvet pancakes: use seasonal garnish
for July 4th, Christmas, Valentine’s Day or
Mother’s Day. Photo courtesy Taste Of
Home.
 

For a special Valentine’s Day breakfast, brunch or lunch, Taste Of Home magazine suggests these red velvet pancakes.

Red food works for July 4th and Christmas, of course. Just vary the garnish:

  • Christmas: mint leaf or sliced kiwi (or make green whipped cream!)
  • Valentine’s Day: red berries
  • July 4th: whipped cream, crème fraîche or mascarpone; plus blueberries
  •  
    Note that the recipe below is for a party-size batch of pancakes—five batches of 16 pancakes per batch.

    However, the mixed dry ingredients can be divided into five batches, which can be stored in a cool, dry place for up to 6 months. You can use the recipe as a guide to make smaller amounts.

    Or, make the five-batch lot, and give the four extra batches as Valentine gifts—tied with a red ribbon.

     
    RECIPE: RED VELVET PANCAKES

    Prep time is: 30 minutes, cooking time is 15 minutes per batch.

    Ingredients For 5 Batches (10 Cups Mix Total)

  • 10 cups all-purpose flour
  • 1-1/4 cups sugar
  • 2/3 cup baking cocoa
  • 6 teaspoons baking soda
  • 4 teaspoons baking powder
  • 5 teaspoons salt
  •  
    Additional Ingredients (For Each Batch)

  • 2 cups buttermilk
  • 2 eggs
  • 2 tablespoons red food coloring
  • Butter and maple syrup
  •  
    Preparation

    1. COMBINE the first six ingredients in a large bowl. Place 2 cups in each of five resealable plastic bags or containers.

    2. PREPARE pancakes: Pour the mix into a large bowl. In a small bowl, whisk the buttermilk, eggs and food coloring. Stir into the dry ingredients just until moistened.

    3. POUR the batter by 1/4 cupfuls onto a greased hot griddle; turn when bubbles form on top. Cook until the second side is golden brown.

    4. SERVE with butter and syrup.


    Comments off

    RECIPE: Homemade Peppermint Patties

    February 11th is National Peppermint Patty Day. Whip up a batch today, and make extras to hand out on Valentine’s Day. (For Valentine patties, top with heart-shaped sprinkles or Conversation Hearts.)
     
     
    IS IT PATTY OR PATTIE & THE HISTORY OF PEPPERMINT PATTIES

    Whether it’s candy, meat or veggies, to be perfectly correct, the spelling is patty. Patties is the plural form, so many folks assumed the singular to be pattie.

    The word first appeared in English around 1700-1710, derived from the French pâté (paste in English), a mix of finely-ground ingredients. Pasta is the Italian word for paste; and in modern French cuisine, pâté refers to a meat loaf as well as the more finely ground goose or duck liver pâté.

    Bonbons—creamy flavored centers enrobed in chocolate—appeared in the 19th century. However, the peppermint versions of the time were gummy.

    Henry C. Kessler of the York Cone Company in York, Pennsylvania set out to make a better peppermint center. In 1940 he developed a center that was firm. He called it the York Peppermint Pattie (alas, not the correct spelling, which is patty).

    Other companies followed suit, most notably James O. Welch, a candymaker in Cambridge Massachusetts who had created Milk Duds, Sugar Babies and Sugar Daddies. In 1949 he introduced Junior Mints, a small, round, bite-size version.

    Today the York brand is owned by Hershey and produces the Peppermint Patties in Monterrey, Mexico. Junior Mints are owned by Nabisco Brands, and still are produced in Cambridge [source].

    So you could run out and get a York Peppermint Pattie or a box of Junior Mints (we far prefer the flavor of York).

    Or, you could spend 40 minutes of prep time making your own (plus 9 hours of drying time).

    And if you’re not in a candy mood, how about a Peppermint Patty Martini?


    peppermint-patties-safeeggs-230
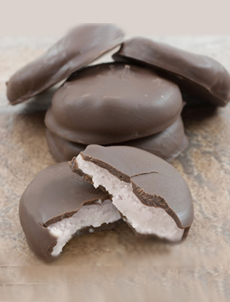
    [1] Homemade peppermint patties (photo © Safe Eggs).

    York Peppermint Minis
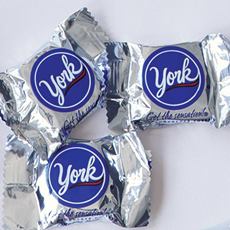
    [2] York Peppermint Pattie minis (photo © The Hershey Company).


    deBrand-230
    Semisweet (50% cacao or more) or bittersweet chocolate (70% cacao or more) are a better counterpoint to the lively mint than milk chocolate. Photo courtesy Debrand.
     

    RECIPE: HOMEMADE PEPPERMINT PATTIES

    Because the recipe uses uncooked egg whites, you may wish to consider Safest Choice pasteurized egg whites.

    Ingredients For 30 Pieces

  • 3-1/2 cups powdered sugar, plus extra as needed
  • 2 egg whites
  • 1 teaspoon water, plus extra as needed
  • 1/4 teaspoon pure peppermint extract
  • 4 four-ounce dark chocolate bars, chopped into 1/2-inch pieces
  • 2 teaspoons vegetable oil
  •  
    Preparation

    1. LINE two baking sheets with parchment paper. Cut a separate 2-inch square of parchment paper. Set aside.

    2. COMBINE the powdered sugar, egg whites, water and peppermint extract in stand mixer on low speed until smooth. Increase the speed gradually to high, to form a stiff, smooth dough, adding ½ teaspoon of water at a time if mixture becomes too stiff.

    3. DUST a clean surface with powdered sugar and roll the dough into a log, approximately 12-inches long and 1-1/4-inches in diameter. Slice the log into 1/4 to 1/2-inch pieces, rolling the pieces into balls as you go. Arrange them on lined baking sheets, about an inch apart.

     
    4. PLACE the square of parchment paper on top of each dough ball and flatten it into a disk, using the bottom of shot glass. Repeat. Let the candies dry, uncovered, at room temperature for at least six hours. After the patties have dried…

    5. COMBINE the chocolate and vegetable oil in a small bowl over a pan of barely simmering water. Stir until the chocolate is smooth and melted. Allow the chocolate to cool slightly. Dip each candy into the melted chocolate, coating both sides.

    6. RETURN the candies to the parchment paper until the chocolate has set, about 3 hours. To set faster, place the candies in the refrigerator.


    Comments off

    TIP OF THE DAY: Kitchen Torch

    The kitchen torch, culinary torch, cooking torch or [less poetically] butane torch is used by chefs and sophisticated home cooks.

    Today’s handy culinary torch descends from the heavy duty blowtorches, long used by gold and silversmiths (the first patent dates to 1791).

    While its most famous kitchen use is to caramelize the sugar on the top of crème brûlée, it is also handy to:

  • Brown meringue (we use it for Baked Alaska)
  • Char vegetables such as bell peppers
  • Melt or brown toppings on casseroles and soups
  • Melt cheese
  • Toast marshmallows
  •  
    Affordable at $25 or so, it’s well worth it if you’d like an easy alternative to using the broiler or holding peppers over the stove flame. You can pick one up at most kitchenware retailers or online.


    creme-brulee-davidvenableQVC-230
    [1] Always a treat: crème brûlée (photo © QVC).

     
    If you get one now, you can make Crème Brûlée for Valentine’s Day. Digging into that crunchy, crackly caramelized sugar topping and eating a piece with the creamy custard underneath is one of dessert’s great experiences. You can make it a signature special-occasion dish.

    Here’s a recipe from QVC’s David Venable. If you want to add a Grand Marnier accent, take a look at this recipe.

    You’ll need round or oval ceramic ramekins: 5-ounce ramekins for four servings, 3-ounce ramekins for seven servings. This set (photo below) from Bonjour includes both the torch and the ramekins.
     
     
    RECIPE: CRÈME BRÛLÉE

    Ingredients For 4 Servings

  • 2 cups heavy cream
  • 3/4 cup packed dark brown sugar, divided
  • 9 large egg yolks
  • 1 teaspoon vanilla extract
  • 2 tablespoons dark spiced rum
  • White sugar (2-1/2 teaspoons for 5-ounce ramekins or 1-1/2 teaspoons for 3-oz ramekins)
  • Optional garnish: fresh berries
  •  

    creme-brulee-kitchen-torch-bonjour-230r
    [3] You can also use the torch to melt the cheese on French onion soup, toast marshmallows and more (photo © Bonjour).
      Preparation

    1. PREHEAT the oven to 325°F.

    2. BRING the cream and 1/2 cup of the brown sugar to a simmer in a 2-quart saucepan.

    3. LIGHTLY WHISK together the egg yolks and 1/4 cup of the brown sugar in a medium-sized mixing bowl. Temper the egg mixture by slowly pouring the cream mixture into the egg mixture, whisking constantly. Add the vanilla and the rum and continue whisking until fully incorporated. Strain the mixture through a fine mesh strainer into a bowl. Place the bowl with the brûlée mixture into an ice water bath and let cool completely.

    4. PLACE the ramekins in a large baking dish. Divide the brûlée mixture evenly among the ramekins, filling them 3/4 of the way full. Place the baking dish in the middle rack of the oven and then fill it with hot tap water, to 2/3 of the way up the ramekin sides.

    5. BAKE for 35-45 minutes for 4 (five-ounce) ramekins; or bake for 25-35 minutes for 7 (three-ounce) ramekins. When done, each brûlée will jiggle lightly in the center.

    6. REFRIGERATE for 4 hours or overnight. Just before serving, sprinkle the white sugar over each cooled crème brûlée and torch until all of the sugar is melted and golden brown (it will begin to harden when the torch is removed). Serve immediately.


    CHECK OUT WHAT’S HAPPENING ON OUR HOME PAGE, THENIBBLE.COM.


    Comments off

    Russian Cocktail Recipe With Maraschino Or Cherry Liqueur

    Do a Google search for “Russian Cocktail” and the first 30 pages are for Black Russians and White Russians. We stopped looking at that point. No simple “Russian Cocktail” could be found.

    But the folks at Grey Goose tell us that this Prohibition-era drink is the oldest vodka cocktail found in print. They shared the recipe below.

    While the drink appeared long before flavored vodkas were available in the U.S., you can use a cherry flavored vodka for more cherry flavor. Grey Goose, Pinnacle, Skyy, Smirnoff, Svedka, Three Olives and UV, among others, make cherry vodka.

    In addition to the cocktail recipe, we have a second recipe for homemade brandied cherries, below.
     
     
    RECIPE #1: RUSSIAN COCKTAIL

    Ingredients Per Drink

  • 1½ parts vodka
  • ½ part maraschino liqueur or cherry liqueur (see next section)
  • Crushed ice
  • Garnish: brandied cherry (see recipe below)
  •  
    Preparation

    1. COMBINE the two spirits in a cocktail shaker. Top with crushed ice and shake vigorously.

    2. STRAIN into a chilled frappe glass. Garnish with a brandied cherry and serve.
     
     
    MARASCHINO LIQUEUR VS. CHERRY LIQUEUR

    We actually prefer generic cherry liqueur to the cherry-specific maraschino liqueur. Maraschino liqueur, such as Luxardo, is a clear, relatively dry liqueur made from Marasca cherries, including the crushed pits. The latter give it a subtle bitter almond flavor.

    If you like the note of almond, go for the maraschino liqueur. If you like things sweeter with more cherry flavor, head for the cherry liqueur.

       
    russian-cocktail-greygoose-230
    [1] The Russian Cocktail, pink for Valentine’s Day (photos #1 and #2 © Grey Goose).


    [2] Thanks to Grey Goose for the recipe. We’d never seen a “Pink Russian” before.

     
    The Original Maraschino Cherry

    The ubiquitous maraschino cherries that are a joke in some food circles were once quite elite. The cherries were originally preserved in the liqueur as a delicacy for royalty and the wealthy.

    The Marasca cherry (Prunus cerasus var. marasca) is a type of sour Morello cherry that grows largely in Bosnia, Croatia, Herzegovina, northern Italy and Slovenia. With a bitter taste and a drier pulp than other cherry varieties, they are ideal to make maraschino liqueur.

    The Marasca cherry tree is very fussy about where it will grow, so in the U.S., the Royal Ann variety is substituted for the Marasca to make maraschino cherries.


    SONY DSC
    [3] Homemade brandied cherries. Here’s the recipe (photo © Darla Cooks).


    [4] Luxardo brand maraschino liqueur. The liqueur is clear, not cherry-red like other cherry liqueurs (photo © The Whiskey Exchange).

      RECIPE #2: HOMEMADE BRANDIED CHERRIES

    You can buy brandied cherries (they’re pricey) or make your own:

  • Maraschino cherries in syrup: Drain 20% of the liquid from a jar of maraschino cherries and replace it with brandy. Place the jar in the fridge and let marinate for at least an hour.
  • With fresh cherries, thawed frozen cherries or canned cherries: Soak the cherries in your own [better quality] brandy or Cognac for an hour in the fridge.
  •  
    Here’s a recipe from DarlaCooks.com. Note that the aesthetically-pleasing stems come only with fresh cherries; so you may want to mark your calendar for cherry season, then get out your Mason jars and preserve them.

    You can also marinate the cherries in cherry liqueur or kirschwasser, a cherry eau de vie (fruit brandy).

     
    THE DIFFERENCE BETWEEN BRANDY & COGNAC

    Both brandy and cognac wall into the category of grape brandy, distilled from white wine grapes. But cognac is a superior product.

    Cognac must be produced according to strict regulations, and only in the region surrounding the town of Cognac in central France. It must be made from a specific group of white grape varietals that are double distilled using pot stills, and then aged for at least two years.

    Brandy is a generic term for a grape distillate that can be made anywhere in the world.

    A good analogy is the difference between champagne, which must be made in the Champagne region of France, with specific grapes and techniques; and sparkling wines, which can be made anywhere in the world from any suitable grapes.

    Grape brandy can be made anywhere, from any grapes (brandy is also made from fruit and pomace). It does not require double distillation or long aging.

    While there are quality brandies, in general Cognac is a better product. The double distilling and aging rounds out the spirit and produces more mellow flavors.


    Comments off

    VALENTINE RECIPE: Cherry Nut Dip Or Spread For Crackers Or Veggies

    Last year our suggestion of foods for a Valentine’s Day “pink party” was very well received. So we’ll build on that list of pink foods with another recipe this year.

    Here’s a dip from the Cherry Marketing Institute, made pink with cherry juice or the stronger cherry juice concentrate. You can also use this cherry recipe to celebrate Washington’s Birthday.

    After you make the dip, dilute the extra concentrate to make cherry juice for cocktails or mocktails, and freeze any leftovers into ice cubes and ice pops.

    Serve this dip with crackers, toasts or vegetables. We also enjoyed it atop cottage cheese.
     
     
    RECIPE: CHERRY NUT SPREAD

    Ingredients For 1 Cup (8 Appetizer Servings)

      pink-cherry-dip-cherrymktginst-230
    Cherry nut dip or spread (photo © Choose Cherries).
  • 1 package (8 ounces) regular or reduced fat cream cheese, softened
  • 3 tablespoons tart cherry juice concentrate
  • 2 tablespoons granulated sugar
  • 2 tablespoons chopped toasted pecans
  • 1 teaspoon chopped fresh thyme (or 1/4 teaspoon dried thyme)
  • Toasted bread or assorted crackers
  • Optional garnish: red microgreens*, pink peppercorns
  • Crackers, toasts, crudités
  •  
    Preparation

    1. COMBINE the cream cheese and tart cherry juice concentrate; mix until smooth. Stir in the sugar, pecans and thyme.

    2. REFRIGERATE, covered, 2 to 3 hours or longer, to allow flavors to blend.

    3. USE as a spread on toasted breads or as a dip for assorted crackers, with garnish as desired.
     
     
    > THE HISTORY OF CHERRIES

    _______________

    *Amaranth, beet, cabbage, chard, kale, mustard, radish and mustard microgreens have red leaves, stems or both.
      

    Comments off

    The Nibble Webzine Of Food Adventures
    RSS
    Follow by Email


    © Copyright 2005-2024 Lifestyle Direct, Inc. All rights reserved. All images are copyrighted to their respective owners.