THE NIBBLE BLOG: Products, Recipes & Trends In Specialty Foods


Also visit our main website, TheNibble.com.

TIP OF THE DAY: Use Your Waffle Or Pizzelle Maker For Savory Sandwich Cones

Waffle Cone With Shrimp
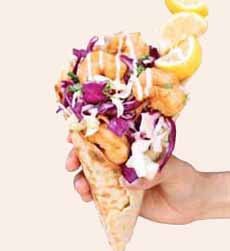
[1] Shrimp, remoulade and crunchy red cabbage: our inspiration for today’s tip (photo courtesy Savannah Seafood Shack).

Waffle Cone Roller
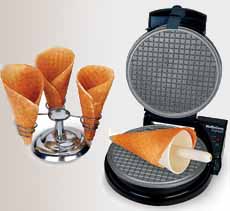
[2] A waffle roller (at right) turns a round waffle into a cone. Here’s the technique from Celebrate-Creativity.

Homemade Waffle Cones
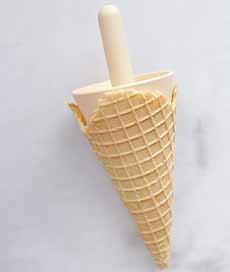
[3] The same sandwich cone maker creates ice cream cones (photo courtesy Chef’s Choice).

  A few years ago, we were stuck indoors at a friend’s country home by a massive rainstorm.

Plans to go shopping for dinner ingredients were discarded, and we searched the cupboards for something to make.

We found waffle mix and peanut butter and jelly in the cabinets, and a refrigerator full of breakfast and lunch materials: bacon, eggs, cole slaw, ham, cheese, salad, cream cheese, smoked salmon.

We were inspired to make savory waffles, and later wrote an article about them.

But we didn’t think to roll the waffles into cones until we saw this photo from Savannah Seafood Shack (photo #1).

The inspiration: waffle sandwich cones.
 
 
HOW TO MAKE SAVORY WAFFLE SANDWICH CONES

1. DECIDE on your main filling: BLT, chicken (a touch of maple syrup makes “chicken and waffles”), Greek salad, ham and cheese, fish fillets, shrimp, taco fixings, etc. You can find other ideas online, including this shrimp and cheese grits cone.

For a breakfast sandwich, consider “the usual suspects:” scrambled eggs, bacon/Canadian bacon, cheese, avocado, tomato, etc.

2. PICK the supplementary ingredients: bacon, lettuce, tomatoes, onion, grits, mashed potatoes, stuffing, condiments, etc.

3. GET out your waffle maker or pizzelle maker. The waffle maker needs to be round to shape a pointed cone. If you don’t have a round waffle maker, see if you can borrow one.

You’ll also need a cone-rolling form (photo #2): a cone shape with a handle. You can purchase a wood version for about $10. The same mold makes homemade ice cream cones (photo #3) and pizzelles.

4. MAKE the batter. Leave the sugar out of the waffle recipe. You can add a pinch, but no more; you don’t want even a slightly-sweet waffle.

You can also flavor your batter with fresh herbs (basil, chives, cilantro, parsley), grated cheese and/or spices (cayenne, chili flakes, curry, poppy, etc.). Check out these cheddar-chive cones.

5. MAKE the waffles, cool slightly, stuff and enjoy. Use a fork, as needed.

 
MORE ABOUT WAFFLES

  • Different Types Of Waffles
  • Waffle History
  • Waffle Iron History
  •  


    Comments off

    TIP OF THE DAY: Make A Root Beer Float, Plus Root Beer History

    Updated June 2026

    August 6th is National Root Beer Float Day: a type of ice cream float (a.k.a. ice cream soda) that combines ice cream, usually chocolate or vanilla, with root beer.

    Just place a couple of scoops of ice cream in a tall glass, add the root beer, and serve with a straw and a long spoon (photo #1). Yum!

    You can do this with any flavor ice cream and any coordinating soda. But for root beer, there’s a second day to celebrate: July 17th is National Root Beer Day. No one will challenge if you add ice cream to the glass.

    Below:

    > Root beer float recipe.

    > The history of the ice cream float.

    > The history of root beer.

    Elsewhere on The Nibble:

    > More ice cream float recipes.

    > More recipes.

    > The year’s 24 non-alcoholic beverage holidays (including juice and soft drinks).
     
     
    RECIPE: ROOT BEER FLOAT

    Make this in a tall glass, beer stein, or classic soda fountain glass.

    Vanilla ice cream is traditional, chocolate ice cream makes the drink a “Brown Cow.”

    You can also add a splash of beer or spirit!
     
    Ingredients Per Drink

  • 2–3 scoops of vanilla ice cream
  • 12 ounces root beer, chilled
  • Optional spirit: 1 ounce aged rum, Bourbon, coffee liqueur, cream liqueur, or vanilla liqueur or vodka
  • Optional beer: milk stout, oatmeal stout, or vanilla porter
  • Optional garnishes: chocolate sprinkles, grated chocolate,, maraschino (or brandied) cherry, whipped cream
  • Straw and a long spoon (e.g. iced tea spoon)
  •  
    Preparation

    1. FROST the glass by placing in the freezer for 15 to 20 minutes or more; this keeps the drink chilled longer. When ready to make the drink…

    2. SCOOP the ice cream into a tall, frosted glass. If using alcohol, pour it over the ice cream.

    3. SLOWLY POUR the chilled root beer at an angle down the tilted inside of the glass to limit the foam. Let any foam settle, then top off with more root beer. Garnish and serve immediately.

    Variations

    Two of our favorites alcoholic floats:

  • Banana float: banana ice cream, vanilla soda, rum, and banana liqueur.
  • Creamsicle float: vanilla ice cream, orange soda, optional vodka, and orange liqueur.
  •  
    You can also make a beer float:

  • Guinness Float & Double Chocolate Stout Float
  • Tipsy Leprechaun Stout Float with Irish whiskey
  •  
     
    ICE CREAM FLOAT HISTORY

    Credit for the invention of the ice cream float was invented by Robert McCay Green, operator of a soda fountain in Philadelphia, Pennsylvania. In the era before bottled soft drinks, a soda fountain was a place where people would stop by for a fresh-jerked soda.

    The “soda jerk” would add syrup to a glass, then jerk the handle of the soda water [carbonated water] tap. The pressure blended the soda, although a swirl with a spoon finished the job.

    Green wanted to create something special to compete with a larger, fancier soda fountain down the street. His brainstorm: a combination of vanilla ice cream and soda water with a choice of 16 different flavored syrups. He called it an “ice cream soda.”

    A variation of the story is that, on one hot day, Green ran out of ice for his soda fountain drinks and used vanilla ice cream from a neighboring vendor, has been put to rest by his own account, published in Soda Fountain magazine in 1910 (source).

    Alas, in those days small business owners were not trademark-oriented, and the competitors soon knocked him off.

    As the ice cream soda soda concept took off, different fountain syrups were used: birch beer, cola root beer and fruit-flavored soft drinks.
     
    Root Beer Float
    [6] Those counting calories can use sugar-free ice cream and root beer (photo © American Heritage Chocolate).

      Root Beer Float
    [1] A root beer float given the glamour treatment with whipped cream and a cookie (photo ShagPhoto | IST).

    Root Beer Float In A Beer Stein
    [2] The classic, in a frosted beer stein (photo © BJ’s Restaurants).

    Ice Cream & Beer Pairings
    [3] Guinness Float. Here’s the recipe for the float, plus homemade stout ice cream (photo courtesy Silver Moon Ice Cream).

    Brown Cow Root Beer Float
    [4] A root beer float made with chocolate ice cream is called a Brown Cow (photo: The Nibble).

    Ice Cream Soda
    [5] Ice cream floats with fruit sodas: strawberry, orange (a Creamsicle float), and raspberry (photo © lanna Taylor Tobin | The Bojon Gourmet).

     
    Bottled soft drinks became broadly available by 1950, enabling consumers to mix and match their own floats. Some examples of the variety:

  • Boston Cooler: ginger ale and vanilla ice cream (invented in Detroit, with no relation to Boston).
  • Brown Cow: a root beer float made with chocolate ice cream.
  • Coffee Float: vanilla ice cream with actual coffee and cream, plus coffee soda or cola (the recipe).
  • Cola Float: vanilla or chocolate ice cream with Coca-Cola or Pepsi Cola.
  • Creamsicle® Float: vanilla ice cream and orange sherbet.
  • Framboise Float: vanilla ice cream with raspberry soda.
  • Orange Whip: orange sorbet with orange soda and optional orange juice.
  • Purple Cow: vanilla ice cream with grape soda.
  • Root Beer Float: also called a Black Cow or a Brown Cow: root beer with vanilla ice cream (or flavor of choice).
  • Snow White: 7 Up or Sprite with vanilla ice cream.
  •  
    In older times, soda jerks would top the float with whipped cream and a maraschino cherry. Today, anything goes—as long as it doesn’t collapse the whipped cream.
     
     
    THE HISTORY OF ROOT BEER

    Modern soft drinks would not exist, had carbonated water not been invented. Here’s the history of carbonated water, which was first sold commercially in the late 1700s; and the debut dates of early soft drinks.

    Root beer, at least in its earliest, non-carbonated form, long predates carbonation.

    Emigrants to the New World found Native Americans drinking beverages made of sassafras root and sarsaparilla vine, for culinary and medicinal reasons American culture.

    By the 16th century, colonists were using European culinary techniques to create it, and other root- and herb-based beverages.

    Ingredients could include, among others, allspice, birch bark, burdock root, dandelion root, coriander, juniper, ginger, hops, licorice, molasses, sarsaparilla, sassafras root, vanilla beans, wild cherry bark and wintergreen.

    Today, the root commonly used is the root bark of the sassafras tree (Sassafras albidum) or the sarsaparilla vine (Smilax ornata).

    With the spread of soda water/carbonated water in the early 19th century, the technique was applied to these traditional beverages. Sweet syrups were the foundation of soda fountains, and it was combined with soda water as early as the 1850s.

    Drinks like root beer were also sold as “tonics,” for their perceived medicinal qualities. The syrup was added to a glass, topped with carbonated water and given a brief stir.

    While traditional root beer was indeed made from sassafras tree roots, modern commercially produced root beer typically does not contain any sassafras root. In 1960, the FDA banned sassafras oil due to an ingredient, safrole, which was shown to be carcinogenic in rats.

    This led to the use of artificial flavorings in most commercially produced root beer. Artisan brands use extracts from which the safrolehas been removed.

    Modern, commercially-produced root beer (and other sodas) is typically sweet, foamy, carbonated, nonalcoholic, and flavored with artificial* sassafras oil (source).

    ________________

    *Sassafras root is still used to flavor traditional root beer. However, sassafras is no longer used in commercially-produced root beer since 1960, when it was banned by the FDA for use in commercially mass-produced foods and drugs. There were health concerns, highly controversial, about the carcinogenicity of safrole, a major constituent of sassafras oil, in animal studies. Some small-batch root beers do use a safrole-free sassafras extract.
      

    Comments off

    RECIPE: Root Beer Float Ice Pops For National Root Beer Float Day

    Root Beer Ice Pops
    [1] Turn a root beer float into an ice pop. Recipe and photo courtesy Volpi Foods.

    Ice Pop Molds
    [2] Buy one or two sets of ice pop molds. You can use them to freeze juice, including vegetable juice for a savory snack . These are from FumCare.


    August 6th is National Root Beer Float Day. For something even colder, try this food fun: Root Beer Float Ice Pops.

    Active prep time is 15 minutes, plus freezing.
     
    RECIPE: ROOT BEER FLOAT ICE POPS

    Ingredients For 6 Pops

  • 1 cup vanilla ice cream, softened
  • 1¾ cups root beer
  • Ice pop mold set with 6 (3½-ounce) molds
  •  
    Preparation

    1. SOFTEN the ice cream slightly on the counter, 5 minutes or so. Then fill the tip of each mold with about 2½ tablespoons of ice cream, packing the ice cream down firmly. Place in the freezer to set until the ice cream is firm again, 15 to 20 minutes. Meanwhile…

    2. BRING the root beer to a low simmer in a medium saucepan, whisking to help remove the carbonation. Simmer gently until there are no remaining carbonation bubbles, about 5 minutes (new bubbles will be caused around the edge of the liquid the process of simmering). Allow to cool.

    3. REMOVE the molds from freezer. Pour about 2 ounces of root beer into each mold. To reduce foaming, it’s best to slowly pour the root beer down the inside wall of the mold, and not straight on top of the ice cream.

    4. LET the root beer settle a moment. Then top the molds with the lids, and insert the sticks or handles.

    4. FREEZE until solid, at least 8 hours or overnight.

    5. SERVE: Unmold the pops by running the molds under water for about 60 seconds (or follow manufacturer’s directions).


    Comments off


    © Copyright 2005-2026 Lifestyle Direct, Inc. All rights reserved. All images are copyrighted to their respective owners.