|
December 15th is National Cupcake Day (there are 8 more cupcake holidays).
When a holiday like this falls right before Christmas, there’s only one way to go: Christmas eat cupcakes.
Below:
> Yummy Christmas cupcake ideas.
> The history of cupcakes.
Elsewhere on The Nibble:
> The history of cake.
> The different types of cake: a photo glossary.
> The year’s 55 cake holidays.
CHRISTMAS CUPCAKE IDEAS
You can turn thi food holiday into a seasonal holiday party, with a DYO (decorate your own) cupcake party, with holiday flavors and garnishes.
Whether you bake them from scratch or buy plain cupcakes to decorate, here are 10 easy approaches:
Candy cane cupcakes: Crushed red and white peppermints on chocolate or vanilla iced cupcakes (see photo).
Coconut “snowball” cupcakes: Shredded coconut on vanilla icing, plain, or decorated with a mini candy cane or other Christmas candy.
Cone Christmas tree cupcakes: Cover a small ice cream cone with green frosting and invert it on top of a cupcake. Add sprinkles or dragées for “ornaments.”
Dragée-dotted cupcakes: A sophisticated approach using metallic-colored gold and/or silver balls.
Frosty The Snowman cupcakes: Use black and orange gels or icing to create Frosty’s face atop flat-iced white cupcakes: eyes, nose, and mouth (see photo).
Holly cupcakes: Use real or candy mint leaves and mini red candies to create a holly sprig.
Red and green icing: Use food color to tint icing, store-bought or homemade. Serve as is or with decorations of choice. Check out the special Christmas-wrap Hershey’s Kisses.
Rudolph cupcakes: To a chocolate-frosted cupcake, add white frosting eyes or candy eyes, a red candy nose, and pretzel antlers (see photo).
Sprinkles cupcakes: Garnish iced cupcakes with red and green sprinkles, confetti, stars or Christmas trees.
Star cupcakes: Crown cupcakes with foil-wrapped chocolate stars or red and green gummy stars .
|
|
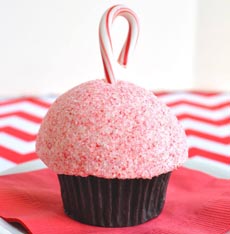
[1] Crushed peppermint and a mini candy cane, at Trophy Cupcakes (photos #1 and #3 © Trophy Cupcakes).

[2] Snowman cupcakes © CreatedByDiane.com.
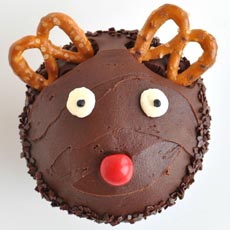
[3] Rudolph cupcake at Trophy Cupcakes. The kids can help make this design!
|
CUPCAKE HISTORY
Before the advent of muffin tins, cupcakes were baked in individual tea cups (hence “cup” cakes) or ramekins. The first reference to these miniature cakes dates to 1796 when a recipe for “cake to be baked in small cups” appeared in the cookbook, “American Cookery.” The earliest documentation of the term “cupcake” was in Eliza Leslie’s Receipts cookbook in 1828 (receipt is an earlier term for recipe). [Source]
Back then, cupcakes were easier to make than cakes because they cooked much faster. It took a long time to bake a cake in a hearth oven; cupcakes were ready in a fraction of the time. [Source]
The cupcake was once known as the 1-2-3-4 cake because the recipe called for 1 cup of butter, 2 cups of sugar, 3 cups of flour, and 4 eggs—plus 1 cup of milk and 1 spoonful of baking soda.
Muffin tins (doing double duty as cupcake tins) became widely available around the turn of the 20th century and offered a new convenience to bakers of muffins and cupcakes. But the next convenience took a while longer: For easier removal of cupcakes from the pan, paper and foil cupcake pan liners were created after World War II.
An artillery manufacturer, the James River Corporation, began to manufacture cupcake liners when its military markets diminished. By 1969, they left artillery manufacturing behind and became a paper manufacturer. During the 1950s, the new paper baking cup gained popularity with U.S. housewives. Its popularity grew, even more, when bakers realized that they could bake muffins as well as cupcakes in the baking cups [source].
Cupcakes evolved into children’s party fare, but in the last decade, they have taken a more sophisticated turn. First, some younger couples began to choose “cupcake trees” instead of conventional wedding cakes. This prompted a flurry of cupcake articles and recipes, and ultimately the opening of boutique cupcake bakeries nationwide, offering what has become an everyday treat.
December 15th is National Cupcake Day; October 18th is National Chocolate Cupcake Day.
National Cupcake Day in Canada is held in late February, beginning in 2013, with the purpose of raising money for SPCAs and Humane Societies across the country. The date is different each year.
In 2005, Sprinkles Cupcakes, the first cupcakes-only bakery in the world, started in Beverly Hills, opened in New York City in 2005, and now has 24 locations across the U.S. Other cupcake boutiques were founded, and for a time seemed to be ubiquitous. Get your share, and have a happy National Cupcake Day.
________________
*Both receipt and recipe derive from the Latin recipere, to receive or take. Receipt was originally used in medieval English to designate a formula or prescription for a medicinal preparation, and the symbol Rx emerged in medieval times. The sense of receipt as a written statement that money or goods have been received emerged later, at the beginning of the 17th century. In terms of cooking instructions, recipe became an alternative to receipt in the 18th century, gradually replacing it over time. Here’s more.
CHECK OUT WHAT’S HAPPENING ON OUR HOME PAGE, THENIBBLE.COM.
|