|
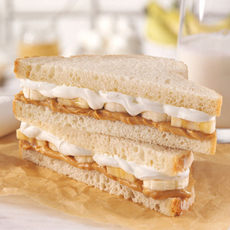
[1] The classic Fluffernutter sandwich: peanut butter and Marshmallow Fluff on white bread (photo © Quaker).

[2] Marshmallow Fluff was first sold commercially in 1910 (photo © Hawkin).

[3] Kerfuffle, a ready-to-spread all natural Fluffernutter blend (photo © Kerfluffle Nut Butter).

[4] The marsh mallow plant has pretty flowers, but the sap in the root makes marshmallows (or it did, until it was replaced by gelatin) (illustration Public Domain).
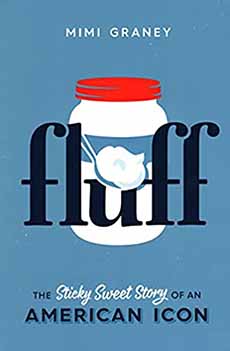
[5] Fluff: A Sticky Story Of An American Icon, will fill in more information than we have below (photo © Union Park Press).

[6] Yes, there’s a Marshmallow Fluff cookbook (photo © Running Press).
|
|
National Fluffernutter Day is October 8th, honoring the classic peanut butter and marshmallow cream sandwich on white bread (photo #1).
The original Marshmallow Fluff was introduced more than 75 years ago and is still made by Durkee-Mower Inc. Some brands call it marshmallow cream, others marshmallow creme.
What’s the difference between cream and creme? Just the spelling. Creme is an Americanization of the French word for cream, crème? (pronounced KREHM).
Why adapt a French word instead of good old American cream? Most likely adapted to make the dish sound more special. There’s no need to misspell and mispronounce another language’s word for cream. Unless it’s a French recipe, such as Coeur à la Crème, stick to cream.
The recipes are below.
THE HISTORY OF MARSHMALLOW FLUFF, STARTING IN ANCIENT EGYPT
Marshmallow dates back to ancient Egypt. The marsh mallow plant that was plentiful along the banks of the Nile has a slippery sap that forms a gel when mixed with water. The Egyptians mixed the “juice” with honey to make a confection, reserved for the wealthy and the gods.
The Roman scholar Pliny the Elder credited the sap with curing all sorts of diseases, and encouraged people to drink the juice daily, although it wasn’t very palatable (what happened to the honey?). Still, for centuries the sap was used to treat sore throats, skin conditions, and other maladies.
Marsh Mallow Sap Gets Replaced With Gelatin
In the mid-19th century, a pharmacist in Paris came up with the idea of whipping the sap with sugar and egg whites into a light, sweet, fluffy throat remedy. A variation soon became popular as marshmallow candy.
By the late 19th century, confectioners had determined how to mass-produce marshmallows, which included eliminating the sap entirely and replacing it with gelatin.
Prepared gelatin was patented in 1845. In addition to setting aspics, it was desirable as glue, a use that also dates back to the marsh mallow plants of ancient Egypt.
Prior to 1845, it was laborious to render and clarify gelatin from cattle and pig bones, skin, tendons and ligaments.
Marshmallow sauces were popular in the early 20th century (see Marshmallow History). But to make marshmallow sauce or frosting required that the cook first make marshmallow creme.
It was a two-step process: make a sugar syrup, melt marshmallow candy in a double boiler, and combine them with the syrup. But, the popularity created an opportunity.
Commercial Marshmallow Cream Arrives
In 1910 a marshmallow cream called Marshmallow Fluff was sold to ice cream parlors by Limpert Brothers, a company that still exists in New Jersey. You can see the original packaging here.
Call greater Boston the home of marshmallow cream!
Brother and sister Amory and Emma Curtis of the Curtis Marshmallow Factory in Melrose, Massachusetts, created Miss Curtis’ Snowflake Marshmallow Creme in 1913. It was the first commercially successful, shelf-stable marshmallow creme. Curtis ultimately bought the Marshmallow Fluff brand from the Lippert Brothers (details).
In 1917, Archibald Query invented a creation he called Marshmallow Creme in Somerville, Massachusetts. He sold it door to door in Somerville.
His formula was purchased by H. Allen Durkee and Fred L. Mower, who called it Toot Sweet Marshmallow Fluff.
Marshmallow Fluff wasn’t the first marshmallow cream, but it’s the one that endured. More than 100 years later, the brand is still thriving.
Unlike conventional marshmallows, which require gelatin (an animal product) or a seaweed equivalent to set, today’s large marshmallow brands are kosher products made from corn syrup, sugar, water, egg whites, artificial flavor (vanillin), cream of tartar, xanthan gum, and artificial color.
Today, the Durkee Mower Company sells about 8 million pounds of Fluff each year. In 2021, the Merriam-Webster dictionary added “fluffernutter” to its dictionary: “a sandwich made with peanut butter and marshmallow crème between two slices of white bread.”
There’s also a book published in 2017: Fluff: The Sticky Sweet Story Of An American Icon.
In Somerville, Massachusetts, there’s an annual ”What The Fluff” festival, where “tens of thousands of people celebrate every possible use of the concoction” [source]
There’s that crème again. Here’s why we’re frustrated.
Marshmallow Fluff is certified kosher by OU, Kraft Jet-Puffed Marshmallow Creme by OK Kosher.
Ricemellow Creme, manufactured by Suzanne’s Specialties, Inc., is a vegan equivalent.
THE HISTORY OF THE FLUFFERNUTTER SANDWICH
In 1917, during World War I, Emma Curtis published a recipe for the Liberty Sandwich, which consisted of peanut butter and Snowflake Marshmallow Creme on oat or barley bread.
The recipe was published in a promotional booklet sent to Curtis’ customers in 1918, and is believed to be the origin of today’s Fluffernutter sandwich.
MAKE YOUR OWN MARSHMALLOW CREAM
You can make your own version of Fluff at home, with this recipe.
|