|
The summers of our youth meant that on the three holiday weekends—Memorial Day, Independence Day and Labor Day—Mom was going to put out a major spread. You could have held a wedding reception with the diversity and quantity of food she set out.
Aside from the fruit pies and trays of brownies, what we most looked forward to was her potato salad.
It was so much better than anybody else’s mother’s, which was more like deli potato salad: potatoes and mayo, maybe a few shreds of carrot. Period.
Not our mom. Gifted with a super-palate and member of a family of competitive (with each other) cooks, her potato salad consisted of:
Red jacket potatoes (the most posh of that era)
Red onion
Small dice of red and green bell peppers (the only colors available then)
Fresh parsley and dill
A dressing of Hellmann’s mayonnaise mixed with Grey Poupon Dijon mustard and some red wine vinegar
We could care less about the steak, chicken, burger or whatever: We just wanted a big plate of potato salad, a big plate of fruit salad (berries, melon balls and stone fruits, presented in a carved out watermelon), glasses of her fruit punch and all those desserts.
(Alas, these remain our preferences. Keep the steak: Got sugar?)
Over the years we’ve tried to improve on Mom’s recipe:
By adding something new [not all at once]: anchovies (for the right crowd), bacon or ham, capers, chiles, crumbled feta or blue cheese, fancy basil from the farmers market (cinnamon, lemon, licorice, opal, Thai), other herbs (minced chives, fresh thyme), peas (English peas, snow peas, sugar snap peas), sliced olives.
By adding newer versions of standard ingredients: homemade or artisan mayonnaise, purple potatoes, orange and purple bell peppers, scallions instead of red onions, vinaigrette with flavored olive oil.
And we look for inspiring recipes from other cooks, such as today’s two recipes.
The first is a rustic Italian potato salad side dish; the second is an elegant first course.
RECIPE #1: HEALTHIER POTATO SALAD
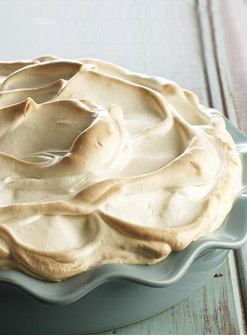
This recipe from Ciao Florentina uses a healthier olive oil dressing, veggies, and some additional ingredients that add not just flavor, but charm.
Fiorentina says this is an Italian-style potato salad recipe, “made with colorful red and purple heirloom potatoes, fresh herbs and spring green peas, then tossed in a lovely light and zesty vinaigrette.”
“To make a meal of things,” says Fiorentina, “feel free to add some toasted pine nuts or fresh radishes sliced paper thin, like I did. I also sprinkled the entire salad with a handful of green pea shoots in season; [at other times] I’ll go for pretty microgreens.”
|
|

[1] Healthy and beautiful potato salad from Ciao Fiorentina (photo © Ciao Fiorentina).
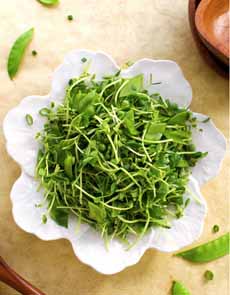
[2] Chopped pea shoots (photo © Hannah Kaminsky | Bittersweet Blog).
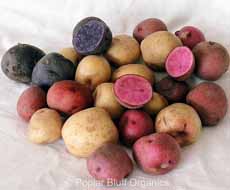
[3] Mixed-color new potatoes (also called creamer potatoes; photo © Poplar Bluff Organics).
|
Florentina is an artist as well as a cook: Everything she makes is beautiful to look at. Her recipes are simple, wholesome, and most important, delicious!
Download her free e-cookbooks and subscribe to her “recipe and inspiration” list here.
Ingredients For 4 Side Servings
2 pound colored new potatoes
Pinch sea salt
1-1/2 cup fresh green peas steamed*
1/4 cup green pea shoots*, roughly chopped
1/2 cup mixed fresh herbs parsley, dill, chives, thyme
1 scallion thinly sliced
5-6 tablespoons extra virgin olive oil
Juice from 1/2 lemon
1/4 teaspoon sea salt + more to taste
1 cup yellow grape tomatoes halved, optional
Optional: 1 radish
________________
*If fresh peas aren’t in season, substitute frozen peas; substitute microgreens for the pea shoots.
________________
Preparation
1. RINSE and cut the potatoes into rustic (thick) slices or wedges. Cover them with cold water and bring to a boil. Season with a good pinch of sea salt and simmer until tender but still al dente, about 10 minutes. Drain and set aside to dry in their own steam for a few minutes. While the potatoes are cooking…
2. STEAM the green peas for 3 to 4 minutes until al dente. Meanwhile…
3. WHISK together the olive oil, lemon juice and most of the herbs in a large bowl. Season to taste with sea salt. Add the potatoes and peas to the bowl with the dressing, and gently toss to coat. Allow the potatoes to sit in the dressing for about 10 minutes to absorb all the flavors.
4. TASTE and adjust the seasonings to taste with more sea salt. Sprinkle with the remaining herbs, pea shoots and scallions. Optional to sprinkle with some grape tomatoes and radish slices.
|
|

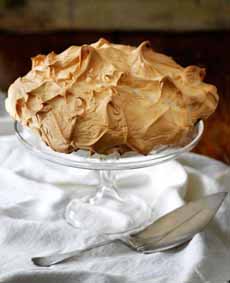
[4] Potato salad as an elegant first course, from Idaho Potato Commission.

[5] Blue Peruvian potatoes. Depending on the strain and the soil where grown, they will be purple instead. Note, however, that blue potatoes often cook up the same purple color as purple potatoes (photo courtesy Burpee).
|
|
RECIPE #2: LEBANESE BLUE POTATO TABOULI
This recipe, developed by Chef Giuseppe Tentori of GT Prime and GT Fish & Oyster in Chicago, came to us via the Idaho Potato Commission, is called tabouli.
Here’s some history for those of us who think of tabouli (tabbouleh) as a salad of cracked wheat, tomatoes, parsley, mint, onions, lemon juice, and olive oil:
The tabouli cracked wheat salad originated in the Levant, a historical area in the Middle East that included parts of the modern countries of Cyprus, Egypt, Iraq, Israel, Jordan, Lebanon, Palestine, Syria and Turkey. The term was first used in the 15th century.
The Levantine Arabic word tabbule is derived from the Arabic word tabil, meaning “seasoning”; or more literally, “dip.” While the word came to define tabbouleh, the cracked wheat salad, Chef Tentori used it to define the small dice of ingredients that comprise his dish.
At a fine restaurant, it sounds better than “potato salad.” (And technically, potatoes are indigenous to Peru, discovered by Spanish explorers. There were no blue potatoes—or likely other potatoes—in the Levant.)
Ingredients For 6 Servings
1 tablespoon red-wine vinegar
2 pounds Idaho All Blue Potatoes, peeled, small dice
4 tablespoons chopped parsley
1 ounce extra-virgin olive oil
1 tablespoon sherry vinegar
Juice of 2 lemons
Salt and pepper to taste
2 English (seedless) cucumbers, chopped fine†
Optional: 6 baby cucumbers‡ with blossoms (see photo)
6 ounces crumbled feta cheese
Asian mesclun mix, as needed
|
|
________________
†We found that we wanted some seasoning in the cucumbers. We mixed them with fresh dill. You could also toss them with dill seed, garlic powder or the zest of the lemons.
‡This is a specialty item available from produce suppliers to chefs. If you can’t find them, use your spiralizer to create a mound of cucumber on top. Alternatively, thinly slice and marinate cucumbers in vinaigrette for an hour or more; then drain to use as a garnish.
Preparation
1. BRING salted water to a boil in a medium pan. Add the red-wine vinegar and then the diced potatoes. Cook until just al dente. Shock the potatoes in an ice bath. Drain well and pat dry.
2. COMBINE the potatoes, parsley, olive oil, vinegar, lemon juice, salt and pepper in large bowl. Toss gently to combine.
3. PLACE a 4-inch ring mold in the center of each plate. Pack the potato mixture firmly into each ring mold; reserve the extra vinaigrette in bowl. Spread the chopped cucumber on top. Carefully remove the ring molds. Top the tabouli with a mini cucumber or two.
4. GARNISH the plate with the feta cheese and Asian greens. Drizzle the greens with the remaining vinaigrette.
POTATO LOVERS: Idaho Potato Commission has more potato recipes than the most avid potato lover could make in a year.
|
|