[1] Most brownies in three sizes: Regular (in front), Sprites (rectangles) and Morsels (mini squares).
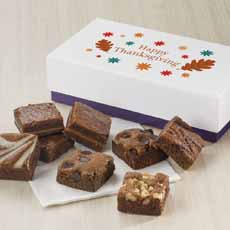

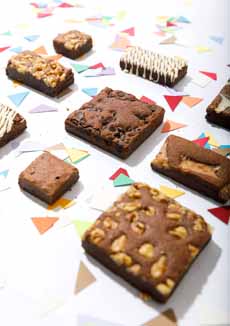
[2] and [3] Seasonal packaging and occasion messaging (birthday, get well, etc.) let you customize your gift. All photos courtesy Fairytale Brownies. |
|
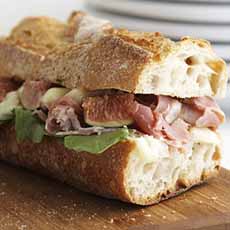
Last month we received a gift shipment of Fairytale Brownies. The excitement generated around here was almost incalculable: a level of joy and energy not seen since…we can’t recall.
Fairytale Brownies has been in business for more than 25 years, when two friends decided to bake and sell a favorite family recipe.
That was before e-commerce; today the squares of chocolate happiness are just a click away.
The ladies were quick to the Internet: Their URL is Brownies.com.
FLAVORS GALORE
There are more flavors than capacity to enjoy them all in any given week: caramel, chocolate chip, coconut, cream cheese, double chocolate, espresso nib, mint chocolate, original (no nuts), pecan, raspberry swirl, toffee crunch, walnut, white chocolate.
There’s also a seasonal pumpkin spice brownie.
There are also six flavors of blondies: cheesecake swirl, chocolate chip, cinnamon, lemon, pecan and raspberry white chocolate.
The good news is that all the bars freeze beautifully. Drooling yet?
There are also sugar-free mini-versions, called Morsels, in original and walnut.
PRETTY PACKAGING
Fairytale has long had packaging for every occasion: whether holiday designs, occasion messages (Happy Birthday, Congratulations, etc.).
The company has recently converted its solid brown box to perky polka dots that appeal to all levels of sophistication.
Custom-printed sleeves are available for corporate gifts.
THREE SIZES
In addition to picking your packaging, you can pick your size:
Full size, 3″ x 3″, the standard.
Snack size Sprites, half-size, 3″ x 1.5″.
Bite size Morsels, quarter-size, 1.5″ x 1.5″, also available with no sugar added.
All brownies are individually wrapped.
You can send as few or as many goodies as you like, from small boxes to gift towers.
|