|
La Poutine Week (poo-TEEN) is here!
Celebrated from February 1st to the 7th, it’s an opportunity for Canadians and American fans to indulge in the Canadian national dish:
French fries with cheese curds, topped with brown gravy.
Poutine is the Canadian version of cheese fries, with a different type of cheese and brown gravy instead of ketchup.
Here’s more about poutine, including the history of poutine.
HOW SHOULD YOU CELEBRATE POUTINE?
Recently we recommended hosting a poutine party.
But for a much smaller effort, you can enjoy a simple lunch at home.
In Canada, restaurants make creative versions of poutine, from poutine nachos, pizza and ribs to Japanese and Middle Eastern variations.
Take a look to see if any inspires you. One thing strangely absent from the list—easy to make at home—is a poutine burger, topped with cheese curds and fries, and drizzled with gravy.
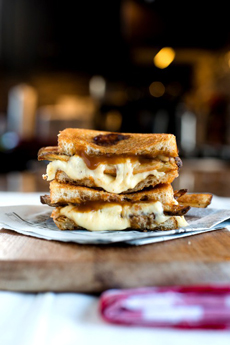
Below, we present another favorite American comfort food—the grilled cheese sandwich—given the poutine treatment.
This Poutine Grilled Cheese Sandwich recipe is from a delicious Canadian website, BSInTheKitchen (written by a brother and sister, Bob and Carrie Deutscher, of Saskatchewan).
In addition to this recipe, check out their Mac & Cheese Grilled Cheese Sandwich (no poutine).
RECIPE: POUTINE GRILLED CHEESE SANDWICH
Prep time is 40 minutes, cook time is 10 minutes.
Ingredients Per Sandwich
2 slices rustic or French bread
6-8 baked French fries
1 package instant brown gravy (or homemade)
½ cup cheese curds
Butter, room temperature
Preparation
1. MAKE the gravy according to package instructions; prepare the French fries.
2. PLACE a pan over medium heat, add the cheese curds and let them get a head start on melting.
3. BUTTER the outside of each slice of bread. Spread a generous amount of gravy on the inside of each slice. Add the French fries (pick the crispest ones). Place the cheese curds on top of fries, and add the top slice of bread to form the sandwich.
4. FRY in butter until golden brown on each side.
|