|
October 11th is World Dulce De Leche Day.
An overview of dulce de leche is followed by an impressive Bananas Foster Dulce de Leche Crêpe Cake recipe, by Sarah Fennel of Broma Bakery. Her recipe website is a compilation of everything sweet you’d like to eat.
DULCE DE LECHE & CARAMEL: THE DIFFERENCE
Dulce de leche and caramel are both made by boiling sugar with a milk product. In desserts, they can be used the same way; but the products do have differences.
Dulce de leche is a caramel spread and sauce* made by boiling heavy cream or milk with sugar, sometimes with a dash of cinnamon. Cajeta is a version of dulce de leche made with goat’s milk.
Caramel adds butter to the cream and sugar, and thus tastes buttery. It’s also lighter in color, while dulce de leche has a deeper flavor.
Here are more differences:
Caramelization is the process of heating sugar or sugar syrup until it browns, decomposing into a liquid. Butter and cream are added to the liquid caramel to make caramel candy and traditional, thick caramel sauce. Here’s the difference between caramel, butterscotch and toffee.
Dulce de leche is made by boiling sweetened condensed milk (or other sugared milk) until most of the water has evaporated and the sugar and milk solids start to brown.
If you want a treatise on dulce de leche, we highly recommend this article from The Heart Of Food blog. We were wowed by the author’s experiments to develop eight different “strengths” of dulce de leche.
THE HISTORY OF DULCE DE LECHE
Dulce de leche originated in Argentina. The first historical reference is as a dessert served at a 1829 peace meeting between two military leaders, Juan Manuel de Rosas and his political rival, Juan Lavalle.
According to legend, dulce de leche was created by accident when Manuel de Rosa’s maid was cooking milk and sugar, and was unexpectedly called away from the stove. Upon her return, the mixture had transformed into a thick, brown consistency. And it was delicious!
From that point forward, the new dessert was referred to as dulce de leche: literally, sweet from milk (in actually, the recipe makes caramelized sweetened milk).
Simple to make, dulce de leche became a traditional Argentinian dessert that spread to other Latin American countries and to sweet tooths worldwide.
While it is called by other names depending on country, before the term became well-known in English it was called milk jam (confiture de lait in French) or milk candy.
When it first entered the American consciousness some 20 years ago, dulce de leche became the “it” flavor for cake and pastry fillings, dessert flavors (ice cream, cheesecake) and as spoon candy. (If you’re not familiar with the term, it’s what many of us do naturally: Eat something sweet straight from the jar.)
It’s used as a cake filling and topping, as well as a batter mix-in. It’s one of the three “leches” in a tres leches cake. You’ll find DDL bar cookies, banana bread, panna cotta, thumbprint cookies, churros, and on and on to DDL infinity.
People with a really sweet tooth spread dulce de leche on toast and other breads, not to mention pancakes and waffles.
For the latter, for ice cream or as a general dessert sauce, heat the dulce de leche to a syrup stage and drizzle it.
RECIPE #1: HOMEMADE DULCE DE LECHE
A small jar of dulce de leche is pricey. You can make your own at home simply with a can of sweetened condensed milk. The can acts as the top half of a double boiler.
Pierce a few holes in the top of the can and place it in a sauce pan of boiling water with the holes facing up. The water should come to the top of the can.
Simmer for 30 minutes if you want runny dulce de leche sauce, or for up to 3 hours or more for thicker consistencies. As the water evaporates away from the top of the can, top it off.
For cooking beyond 30 minutes, watch the pan and add more boiling water as needed.
See photo #7.
Here’s the oven technique for making dulce de leche:
1. PREHEAT the oven to 425°F with the rack in middle. Pour the sweetened condensed milk into a 9-inch, deep-dish pie plate and cover tightly with foil. Set the pie plate in a roasting pan and add enough hot water to reach halfway up the side.
2. BAKE for 45 minutes, then check the water level. Add additional water as necessary, and bake another 45 minutes, or until the milk is thickened and brown. Remove the plate from the water bath and cool, uncovered.
3. REFRIGERATE, tightly covered, until ready to use. It will keep for up to 2 weeks (then it may start to lose flavor).
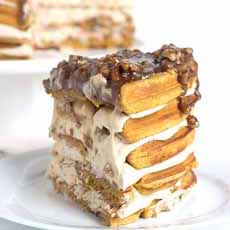
RECIPE #2: BANANAS FOSTER DULCE DE LECHE CREPE CAKE
This recipe is not for beginners, but if you must have it (as we did), it’s worth inviting the best cake baker you know to make it with you. (Or actually, make it as you watch. Thank you, R.G.)
Otherwise, here’s an easy naked layer cake recipe with bananas and cream cheese dulce de leche frosting.
For The Salted Dulce De Leche
15-ounce can sweetened condensed milk
¾ teaspoon salt
For The Crêpes
4 eggs
2¼ cups flour
2 medium bananas
4 cups milk
¼ cup sugar
2 tablespoons oil
¼ teaspoon salt
¼ teaspoon cinnamon
For The Topping
1 cup heavy whipping cream
½ cup brown sugar
¼ cup dark rum
2 tablespoons maple syrup
4 tablespoons butter
3 bananas, sliced lengthwise
Preparation
1. MAKE the dulce de leche. Bring a pot of water to a boil and place the can of sweetened condensed milk, unopened, on its side. The water must cover the top of the can at all times, so be prepared to pour in more boiling water from time to time. Lower the heat and simmer for 3 hours. As the label floats off, remove it from the pot. After 3 hours, remove the can from the water, allow to cool slightly, then open and stir in the salt. Set aside.
2. MAKE the crêpes. Heat an 8-inch nonstick skillet over medium heat. Pulse all crêpe ingredients in a food processor until homogenous (do not overmix—it toughens the final product).
3. POUR the mixture ¼ cup at a time into the skillet. As soon as the batter hits the center of the pan, lift the pan from the stove entirely and roll in a circular motion so the batter moves evenly around the skillet and forms a circle. Cook for about 30 seconds, or until the crêpe begins to bubble all around and goes from a glossy batter to a matte surface.
4. FLIP the crêpe over with a spatula. Cook the second side for about 30 seconds more. Set aside on a large work surface to cool. Repeat the with remaining batter. You should have 25-30 crêpes.
5. ASSEMBLE the cake. Lay two crêpes on top of each other in the middle of a cake stand, making a sturdy base. Scoop a rounded tablespoon of dulce de leche onto the top crêpe and spread to the edges of the crêpe using a cake spatula or butter knife. It will be thin but there are many layers to go!
Continue stacking layer after layer of crêpe, dulce de leche, crêpe, dulce de leche. About every 5 layers, stack 2 crepes together in order to keep your cake sturdy. Soon you will have a crepe cake!
|
|
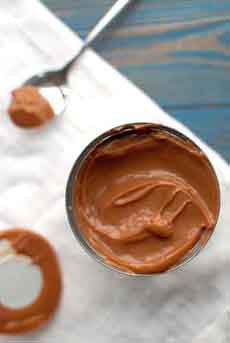
[1] A can of homemade dulce de leche. The recipe is below (photo © The Tough Cookie).

[2] The recipe for this amazing dulce de leche cake from Broma Bakery is below (photo © Broma Bakery).
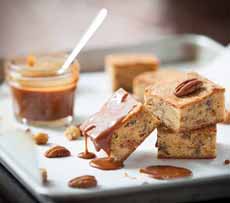
[3] Want a dessert sauce? These blondies are served with dulce de leche sauce (photo © Valrhona).

[4] Or, layer the dulce de leche inside the brownie, blondie, cake, etc. (photo © Brown Eyed Baker).
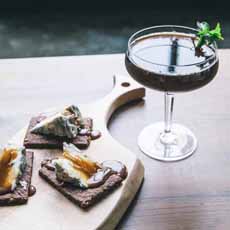
[5] Dulce de leche as a cheese condiment, here with Bonne Bouche goat cheese from Vermont Creamery (photo © Vermont Creamery).

[6] Dulce de leche layer cake. Here’s the recipe from Winnish (photo © Winnish).

[7] Homemade dulce de leche, boiling sweetened condensed milk on the stove top (photo © The Heart Of Food).
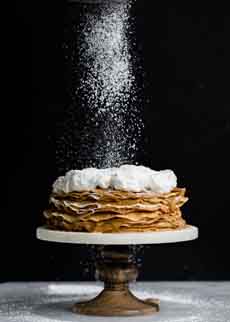
[8] Are you inspired? Here’s the result when you make the recipe (photo © Broma Bakery).
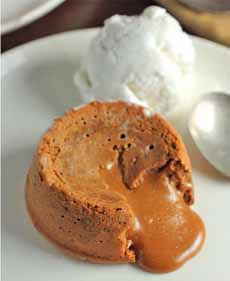
[9] How about a dulce de leche molten lava cake? Here’s the recipe from Honest Cooking (photo © Honest Cooking).
|