THE NIBBLE BLOG: Products, Recipes & Trends In Specialty Foods


Also visit our main website, TheNibble.com.

PRODUCT: Freakin’ Awesome Snack Mix

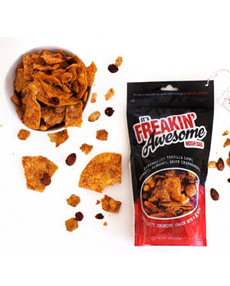
freakin-awesome-bag-bowl-230
The fun name made this product a hit. Photo courtesy The Festive kitchen.
  Recently, we were asked if we’d like to try a snack mix called It’s Freakin’ Awesome. How could we resist?

It was developed by a Dallas-area caterer, and became a big hit locally.

A bag arrived: a mix of sweet and salty flavors with a bit of heat. A blend of caramelized tortilla chips (a fun idea!), Chex cereal pieces, dried cranberries, almonds and peanuts, it’s a variation on a Chex Mix.

It’s tasty, to be sure, but no more awesome than some other Chex Mixes we’ve made. We will acknowledge, though, that compared to the boxed Chex Mixes on the market, the ingredients are more pure (you can taste the higher quality).

So why are we writing about it?

First, you might need something freakin’ awesome as a stocking stuffer or party favor. The name is sure to delight. “It’s Freakin’ Awesome” may be hyperbolic, but it is fun.

Second, a portion of every purchase goes to Carry The Load, a charity started by a former Navy Seal to support the families of fallen heroes from the military, law enforcement, firefighters and rescue personnel.

We love food with a mission!

 
You can purchase It’s Freakin’ Awesome online at FestiveKitchen.com, and at Festive Kitchen stores in the Dallas area. A 9-ounce bag is $8.65.
  

Comments off

The History Of Sangria & 15 Sangria Recipes For National Sangria Day

December 20th is National Sangria Day. The word derives from the Spanish word for bloodletting, and refers to the red wine that was used as a base for the punch.

While many of us think of sangria as a summer cooler, red sangria is the perfect color to celebrate the holidays.

> The year’s 25+ red wine holidays.

> The year’s 22+ white wine holidays.
 
 
THE HISTORY OF SANGRIA

Sangria’s ancestor is a Roman drink called “hippocras” (wine, sugar, spices and other ingredients).

Around 200 B.C.E., the conquering Romans arrived in Spain and planted vineyards.

They soon discovered that red grape varietals produced the best wine in the local soils.

The locals created fruit punches from the wines, and called these drinks sangria after the color.

While sangria was drunk in Spain for more than 1,000 years, it didn’t arrive in the U.S. until the 1964 World’s Fair in New York City.

It was served at the Spanish Pavilion, and quickly made its way into American homes and restaurants.

Sangria is available in bottles, ready to drink. Since January 2014, the use of the word “sangria” on bottle labels is restricted by the European Union. Only sangria made in Spain and Portugal can be sold under that name.

Here’s more about sangria
 
 
HOW TO MAKE SANGRIA

Sangria is made with wine, a spirit or liqueur, club soda, ginger ale, or another sparkling element (including sparkling wine), fruit, and sometimes, a sweetener.

In Spain, sangria is typically made with Rioja or another local red wine.

  • There are white wine versions, called sangria blanco (white sangria) and sparkling versions using cava, Spain’s sparkling white wine.
  • In countries where rosé is popular, it, too, is used as a base for sangria; is saké, Japan’s rice wine.
  •  
    The wine is typically blended in a pitcher or a punch bowl with chopped fruit, fruit juices, or a sweetener (honey, sugar, syrup, lemon-lime soda instead of the club soda), soda water, and sometimes brandy.

    While some people feel that the cheapest wine will suffice because the flavor gets blended with these other ingredients, we recommend using a good (not great) quality wine. Let “quality” refer to anything you’d be happy to drink straight from the glass.

    Ideally, the sangria—without the soda water—should be allowed to chill overnight for the flavors to meld. The chilled soda water or other sparkling beverage should be added right before serving.

    To serve, pour the sangria into a pitcher filled with ice cubes and garnish with more fresh fruit.

  • Traditional sangria pitchers have a pinched lip so that the fruit and other solids do not splash into the glass.
  • But if you’re going to purchase a pitcher, we particularly like a pitcher with a central well to hold the ice. This keeps the drink cold without diluting it.
  •  
     
    SANGRIA TRIVIA

  • Since January 2014, the use of the word “sangria” on bottle labels is restricted by the European Union. Only sangria made in Spain and Portugal can be sold under that name.
  • Based on its ingredients, sangria is both a cocktail and a punch.
  • Sangaree, a fruit and wine punch from the West Indies, is the same drink. The name is an archaic English term for sangria.
  •  
     
    15 SANGRIA RECIPES

  • Apple Sangria
  • Cranberry Sangria Recipe
  • Halloween Sangria
  • Jubilee Sangria
  • Peach Sangria #1
  • Peach Sangria #2
  • Pomegranate Sangria Recipe
  • Rainbow Sangria
  • Red, White & Blue Sangria
  • Rosé Sangria
  • Ruby Port Sangria
  • Saké Sangria
  • Stone Fruit Sangria
  • Summer Sangria (White Sangria)
  • Winter Sangria
  •  

    port-sangria-sandemans-230
    [1] This version adds Port to the red wine (photo © Sandemans).

    Rose Sangria
    [2] You can also make sangria with red or white wine (photo © La Marina | NYC [now closed]).

    apple-sangria-230
    [3] While traditionally made with red wine, white wine sangrias are also popular. You can make them with sparkling wine, too (photo © U.S. Apple Association).


    [4] Rosé Sangria With Peaches (photo © Sun Basket).


    [5] Unless you’re expecting a punchbowl-sized crowd, it’s easier to make sangria in a pitcher (photo © Anna Tukhfatullina | Pexels).


    CHECK OUT WHAT’S HAPPENING ON OUR HOME PAGE, THENIBBLE.COM.


    Comments off

    TIP OF THE DAY: The Five Minute Stackable Appetizer Maker

    Some gadgets are a snore. Others really make a difference. In the latter camp is the Five Minute Stackable Appetizer Maker.

    The device enables you to create bite size, multi-layered gourmet appetizers using everyday ingredients. Yes, even peanut butter and jelly or egg salad seems “gourmet” when made in this format!

    The manufacturer claims that this can be done in “just five minutes,” but that’s just for simple layering, slicing and plating. You need to add a bit of time for any prep work—making crab salad, slicing olives and pimentos, chopping nuts, whatever. But what you end up with is worth it: fancy and fun appetizers or dessert bites that can become a signature offering at your home.

    If you have great knife skills, you don’t need this gadget. Just build a loaf of layers and slice your own.

    If, however, you’d never get even slices without help, this is your gadget for triple- or quadruple-layer appetizer or dessert bites that delight adults and kids alike. The instructions are easy to follow and deliver perfectly proportioned pieces. The device is fool-proof: Anyone can turn out impressive, professional looking appetizers with inexpensive ingredients (or, feel free to load in the pricey ones).


    Stacked layers of crab salad, garnished with crème fraîche and celery. Feel free to add more complexity to your stacks: some watercress atop one of the crab layers or some pimento strips, for example. Photo courtesy Architec.

     
    HOW IT WORKS

    You layer the ingredients in the plastic mold (see the photo below), then use the slots in the mold to cut the loaf into even pieces.

    You start and ending the stacked loaf with bread or another base. The base can be polenta, tortillas or even sushi rice.

    The fillings can be anything that’s a bit moist or creamy—the ingredients need to be “flexible” since the mold presses them into bites that hold their shape. So avoid a hunk of iceberg lettuce (but arugula, cress, mesclun or baby spinach work) or roast turkey. But if there’s something you really want, you may be able to figure out how to make it work. (Shred the lettuce and dice the turkey into mini cubes in a layer with moist stuffing, for example.)

    The layers are pressed to your desired thickness, and you can keep adding layers until the body of the mold is full. Then slice. When you remove the mold, the appetizers can be served from the plastic bottom tray. But for impressing your guests, you’ll probably want to re-plate them.

    And of course, you can garnish them with whatever you like, from crème fraîche to caviar, or whipped cream for dessert stacks.


    Layers of pimento, goat cheese and black olives. In this photo, the bottom tray has been removed from the mold and the individual stacks are being separated for serving. Photo courtesy Architec.
     

    WHAT TO MAKE

    Kids will enjoy peanut butter, jelly and banana bites; ham and cheese; bacon and egg stacks on a toast or waffle base; and mini pizza stacks.

    Foodies will enjoy crab salad, smoked salmon, goat cheese, chicken mousse, and a garnish of caviar.

    For everyone else: you know what your friends and family like (onions? pickle relish?), and where your own creativity will lead you.

    For desserts, you can layer angel or pound cake with jam, fruit compote or pudding; make zebras from brownies, cheesecake and perhaps some jam; and otherwise layer your fantasy dessert ingredients.

    The fun of the Stackable Appetizer Maker is playing around with different ingredients to find what works for you. Do your experimenting right before lunch, so you can eat your experiments.

     
    WHERE TO BUY IT

    The Stackable Appetizer Maker is $19.99, available on Amazon or from the manufacturer, Architec, in your choice of black, blue or red.

    Customers have posted a lot of good comments on Amazon—that the cutting tool isn’t effective (use your own bread knife), that the recipe booklet is a mess (you’ll have no problem putting together your own combinations).

    There are also great tips not provided by the manufacturer, including:

  • Watch the video before you begin.
  • Use “squishable” ingredients with enough fat or moisture content to act as glue when the stacks are compressed. Spreads and salads (chicken, crab, egg, shrimp, tuna) work with a bread base.
  • Be sure that all the ingredients are cold.
  • Dip your knife in ice water after each cut to prevent sticking.
  •  
    You can watch the video and download the recipe book for free on the Architec website (the video link leads to YouTube).


    Comments off


    © Copyright 2005-2026 Lifestyle Direct, Inc. All rights reserved. All images are copyrighted to their respective owners.