THE NIBBLE BLOG: Products, Recipes & Trends In Specialty Foods


Also visit our main website, TheNibble.com.


TIP OF THE DAY: Homemade Caramel Apple Recipe

Here’s a different approach to caramel apples (also called toffee apples*): Use pretty twigs instead of the same old predictable wood popsicle/craft sticks.

The recipe comes from the book Sugar, Sugar: Every Recipe Has a Story, by Kimberly “Momma” Reiner and Jenna Sanz-Agero. The book will be published on October 25th, but you can order it now.

First, send the kids to the backyard or the park in search of twigs. Look for twigs that are about five inches long, although anything from four to six inches will do.

Note that this is a quick recipe for busy mommas. If you make caramel from scratch, you’ll notice the superior taste.

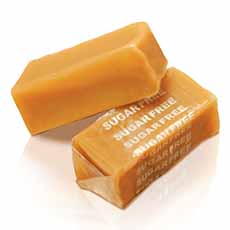
And if you prefer sugar-free treats, get sugar-free caramels.
 
 
CARAMEL APPLE RECIPE

Ingredients

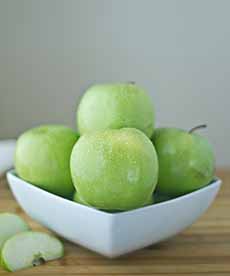
  • 5 medium-size tart apples (such as Granny Smith or Pippin)
  • Assortment of twigs
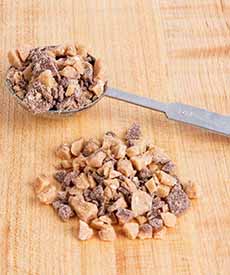
  • Toppings such as Oreo cookie crumbs, graham cracker crumbs, Heath Bar or Skor bits, chopped pecans and mini chocolate chips
  • 1 package (11 ounces) Kraft Premium Caramel Bits† or other caramels
  • 2 tablespoons water
  • Wax paper or parchment paper
  •  
    Preparation

    1. DE-STEM the apples, wash and drop into boiling water for 10 seconds. This removes any wax from the apples and helps the coating adhere. Alternatively, you can soak the apples for a few minutes in a bowl of hot tap water with a splash of vinegar (known as a “vinegar wash”) or clean them with a produce wash such as Veggie Wash, a spray solution that removes the wax from fruits and vegetables.

    2. REMOVE and polish the apples dry with a soft cloth. You may also wish to let the apples air dry for an hour, to be sure all the moisture is gone. (Moisture hinders the coating from adhering properly.)

    3. RINSE the twigs under water and set aside to dry.

    4. LINE a baking sheet with wax paper or parchment paper.

    5. CRUSH the toppings and put them in separate bowls.

    6. USE a sharp paring knife to cut a small “X” in the top of each apple where the stem was. Gently push the twig down into the center of the apple.

    7. PLACE the Caramel Bits and the water in a medium glass bowl or other microwave-safe dish. Microwave on high for 2 minutes. Remove the bowl from the microwave (be careful not to burn yourself—it will be hot).

    8. STIR the caramel with a wooden spoon until all the bits are melted. If necessary, heat in additional 30-second increments until caramel is thoroughly melted and smooth. Let the caramel sit 1 to 2 minutes, until it is thick enough to coat an apple. If it is runny like water, the coating will drip off the apple.

    9. CAREFULLY SWIRL the apple in the caramel, making sure it is completely coated. Tilt the bowl as needed. You may need to spoon the caramel around the top rim. Let the caramel drip off the bottom of the apple onto wax paper. Then…

    10. ROLL the apples in the desired topping(s). Once coated, place the apples on wax paper to set for a minimum of 30 minutes to one hour. Enjoy your twiggy treat or store it in the refrigerator.
     
    ____________________

    *Caramel and toffee are part of a family of butter-and-sugar confections that also includes butterscotch. Here’s the difference. Often, red candy apples, coated with a colored sugar syrup, are called toffee apples. This is incorrect. The terms caramel apple and toffee apple can be used interchangeably.

    †These little caramel balls melt easily and provide the perfect consistency for caramel apples. However, you can cut up and melt full-size caramels, too. We do this with our favorite gourmet caramels, as we prefer the flavor.

     
    [1] Twigs from the yard add artistry to caramel apples (photo © Momma Reiner [now closed]).


    [2] With caramel apples, use green rather than red apples so the red color doesn’t show through the caramel. Shown, Granny Smith apples (photo © Lisa Solonynko | Morguefile).


    [3] You can find sugar-free caramels to make this a better-for-you treat. These are from Abdallah (photo © Abdallah).


    [4] Heath Bar or other toffee bits are a great pairing with a caramel apple (photo © Webstaurant Store).


    Comments off

    PRODUCT: Gourmet Dog Food

    Pheasant, buffalo, duck, rabbit and
    venison…for dogs. Photo courtesy Evanger’s.

      It’s National Roast Pheasant Day. What did we come across when doing some research?

    Canned pheasant for dogs!

    Evanger’s Grain Free 100% Pheasant Canned Dog Food is made with only one ingredient: pheasant, in some pheasant broth.

    The rich food is recommended as a mixed/topper. Not only is it gourmet, but it’s also great for pets with food allergies and sick dogs/fussy eaters.

    And that’s not all: Canine connoisseurs can enjoy buffalo (more accurately, bison—here’s the difference), duck, rabbit and venison.

    While we don’t write about products we haven’t tasted, this is the exception.

    Treat your pup with a can or two. While you’re at it, get a smoked pheasant—for yourself and any other humans you’d like to treat.


    Comments off

    Start A Tradition With A Halloween Gingerbread House Kit & Gingerbread House History

    Gingerbread houses have long been a popular Christmas tradition. But they may be more appropriate for Halloween. After all, they were inspired by the gingerbread house belonging to the wicked witch done in by Hansel and Gretel. Witches = Halloween.
     
     
    THE HISTORY OF THE GINGERBREAD HOUSE

    At the end of the 11th century, when the Crusaders returned to Europe from the Middle East bringing ginger and other spices, gingerbread became popular in Germany.

    It was baked during the Christmas season as well as for year-round festivals. It engendered a trade guild: Only guild members could bake gingerbread, except during Christmas, when anyone could bake it.

    According to a reference in FoodTimeline.org, the tradition of baking gingerbread houses began in Germany after the Brothers Grimm published their collection of fairy tales in 1812.

    Inspired by the story of Hansel and Gretel, who nibbled at the witch’s candy-covered gingerbread house, German bakers created miniature houses from the already popular lebkuchen (gingerbread). Artists were employed to decorate the houses, which became particularly popular during Christmas.

    The tradition crossed the ocean with the German immigration wave that began in 1820. But it’s only in recent years that we’ve seen gingerbread houses for Halloween.
     
     
    HALLOWEEN GINGERBREAD HOUSE KITS

    Halloween gingerbread houses are available in easy-to-assemble kits; Those who just want to decorate can buy pre-assembled houses.

    This week, we tasted two different brands. The Wilton kit we tried was a Victorian mansion—not particularly haunted based on the kit’s contents, but you can add your own touches.

      Gingerbread House
    [1] A traditional gingerbread house for Christmas (photo © King Arthur Flour)..


    [2] A new tradition: the Halloween gingerbread house available from Wilton (photo © Wilton).

     
    More important than the accouterments in the kit, the gingerbread was delicious. We tried another brand’s gingerbread house kit that was full of Halloween-themed decorations: candy ghosts, candy corn, a spider, a black cat, and a tombstone. But the gingerbread was flavorless, and we declined to take a second bite.

    The assembled Wilton gingerbread house measures 6 inches wide by 3.5 inches deep by 9.5 inches high. It is available at Michael’s Stores and Jo-Ann Fabric & Craft Stores. You can find it online at Amazon.com.

    If you want to buy one online, here’s a haunted gingerbread house with all of the aforementioned Halloween decorations. We haven’t tasted it. If you buy one, please send us your opinion on gingerbread.

    ASSEMBLY TIP: Some of our gingerbread pieces arrived cracked. This is a relatively common occurrence, but not a disaster. The same royal icing you make to decorate the house is a good mortar to “glue” the pieces together. Glue it from the back.
     
     
    START A FAMILY TRADITION

    Decorating a gingerbread house is a family activity that can be carried through the generations. Start the tradition and take a photo of the finished house and the participants. See how the skill at decorating changes from year to year.

    If you don’t have kids but want the tradition, invite your friends to an annual Halloween tea party with the gingerbread house as the centerpiece. Here are tea party ideas for every month of the year.

    Gingerbread Recipes

  • Gingerbread Bars With Cream Cheese Frosting. For Halloween, press a piece of candy corn into the top of each piece. Recipe.
  • Gingerbread Whoopie Pies. For Halloween, leave off the crushed peppermint candy. Recipe.
  • Ginger Snaps. You can make these round cookies and add Halloween decorations: black and orange royal icing stripes, candy spiders, candy corn, etc. Recipe.
     
     
    CHECK OUT WHAT’S HAPPENING ON OUR HOME PAGE, THENIBBLE.COM.


  • Comments off

    RECIPE: Candy Corn Cones For Fall & Halloween

    Candy corn is great as a garnish during the fall season in general, and Halloween in particular season.
     
     
    EASY CANDY CORN GARNISHES

    Cupcakes

    Use candy corn as a cupcake topping. Create a circle of candy corn kernels around the rim of the cupcake. You can stand one kernel in the middle of the cupcake.
     
    Or create your own patterns. It’s a fun party activity or after-dinner dessert activity for kids.
     
    Jack-O-Lantern Cake

    Make a carrot cake with cream cheese frosting and filling, and cover the sides with a mixture of candy corn and chopped nuts (if it’s a loaf cake, cover the top). Use the nuts to cover most of the cake and press in candy corn at intervals.
     
    You can also use candy corn to make the eyes, nose and mouth of the Jack-O-Lantern, on the top of the cake.

    For a regular iced cake, add candy corn as a cake topper.
     
    Halloween Sundae

    We love a scoop of vanilla ice cream topped with hot chocolate sauce and sprinkled with candy corn. (Butterscotch or caramel sauces don’t provide enough contrast to the candy corn.)
     
    Here’s a fun idea that decorates ice cream cones with candy corn.

  • You can fill a cone with candy corn, the crunchy cones contrasting nicely with the soft corn “kernels.”
  • You can add a scoop of ice cream first, or fill with chocolate or vanilla pudding.
  •  
     
    RECIPE: CANDY CORN CONES

    Ingredients

  • Ice cream cones, sugar cone style
  • Royal icing (recipe)
  •  
    Preparation

    Use a piping bag to pipe royal ice cream around the perimeter of the cone, an inch at a time. Quickly press in the candy corn. Start at the bottom (pointed end) of the cone.

    Royal icing dries to the touch quickly, although a thin layer can take 4 to 6 hours to dry completely.

    The process goes faster with a group: Enlist the family. Otherwise, do it in front of the TV and the task will go more quickly.
     
     
    MORE CANDY CORN RECIPES

  • Candy Corn Cocktail
  • Candy Corn Cones
  • Candy Corn Fruit Salad
  • Candy Corn Fudge
  • Candy Corn Layer Cake
  • Candy Corn Popcorn Balls
  •   Candy Corn Ice Cream Cones
    [1] Attach candy corn pieces to ice cream cones. These cones are upside-down. Eat them right-side-up (photo courtesy Food Network).

    Candy Corn
    [2] Candy corn (photo Liz West | Wikipedia).


    [2] How about some candy corn fudge? Here’s the recipe from The Pampered Chef.


    Comments off

    FOOD 101: The Difference Between Ascorbic Acid & Citric Acid

    Ascorbic acid prevents cut fruit from turning brown. Citric acid provides tart flavor. And dipping apple slices into honey is delicious. Photo by Tova Photography | IST.

      In the previous post, we discussed how to make your own lime juice cordial. The recipe contains citric acid.

    One of our colleagues wondered, “What’s the difference between citric acid and ascorbic acid? Aren’t they both in lemon juice?”

    Yes, but the two products are not interchangeable.

    Citric acid and ascorbic acid are both found in citrus juice, as well as in numerous other fruits and vegetables. But they have different properties.

  • Ascorbic acid is vitamin C, a powerful antioxidant. It is the more versatile of the two acids. Among its many uses, it keeps cut fruits and vegetables from turning brown. Another major use is in baking bread: It promotes the growth of yeast, which gives bread a finer texture and greater volume. In commercial food processing, it is used as a preservative. Its chemical formula is C6H8O6 (sorry, we can’t figure out how to turn the numbers into subscripts).
  • Citric acid is a less potent antioxidant. It has one more oxygen atom than ascorbic acid (chemical formula C6H8O7). But it has little nutritional value. Its value is its tartness. Citric acid is used commercially to enhance or provide tart flavor in products from tart candies to soft drinks. So much of it is added to cola that it can soften the teeth of heavy consumers. Some bakers use it in sourdough bread to produce an especially assertive tanginess.
  •  

    Now that you know the difference, put it to work.

    Start by serving sliced apples with a honey dip or drizzle. Use ascorbic acid—dip the sliced fruit in a lemon juice-water mixture—to keep the flesh from turning brown.

    For citric acid: make some lime juice cordial!


    Comments off

    The Nibble Webzine Of Food Adventures
    RSS
    Follow by Email


    © Copyright 2005-2024 Lifestyle Direct, Inc. All rights reserved. All images are copyrighted to their respective owners.