THE NIBBLE BLOG: Products, Recipes & Trends In Specialty Foods


Also visit our main website, TheNibble.com.


TIP OF THE DAY: Try Dragon Fruit

Dragon fruit looks so summery. Who’d think this exotic tropical charmer is a fall fruit—not to mention the fruit of a genus of cactus?

Lightly sweet and pleasantly crunchy, dragon fruit, also called pitaya, is too alluring to pass by.

Pitaya is the fruit’s indigenous name in its home territory, Central America. Dragon fruit, which sounds more tempting, is the name bestowed by Asian growers. Depending on the species, the skin is textured like dragon’s flesh.

Dragon fruit is now grown in California and Florida, making it more available in U.S. markets.

Depending on the species, the skin ranges in color from hot pink to red. There is also a yellow variety that has a more spiky, dragon-like texture.

The flesh can be white, pink or magenta and has tiny, edible black seeds similar to those in kiwifruit.


Dragon fruit species range from magenta to yellow in color. Photo courtesy Melissas.com.

 
The fruit is a bit of a tease. The exterior looks resplendent but the flesh is on the mild side: like a watermelon that is only mildly sweet. The flavor comes up best when the fruit is chilled. Some varieties (look for the yellow skins) are more tart, which makes them more refreshing.

So what’s the big deal?

Whenever something is exotic and seasonal, it’s reason enough to bring it to the table. The arresting-looking dragon fruit may not taste as luscious as the homely mango, but it’s crunchy and interesting. Or, in the word most used to describe dragon fruit, it’s exotic.
 
 
HOW TO EAT DRAGON FRUIT

Dragon fruit should be refrigerated, unwashed, for up to 5 days, and served chilled. To eat dragon fruit, just wash and peel it. Refrigerate cut fruit in an airtight container.

Enjoy it in:

  • The Skin: Carefully remove the fruit from the skin, cube it and return it to the skin for serving. We toss the cubes with fresh lime juice. You can also add pomegranate arils, shredded coconut, a brunoise (tiny dice) of other fruit or anything that appeals to you.
  • Cocktails: Mix the puréed fruit with gin, tequila or vodka and garnish with a slice of the whole fruit.
  • Sorbet: Substitute dragon fruit in any fruit sorbet recipe.
  • Fruit Salad: A curiosity in any fruit salad, dragon fruit especially works in a tropical fruit salad, with guava, mango and papaya.
  • Garnish: As a sweet or savory garnish or a drink garnish.
  •  
    Dragon fruit is very nutritious, delivering B vitamins, calcium, carotene, fiber, phosphorous and vitamin C. The typical dragon fruit has 60 calories, reflecting the low sweetness level.

    If you can’t find it locally, you can order it at Melissas.com.

    Find more of our favorite fruits and fruit recipes by pulling down the menu above right, or in our Gourmet Fruits Section.
      

    Comments off

    HALLOWEEN: Skull & Crossbones Tumbler


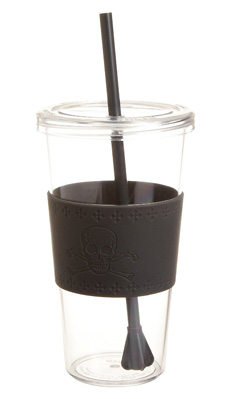
    The “Crossbones” tumbler is fun on
    Halloween and the other 364 days of
    the year. Photo courtesy Copco.
      Want to celebrate Halloween in a way that isn’t fattening?

    We’re partial to this “Crossbones” Sierra Cold Tumbler from Copco, featuring a subtle skull and crossbones motif on the plastic gripper (it’s hard to see in this photo—look on the left side of the grey band).

    The 24-ounce capacity tumbler has a leakproof seal, closed by a quarter-turn lid sealing mechanism. The permanent straw has a weighted bottom so the straw doesn’t rise up.

    It has durable construction and is BPA-free.

    We find it stylish for the workplace, and great at home for kids and others who tend to knock over filled cups. It’s a different kind of trick or treat.

    There’s a color for everyone in the house: beige, blue, brown, grey, orange, pink, purple and a damask print. But there’s only one Crossbones.

    Pick one up at Amazon.com, for $7.99.

    If you’re having an adult Halloween party or dinner and want a super party favor, fill a Crossbones tumbler with candy corn.

    For really special Halloween candy, check out these spooktacular treats.


    Comments off

    TIP OF THE DAY: Tips For Storing Chocolate

    If you only occasionally bake with chocolate, it’s easy to end up with leftover blocks and bars. How long can you keep the chocolate?

    Dark chocolate can last for two years or more. Milk chocolate and white chocolate should be kept for under a year, because the milk content in them deteriorates.

  • Store chocolate tightly wrapped. Start with plastic wrap, then place the wrapped chocolate in an airtight container. The container is needed because the cocoa butter in the chocolate absorbs flavors and aromas from neighboring foods, as well as ambient cooking aromas.
  • Store chocolate in a dry, dark place. The storage location should be cool, 60° to 75°F. “Dry” means away from humidity—which means not in the fridge. Chocolate has longevity because of its low moisture content. Moisture from the refrigerator air will attack the integrity of the chocolate. In terms of a dark place: All foods should be stored out of direct sunlight, which makes pretty much everything deteriorate faster.
  •  

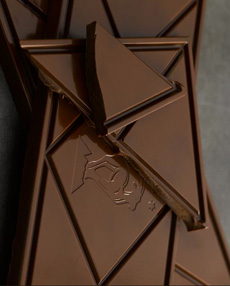
    Beyond the expiration date on the package: You can extend the shelf life of chocolate with proper storage. Photo courtesy Artisan Chocolate Company.


  • Stick it in the freezer. We’ve never tried this, but others claim that if you’re not planning to use the chocolate for months, you can store it in an airtight, freezer-safe container. The best way to defrost it is in the fridge, to avoid temperature shocks that cause bloom (see below).
     
    What Are Those White Spots?

    It’s called bloom. Room temperatures in excess of 75°F, fluctuations in temperature (from cold to warm, e.g.), and too much humidity can cause the chocolate to develop bloom—a white-grey streaking or spotting on the surface. There are two types of bloom.

    Fat bloom is the appearance of large cocoa butter crystals on the chocolate surface. It is a result of improper storage, poor tempering, lack of tempering or changes in temperature.

    Heat-related issues cause the cocoa butter to separate and rise to the surface. While the chocolate looks dull, it tastes the same and is safe to eat. It can still be used for baking or recipes in which the chocolate is melted (the cocoa butter reincorporates into the chocolate when melted). For other uses, such as candy-making, the chocolate needs to be re-tempered.

    Sugar bloom is more problematic. It is a crystallization of sugar that can be caused by high humidity and condensation (and is why you shouldn’t store chocolate in the fridge). The moisture combines with the sugar in the chocolate to create a “syrup.” When the syrup evaporates, large sugar crystals remain on the surface of the chocolate.

    The grainy sugar bloom crystals make the chocolate unpleasant to eat. But as with fat bloom, bars with sugar bloom can be re-melted and re-tempered, or used in baking or in sauces where the texture is not a factor. Filled chocolates with sugar bloom cannot be restored. Filled chocolates with fat bloom will still taste fine, although they won’t look as appealing.

    Fat bloom and sugar bloom can look the same. To determine which you have, you’ve got to touch them. Fat bloom fees oily and melts to the touch, while sugar bloom feels grainy.

    What If You Have Too Much Chocolate?

  • Make savory recipes. Chocolate is an ingredient in barbecue sauce, chili and tortilla soup, mole sauce and steak sauce. Jacques Torres makes a savory cream cheese and chocolate hors d’oeuvre.
  • Make a quicker dessert. Baking takes time, but you can prep a chocolate mousse in 10 minutes.
  • Drink it. Chop finely and heat with milk for hot chocolate.
  • Trade it. Give the chocolate to a friend who can use it now, in exchange for some of the cake, mousse or cookies in return.
  •  
    What About Eating Chocolate?

    Chocolate bars (“eating chocolate”) can be used for baking, and baking chocolate can be used for eating. To substitute conventional chocolate bars for baking chocolate, you need to use the percent cacao specified in the recipe (40%, 70%, 85%, etc.) or else adjust the recipe’s amount of added sugar to compensate.

    Storing eating chocolate:
    Observe the expiration date. Chocolate bars dry out as they age. In baking or other recipes, which have added fat, you won’t notice. On your palate, you will.

    Nuts in chocolate bars will go rancid over time, so especially observe those expiration dates. If the expiration date was a few months ago, take a bite. It may be just fine.

    Or it may be ready to be turned into hot chocolate or barbecue sauce.

    Chocolate Fun

  • Chocolate Terms: everything you want to know about chocolate
  • Chocolate Trivia Quiz
  • Chocolate Truffles Trivia Quiz
  •   

    Comments off

    CONTEST: Enter Your Best Chocolate Dessert Recipe


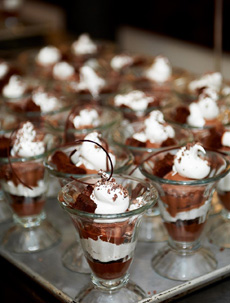
    Elizabeth Faulkner updates the chocolate sundae with chocolate gelato, chocolate cake, chocolate sauce and marshmallow creme. Photo by Phillip Angert | Scharffen Berger.


    We love chocolate. Who doesn’t? But after many years of tasting both the very finest and the most mediocre chocolates, we have to admit we don’t find chocolate quite as exciting as we used to.

    That’s why we think Scharffen Berger’s Elevate a Classic Desert Contest is such a great idea. Scharffen Berger is accepting recipe submissions that take classic chocolate desserts to the next level with new and interesting flavors.

    A panel of chocolate dessert experts including John Scharffenberger, Elizabeth Faulkner and Alice Medrich will judge the entries.

    Why should you enter your best chocolate recipe?

  • The Grand Prize winner will receive $10,000 and a whole host of Scharffen Berger goodies.
  • The Second Prize and Third Prize winners will receive $7,000 and $3,000, respectively.
  • All three winning recipes will be featured on the Scharffen Berger website.
  •  
    Here are the contest rules in full.


    To give you some inspiration, Johnny Iuzzini, Executive Pastry Chef at Jean Georges restaurant in New York City, and Elizabeth Faulkner, owner and Executive Chef of Orson Restaurant and Citizen Cake in San Francisco, created their own special versions of classic chocolate desserts. We got to taste both at the contest launch party a few days ago, and we can report that we had a table full of very clean dishes.

    Johnny whipped up Chocolate Pudding with Passion Fruit Gelée, Whipped Chocolate Creme Fraîche and Cacao Nibs, while Elizabeth created a Chocolate Gelato Sundae with Chocolate Cake Crumbles and Marshmallow Cream.

    Two tidbits we picked up that might be of use when you’re creating your recipe:

  • Both chefs prefer to use Madagascar vanilla beans, as opposed to Tahitian or other origins. Johnny finds Tahitian beans overpowering and too pungent. See the different types of vanilla beans.
  • Both chefs also like Scharffen Berger’s cocoa powder because it is un-dutched. The dutching process removes some of the essential flavors of chocolate. Learn more about dutched versus non-dutched cocoa powder.
  •  
    Now get baking!

    Find our favorite chocolate recipes:

  • Cakes
  • Cookies & Brownies
  • Ice Cream
  • Other Desserts
  • Read our review of Scharffen Berger Chocolate.
      

    Comments off

    FOOD HOLIDAY: Have A Fluffernutter Sandwich ~ It’s National Fluffernutter Day

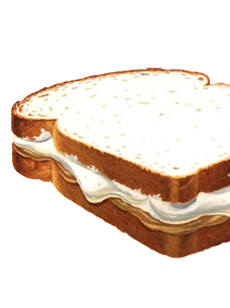
    Fluffernutter sandwiches require bread plus two fillings: peanut butter and marshmallow creme. Peanut butter was invented in 1890 but not mainstreamed in America until 1908 (see the history of peanut butter).

    Marshmallow, on the other hand, dates back to ancient Egypt, and marshmallow sauces were popular in the early 20th century (see marshmallow history). A marshmallow creme called Marshmallow Fluff was sold to ice cream parlors in 1910 by the Limpert Brothers, and Snowflake Marshmallow Creme was available around 1914. The first commercially successful, shelf-stable marshmallow creme, it was produced by the Curtis Marshmallow Factory of Melrose, Massachusetts.

    Marshmallow Fluff wasn’t the first marshmallow creme, but it’s the one that endured: 94 years later, the brand is still around. No one remembers the Limperts or the Curtises.

     
    A basic Fluffernutter sandwich. Photo
    courtesy Durkee-Mower.
     
    Made of corn syrup, sugar, dried egg whites and vanilla flavoring, Marshmallow Fluff’s origin dates to 1917. A Somerville, Massachusetts man named Archibald Query made a proprietary recipe in his home kitchen and sold it door-to-door.

    In the middle of World War I (1914 to 1918), sugar shortages forced Query to move on to other work. When peace returned, he was content with his situation and sold the formula for $500 to two returning veterans, H. Alan Durkee and Fred L. Mower. The product was popular among local homemakers, and the door-to-door sales soon shifted to grocers’ shelves. The rest is history.

    But what about the Fluffernutter sandwich?

    There’s no specific reference that cites when and where the Fluffernutter was born. We know who created the first sandwich filled with peanut butter and marshmallow creme, but not who named it. Was it someone at Durkee-Mower who sought to publicize the name, a creative consumer whose recipe was published in the local paper or perhaps a sandwich sold at a luncheonette? Durkee-Mower records don’t say.

    Who Made The First Sandwich With Peanut Butter & Marshmallow Creme

    Emma Curtis, co-owner with her brother of the Curtis Marshmallow Factory, was prolific in the development of many recipes for Snowflake Marshmallow Creme. Some of the first product labels, dating to 1913, suggested using the creme in sandwiches, topped with chopped nuts.

    In a recipe leaflet published in 1914, Emma suggests peanut butter as an accompaniment to the marshmallow creme. She thus gets the credit as the person most likely to have created what later became known as the Fluffernutter sandwich. Other claimants, please step forward! (Source.)

    In a booklet published before the end of the war, in 1918, Emma introduced the Liberty Sandwich: marshmallow creme and peanut butter (Americans were urged to give up meat one day a week during the war). The same recipe appears on a label for SMAC, an acronym for Snowflake Marshmallow Creme, which the brand adopted in 1922. (Source.)

    By 1935, peanut butter and marshmallow creme were an established pairing. An ad for SMAC presented many uses including, “Make sandwiches for the kiddies with SMAC and peanut butter.” But then, no “SMACwich” soared into history. Instead, we have the Fluffernutter. Did someone at Durkee-Mower, in the Boston area along with Curtis, see the SMAC ads and snitch the recipe, renaming it the Fluffernutter? That’s our [totally unsubstantiated] guess.

    Ways To Celebrate National Fluffernutter Day

  • Classic Fluffernutter Sandwich. The basic is creamy peanut butter and Marshmallow Fluff on white bread. We like to substitute whole wheat bread for the white bread, chunky peanut butter for added crunch and half of a sliced banana or caramelized banana slices. Others add a few strips of bacon. Peanut Butter & Co. suggests crumbled graham crackers.
  • Strawberry Fluffernutter. Use Strawberry Marshmallow Fluff or add strawberry jam and/or sliced fresh strawberries. (You heard it here first!)
  • Mock Fluffernutter Sandwich. Another NIBBLE creation: If you’ve got marshmallows but no marshmallow creme, slice them (or use miniature marshmallows) and lay them atop the peanut butter.
  • As of this writing, Marshmallow Fluff is also made in raspberry and strawberry versions.
  • Toasted Fluffernutter Sandwich. Still another NIBBLE recipe: Toss the sandwich under the broiler (open face) for a gooey, toasty effect, using either marshmallow creme or sliced or miniature marshmallows. You can buy toasted marshmallow creme from Solo.
  • Cookies, Cake, Muffins. Top peanut butter cookies, cakes, cupcakes or muffins with Marshmallow Fluff. Alternatives: Make PB and Fluff cookie sandwiches; use Fluff as the filling in a peanut butter cake; use a pastry bag to inject Fluff into a cupcake or muffin.
  • Milk Shake. Make a Fluffernutter Shake: Add two tablespoons of creamy peanut butter and two large spoonfuls of Marshmallow Fluff into a blender, along with a cup of milk. Blend 30 seconds or until smooth.
  •  
    Toonie Moonie makes organic marshmallow creme and Bountiful Harvest makes sugar-free marshmallow creme.

    There’s a website devoted to all things Marshmallow Fluff, including many recipes. Check it out!
      

    Comments off

    The Nibble Webzine Of Food Adventures
    RSS
    Follow by Email


    © Copyright 2005-2024 Lifestyle Direct, Inc. All rights reserved. All images are copyrighted to their respective owners.