THE NIBBLE BLOG: Products, Recipes & Trends In Specialty Foods


Also visit our main website, TheNibble.com.


TOP PICK OF THE WEEK: Talenti Gelato In Spring Colors For Easter


It’s really easy to make this ice cream cake
for Easter, or to simply serve three pretty
colors of gelato or sorbetto in a bowl. Photo
courtesy Talenti Gelato.
 

By the time dessert comes, we’ll be bursting at the seams: no room for carrot cake or coconut cake (can we get that to go?), not to mention pie or anything chocolate.

But what’s a festive meal without dessert?

Our solution? The beautiful spring colors of Talenti gelato:

  • The green, spring-evoking Mediterranean Mint and Sicilian Pistachio
  • The lavender loveliness of Black Raspberry Chocolate Chip
  • The lush, orange-hued Alphonso Mango Sorbet
  • The pink hues of Blood Orange Sorbet, the intensely hued Roman Raspberry and the pale pink Simply Strawberry
  • The speckled egg effect of Black Cherry and Caramel Cookie Crunch
  •  
    Read the full review of Talenti gelato to see how to turn them into a lovely “Easter Nest” dessert, that everyone will have room for…and how easy it is to make the colorful ice cream cake in the photo.


    Comments off

    A Recipe For Lemon Chiffon Cake Day & A Candied Peel Recipe

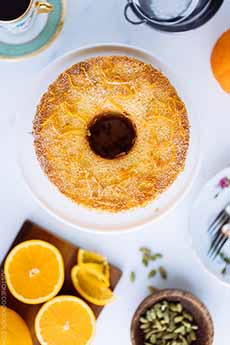
    March 29th is National Lemon Chiffon Cake Day. A recipe that isn’t seen much anymore, it was a favorite of our mother’s. She baked them in a tube pan and garnished the light, lemony slices with sliced strawberries and whipped cream.

    We prefer the lemon glaze and candied lemon peel in the recipe below.

    > Head to the recipe below.

    > The history of cake.

    > The different types of cake: a glossary.
     
     
    LEMON CHIFFON CAKE HISTORY

    According to General Mills, the chiffon cake, invented in 1927, was the first new cake to come along in 100 years.

    (One might dispute that—the brownie debuted within 30 years prior to it, although it is classified as a bar cookie and not cake. Digging through culinary history will no doubt produce other challengers.)

    The secret of this airy, fluffy cake are two: That egg whites are beaten separately from the yolks, and that the recipe uses vegetable oil instead of butter or conventional shortening.

    Using oil as the fat enables the cake to be refrigerated without hardening—and it was a breakthrough.
     
     
    Created By Necessity

    Chiffon cake was invented by the aptly named Harry Baker (no irony), an Ohio insurance agent.

    His business had gone south in the slump of 1921 and he was broke (there was also a sex scandal that led to divorce—read the details here). At the age of 40, Baker moved to Hollywood, leaving his wife and children behind.

    Looking for a new occupation, he decided to make and sell his homemade fudge, selling enough to a high-end confectioner to make a living.

    He also began to tinker with cake recipes, making more than 400 different recipes in his quest to bake a sweeter, moister angel food cake.

    Nothing worked until he replaced the butter with vegetable oil—his “secret ingredient”—in the cake recipe (recipe below).

    The cake was called chiffon for its weightlessness.
     
     
    Adored By Celebrities

    He brought samples to the Brown Derby restaurant on Wilshire Boulevard, which became a customer. After the Cobb Salad, it became the restaurant’s most popular dish.

    He also created a version with grapefruit replacing the lemon, at the demand of Louella Parsons.

    Stars such as Dolores del Rio, Nelson Eddy, Lily Pons, and Barbara Stanwyck ordered cakes for their parties. The studio commissaries followed suit.

    When the Brown Derby opened an outpost near Paramount Studios, it was mobbed by movie stars who wanted the cake: Claudette Colbert, Clark Gable, and Tyrone Power, among others (diets be damned?).

    First Lady Eleanor Roosevelt tasted the cake at a Los Angeles party she attended with Will Rogers. Shortly after, Baker was invited to the White House to share his recipe with the staff.

    Baker sent a cake but declined that invitation, along with hundreds of other requests for his recipe.
     
     
    A Secret Recipe

    He took elaborate precautions to guard his recipe, mixing the batter alone in the kitchen of his bungalow on Larchmont Boulevard.

    Not only was no one was allowed in his kitchen, but he also hid his garbage, fearing that spies would see the high volume of used vegetable oil containers and guess his secret ingredient.

    Throughout the 1930s, orders for the chiffon cake came in faster than Baker could make them.

    He mixed batter for each cake individually and baked them separately, using twelve tin hot-plate ovens he set up in a spare bedroom.

    Finished cakes were set to cool on his porch, where customers could pick them up, leaving the two dollars’ payment in the mail slot— the equivalent of around $45 today [source].

    At the peak of his business, Baker produced 42 cakes in an 18-hour day, from which he grossed the equivalent, in today’s dollars, of around $900. [source]
     
     
    Selling The Rights

    In 1947, Baker sold the recipe to General Mills—some say for $25,000, some say for $50,000, although the exact amount was never divulged.

    It was a secret no more. Chiffon cake created a sensation when it was published in the May 1948 issue of Better Homes and Gardens magazine.

    Today, in the U.S., the trend has long cooled and the chiffon cake is considered “retro.”

    But in Asia, its lightness has made it very popular from Japan to Singapore. If you visit, you can eat more than your fill.
     
     
    The Chiffon Pie

    Before Baker, another man, Morton Boston Strause, created the chiffon pie. Here’s more about him and a detailed article on how he became the “pie engineer.”

    For this recipe, you’ll need a 7-inch tube pan.

    FOOD 101:
    The difference between a chiffon cake and a sponge cake is that a chiffon cake contains oil; most sponge cakes contain no fat.
     
     
    RECIPE #1: LEMON CHIFFON CAKE

    The recipes for the lemon zest glaze and the candied lemon peel follow.

    Ingredients

  • 3/4 cup cake flour*
  • 1/4 teaspoon baking soda
  • 1/4 teaspoon salt
  • 3/4 cup plus 1 tablespoon granulated sugar
  • 3 large eggs, separated
  • 1/4 cup vegetable oil
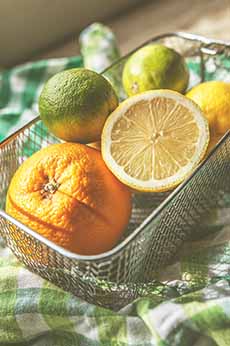
  • 1 tablespoon freshly squeezed lemon juice
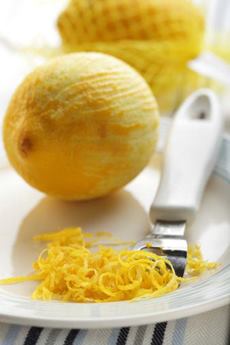
  • 2 tablespoons grated lemon zest, (about 4 lemons)
  • 1/2 teaspoon pure vanilla extract
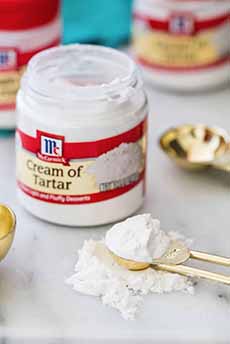
  • 1/4 teaspoon cream of tartar
  • Garnish: confectioners’ sugar, lemon glaze (recipe below) or whipped cream with berries or candied lemon peel
  •  
    _____________

    *Use regular cake flour, not self-rising flour.
    _____________

    Preparation

    1. PREHEAT the oven to 325°F

    2. SIFT together the flour, baking soda, salt, and 3/4 cup sugar. Set aside.

    3. WHISK together the egg yolks, vegetable oil, 1/3 cup water, lemon juice, lemon zest, and vanilla. Add to the sifted dry ingredients; beat until smooth.

    4. BEAT the egg whites in the bowl of an electric mixer on medium speed, until foamy. Add cream of tartar and beat on high speed until soft peaks form, about 1 minute.

    5. ADD gradually the remaining tablespoon of sugar; beat on high speed until stiff peaks form, about 2 minutes.

    6. FOLD egg-white mixture into the batter slowly, 1/3 at a time. Add batter to an ungreased tube pan. Using an offset spatula, smooth the top. Bake until a cake tester inserted in the middle comes out clean and the cake is golden, about 45 minutes.

    7. REMOVE cake from the oven. Invert the pan over a wine bottle for 2 hours to cool. Remove and run a knife between the cake and the pan; invert again, and remove the cake.

    8. GARNISH as desired: Dust the plain cake with confectioners’ sugar before serving, or serve with whipped cream. We like to drizzle the cake with the lemon zest glaze below.
     
     
    RECIPE #2: LEMON ZEST GLAZE

    Ingredients

  • 1 cup confectioners’ sugar
  • 2 tablespoons lemon juice
  • 2 tablespoons lemon zest
  • Pinch of salt
  •  
    Preparation

    1. COMBINE the ingredients in a small bowl and stir until well blended.

    2. DRIZZLE over the top of the cooled cake.
     
     
    RECIPE #3: CANDIED LEMON PEEL RECIPE

    You can also use this recipe for candied grapefruit, lime, and orange peel.

    For other recipes, or just as candy, you can dip the peel in melted chocolate and dry it on wax paper. Serve it with after-dinner coffee.

    Ingredients

  • 3 lemons
  • 2 cups water
  • 2 cups white sugar
  •  
    Preparation

    1. WASH lemons, pat dry, and remove the fruit pulp and as much of the white pith as you can. Cut peel into slices 1/4 inch wide.

    2. BOIL water in a small pan; add peel strips. Boil for 5 minutes, until tender.

    3. REMOVE peels from water and whisk in the sugar until dissolved. Return water to a boil; add peels and boil until syrup absorbs into the peel.

    4. DRAIN cooked peel on paper towels. After they dry, you can store them in an airtight jar for a week.
     
     
    WHAT IS CREAM OF TARTAR?

    If you’re a baker, you’ve likely been using cream of tartar since your first forays.

    Angel food cake, biscuits, chiffon cake, crystallized candy, lemon meringue pie, meringues and other cookies, and many other recipes require it.

    But what is it, exactly?

    Technically, it’s a chemical compound, potassium bitartrate, also known as potassium hydrogen tartrate (for you chemistry majors, the formula is KC₄H₅O₆). In cooking, it is known as cream of tartar.


    [1] This lemon chiffon cake is finished with a lemon glaze. Both recipes are below (photo © Py Ha | Dreamstime).


    [2] This orange chiffon cake shows a topping of orange peel. Here’s the recipe. The lemon chiffon recipe below has instructions for lemon peel (photos #2, #5 and #6 © Just One Cookbook).


    [3] This lemon emon chiffon was made as a iced layer cake. It can also be made in a tube pan without layers (photo © K.G. Toh | iStock Photo).


    [4] A slice of iced chiffon cake with lemon buttercream filling (photo © American Egg Board).


    [5] An Earl Grey chiffon cake. Here’s the recipe.


    [6] How about a chocolate chiffon cake? Here’s the recipe.

    Basket Of Citrus Fruit: Grapefruit Lemon Lime Orange
    [7] You can use your favorite citrus fruit in the recipe (photo © Monika Stawowy | Wesual | Unsplash).

    Zested Lemon
    [8] Lemon zest (or grapefruit zest, lime zest, or orange zest, depending on your choice of citrus (photo © Sunkist).

    Bowl of candied lemon peel
    [9] If you don’t want to make lemon peel, you can buy it (photo © Amifruit).

    Jar Of McCormick Cream Of Tartar
    [10] Cream of tartar: what is tartar, and why is this the “cream?” (photo © with a long explanation at Sugar Spun Run).

     
    It’s a byproduct of wine making, processed from the potassium acid salt of tartaric acid. Tartaric acid occurs naturally in grapes and is the main type of acid that you taste in wine (especially white wine).

    Cream of tartar is a powder of tartaric acid mixed with potassium hydroxide, a.k.a. potash†, and therefore is less acidic than straight tartaric acid.

    Why do we use it?

    When paired with baking soda, cream of tartar gives baked goods their rise. It’s a volumizer and also a tenderizer. Plus:

  • It stabilizes egg whites and whipped cream.
  • It’s an anti-caking and thickening agent.
  • It prevents sugar syrups from crystallizing.
  • On another note, it reduces the discoloration of boiled vegetables.
  •  
    It’s also a component of baking powder, as an acid ingredient to activate baking soda.

    And it’s combined with potassium chloride in sodium-free salt substitutes.

    Fun Facts

  • Use of potassium bitartrate has been found in an ancient village in northern Iran that’s 7,000 years old [source].
  • Modern applications of cream of tartar began in 1768 when the French started using it regularly in their cuisine.
  • In addition to causing a fluffy rise in baking, the powder can be used in baking or as a heavy-duty cleaning solution. Mix equal parts cream of tartar with white vinegar into a paste. Apply to bathroom and other surfaces with a scrub brush or heavy-duty sponge, then wipe off with a clean, damp cloth.
  •  
    > Here’s more about cream of tartar, including cream of tartar substitutes.
     
    ________________

    †Potassium hydroxide, an inorganic compound denoted by the chemical formula KOH, an alkali metal hydroxide and a strong base. Caustic potash, potash lye, and lye are all names for potassium hydroxide.


    CHECK OUT WHAT’S HAPPENING ON OUR HOME PAGE, THENIBBLE.COM.


    Comments off

    TIP OF THE DAY: Cooking With Black Garlic

    Chef Johnny Gnall takes on a relatively new ingredient, black garlic, which originated in Korea. It’s a fermented…If you have questions or suggestions for tips, email Chef Johnny.

    Sometimes you can dramatically alter the flavor profile of an ingredient simply by leaving it alone; such is the case with my new favorite ingredient, black garlic. By letting raw garlic ferment for a month at high heat under specific conditions, it can be transformed into what appears to be something completely new and unique. Think of the process of caramelizing onions: the flavor, color, and texture of the onion are changed so dramatically by the end that if you didn’t know better, you might think you were dealing with a completely different ingredient.

    Since garlic is even sharper and more acrid than onion when raw, the resulting metamorphosis is that much more dramatic and contrasting. Cloves of black garlic have a rich black hue and are soft enough to squish between your fingers. Tiny pockmarks and imperfections across its otherwise sleek, black surface give it the appearance of freshly laid tar on a blacktop. Its flavor, however, is where you can really taste the magic. With notes of dark beer, caramel, molasses, fig, and balsamic vinegar and an umami similar to that which you taste in soy sauce, black garlic could not taste more different than its raw garlic origin.


    As with roasted garlic, you can spread the cloves on bread. Photo by Katharine Pollak | THE NIBBLE.


    Where before there was acrid bite, there is now sweetness; the soft fruitiness is a sharp contrast to raw garlic’s pungent, often unpleasant odor. In essence, all the work of “taming” raw garlic has been done for you, so there is no need to roast, or sweat, or sauté, or blanch, or whatever other method you might choose to soften the potentially overpowering flavor of garlic. Make no mistake, however: garlic, when cooked and applied properly, is pure heaven (I think most people would agree). In fact, the makers of Black Garlic go out of their way to make it clear that they do, indeed, love regular garlic; they just also love black garlic. I can’t say I blame them.

    When I recently got my hands on some black garlic (which comes in the form of whole heads, peeled cloves, and paste), I was excited to experiment. Having eaten it before, but never cooked with it, I wanted to try a variety of cooking methods across a number of different ingredients, both to test its versatility as an ingredient, and also to find the dishes and techniques that best showcased its unique and delicious flavor.

    COOKING CHICKEN WITH BLACK GARLIC

    I got myself a whole chicken and rooted around for a few other odds and ends (some stock scraps, butternut squash, and farro, among others), broke the chicken down into all its parts, and spent the next 6 hours in the kitchen, up to my elbows in black garlic. What follows is a chronicle of my findings as I cooked and ate my way through the discovery process:

    Chicken Wings: Starting with the wings, I seasoned them with salt and pepper and shallow fried them in oil as I melted some butter and whisked in a couple of tablespoons of the black garlic paste. It was challenging to properly emulsify the butter and the all-natural paste, since “all-natural” means it contains nothing but finely smashed black garlic cloves. This is good for whole food purists, but bad for emulsifying.

    Had I deep-fried the wings, it probably would have helped the butter mixture stick better, as would a light dredge in flour prior to the shallow fry. At any rate, I tossed the wings in the butter and drizzled the remainder over the top, then let them rest for a couple of minutes. Sure enough, the flavor got in there, even if the butter’s broken texture wasn’t exactly what you’d want on your wings. As far as the flavor, the black garlic was sweet, sticky, and rich in umami, which is exactly what you want on your wings.

    It’s worth mentioning that you should use restraint with the salt, as you really want to let the black garlic flavor to come through, and chicken wings can get salty very quickly if you’re heavy handed when you season. All in all, they were super tasty; feel free to rub them with the paste and marinate them overnight to really let that flavor sink in.


    Look for black garlic in sealed bags that
    protect the product. Photo by Katharine
    Pollak | THE NIBBLE.
     

    Chicken Legs: The next piece I grabbed was a leg. I wanted to braise this one with some red wine, as I imagined the wine’s fruity yet earthy flavor profile would compliment the black garlic’s, their flavors melding and concentrating as they cooked. Unfortunately, I found that while the chicken leg turned a beautiful mahogany color, the black garlic flavor was lost in the wine. The meat was, of course, succulent and juicy, but it tasted nearly all of wine and I barely got the black garlic notes.

    I had used 5 cloves of black garlic, about a cup of wine, and a cup of chicken stock; clearly I needed to up the black garlic content if I wanted to harmoniously blend these two flavors. The chicken now out of the sauce pot it was braised in; I added two heaping tablespoons of the black garlic paste and a few teaspoons of sugar, whisked it into the wine and stock, and set it to a low simmer.

    After about an hour it was reduced by about half, and I tasted it: holy moly. The flavor was absolutely outstanding, sweet and round and full of umami. It was a flavor that would go well on just about anything, a perfect blend of wine and black garlic, and just enough savory to balance the sweet.

     
    In all honesty, it tasted like a nearly indistinguishable substitute for demi-glace, and I immediately thought of French Onion Soup. If one needed a vegetarian version, this reduction, cut with a splash of vegetable stock, stock could replace beef stock and no one would miss a beat. I let mine reduce a bit more, to about a quarter of its original volume, and now I had a luscious, syrupy reduction that I honestly could drink a glass of: pure, sweet, black garlic heaven.

    Chicken Breasts: I attempted a black garlic brine for one of the chicken breasts using a quart of water, ¼ cup of salt, 5 cloves of black garlic, 1 thai chile, and a few pieces of lime peel; after brining it overnight, I seasoned, seared and roasted it. I wanted the preparation after the brine to be as simple as possible so that I could really judge how much the black garlic flavor transferred to the breast.

    In truth, there was not much infusion in the meat; while it was tender and juicy from the brine, it tasted like little more than chicken. Interestingly enough, I did notice that some of the drippings that had fallen as the breast roasted had caramelized on the roasting plan. I dipped my finger in them and tasted, and the favor explosion in my mouth caught me by surprise. Its concentration and richness were like that of the wine reduction, but this time the profile was much more savory, as it had now been combined with the flavors of well-seasoned chicken instead of sugar-rich wine. The caramel-colored goo tasted of umami, its flavors and texture akin to a rich, slightly sweet soy sauce.
    Lessons Learned: I was starting to get a sense of how to cook with the black garlic, from both my misses and successes. It made sense that a very gentle method of developing its flavor wasn’t going to do much; after all, the garlic had already been through a very gentle and mellowed fermentation process to get to its current state. To unlock something even deeper, it was going to take more intense cooking: techniques that involved direct heat might be the key to getting something entirely new out of what is already quite the unique ingredient.

    Infusing butter, brining, and braising didn’t quite work, perhaps because these are slow cooking methods deigned to gently coax the flavors out of ingredients. Roasting, on the other hand, applies direct, dry heat; harsher than a liquid simmer, that worked out much better, even in just a few drops of drippings. Reducing almost all of the water out of the black garlic and wine yielded similar, outstanding results.
    Chicken Legs, Part 2: With this in mind, I rubbed the other chicken leg all over with a paste I’m calling a “Korean Jerk,” made from a tablespoon of neutral oil, a tablespoon of black garlic paste, salt, pepper, and a ¼ of a finely minced habanero (roughly a teaspoon or less), then I wrapped it tightly in plastic wrap and put it in the fridge to marinate overnight. The rub was a bit challenging to stick, so you could probably add a bit of corn starch if you wanted, but if you spend a minute really rubbing it in, that and the time marinating in the fridge will do just fine.

    The next day I pulled the leg out and noticed the stunning change in color that it had picked up while marinating: it was now amber all over the skin, with tiny flecks of bright orange from the habanero and sexy splashes of deep black sheen from the paste. I hit it with a touch more salt and pepper and set it to roast at 350 for about 20 minutes, finishing at 450 with a drizzle of olive oil to help crisp up the skin a bit. This result was the best by far. The black garlic provided a nice, soft background for the heat of the habanero, just as you notice in traditional jerk seasoning, and it quite naturally went great with the chicken. All in all, the flavors were infused, balanced, and tasty.

    In retrospect, I probably could have seared it if I wanted to really test my theories of intense heat and get a crispier skin, but I was worried about the black garlic burning. I guess we won’t know until you try it. So try it!

    Next up were the thighs; these I was really excited about: I deboned them completely and stuffed them with a handful of cloves of black garlic and some very thin slices of lemon, rolled them up, tied them, and seared them on all sides. Then I whisked about a quarter cup of the black garlic paste into a cup of particularly earthy cocoa & coffee barbecue sauce I’d made the week prior. I placed the thighs back into the pan in which I’d seared them, added the black garlic barbecue sauce, finished with stock until the thighs were mostly submerged, then braised it, covered, at 350 for about 15 minutes.

    This was another big success. The high concentration of the paste and the thick, rich sauce as a vehicle to carry its flavor meant that everything really came together; it was reminiscent of a red mole sauce, sweet and earthy as it clung to the chicken thighs. Moreover, inside the rolled thighs was another completely different flavor combination of bright lemon, sweet, rich black garlic, and savory dark meat, all keeping one another in check and adding even more overall depth to the dish. A bite containing a bit of everything together was almost indescribable: you got bright, tart, sweet, earthy, salty, tangy, and more, all hitting you at once. It was the veritable surprise party in your mouth that comes only from multiple layers of flavors and ingredients brought together with care.

    On the side I made a simple green salad and dressed it with a black garlic vinaigrette, emulsified in the blender (hyperlink to emulsified vinaigrettes article) and containing 5 cloves of black garlic, about 3 tablespoons of red wine vinegar, some salt and pepper, and a slow stream of neutral oil (I used neutral as opposed to olive oil in order to let as much black garlic flavor come through as possible). The vinaigrette was subtle and pleasant, the black garlic adding a sweetness that was richer and more complex than if I had simply used white sugar.

    I did notice that, even in the blender, there were still small bits of black garlic that did not blend into the dressing. This was not an issue because the little morsels were delicious, but it was worth noting the continued resistance to easily break down and emulsify. That being said, I think these tiny flavor bursts in the salad were as much a flavor ‘pro’ as they were a consistency ‘con,’ but if you’re not into it, you can always strain them out.

    All the stock I used throughout the cooking process was a black garlic chicken stock I made by rubbing the chicken carcass, thighbones, and wing tips with black garlic paste before roasting them at 375 for an hour and a half; I also added a handful of cloves to the stock as it simmered. The color was absolutely gorgeous, sort of a chestnut brown; and the aroma that filled my entire house was like the combination of a magical forest and a dark chocolate sauna. It was nutty and sweet and savory and gamey, and it brought me several times to stand over the pot, inhaling deeply and smiling as its heavenly, honey perfume wafted about my head.

    Unfortunately it tasted far more like chicken and stock scraps than it did like black garlic, even after it reduced for several hours; it was perplexing to get so much by smelling and so little by tasting, but I have had the same experiences with certain wines. Whether it’s me or what I’m smelling, I think I can pick up more complexity from aroma than I can from taste. It also may have to do with my previously noted observations of gentle versus harsher cooking with this particular ingredient: simmering stock is definitely on the gentler side, and there’s a lot of water, scraps, and bones to dilute the black garlic’s flavor.

    I froze most of the stock, reserving just under a quart to keep on hand for one last use. I ended up using it to make farro the next day, and as the hearty grains of farro took their time soaking it up, the stock reduced to literally nothing, as it goes when you cook most grains. I ran my finger across the bottom of the pan after the farro came out, and when I tasted it, the sweetness was right up front, as if I had added a spoonful of caramel to the pot at some point. The hearty flavor and toothsome texture of the whole grain married with this sticky sweetness, straddling the line between sweet and savory, kind of the way a muffin sometimes does.

    From this point I could have added dried fruit and nuts or fresh herbs and feta and either would been perfect. I went with a squeeze of lemon and some thinly sliced kale, then topped it with chunks of butternut squash that had been roasted in some of the leftover black garlic barbecue sauce, then tossed with a little mascarpone cheese.

    There are literally thousands of other directions you could go with black garlic. Its flavors are very complementary and it’s hard to overdo it, which is most definitely not the case with raw garlic, as I’m sure you know. Plus it happens to be rich in antioxidants (twice the content of raw garlic) and cancer-fighting agents. Bonus!

    Try marinating some Korean style short ribs (or almost any protein) overnight in a black garlic marinade to get the most out of its flavor. Better yet, go uber-simple and serve a pile of whole cloves on a cheese plate to really blow people’s minds. You can put time and love into taking its flavor to the next level, or let let the black garlic speak for its delicious self: both will be crowd pleasers. I’m glad I finally got to know this delicious and unique ingredient. It’s time you did the same!

    THE ORIGIN OF BLACK GARLIC

    It’s one of those things that you’d guess has been around for thousands of years, fermenting in crocks. But it’s quite new, created with a high-heat fermentation process that turns regular garlic into black garlic in 30 days. While it probably developed within the last 10 years in Korea, the American product was invented by a Korean-American named Scott Kim in Southern California, who has a patent pending on the process. He is currently the only supplier in the U.S.
    MORE ABOUT BLACK GARLIC.


    Comments off

    EASTER SNACK: Bunny Pops


    Bunny Pops: Rice Krispie Treats or ice cream
    bars. Photo courtesy Recipe.com.
     

    How cute are these Easter Bunny Pops?

    They’re a creative Easter snack idea: Rice Krispie Treats on a stick. Here’s the recipe, from Recipe.com.

    You can also port the idea to ice cream bars: Paint bunny faces on ice cream bars (our favorite brand is Magnum Ice Cream Bars):

  • ADD 1 or 2 drops of food coloring into melted white chocolate chips or royal icing recipe below; stir to combine.
  • DIP the tip of a paintbrush or a wooden skewer into the pink chocolate, then paint ears, nose and mouth on bars.
  • FREEZE until firm, about 30 minutes.
  •  
    You can make a half batch of this recipe:

    ROYAL ICING RECIPE

    Ingredients

  • 4 cups confectioners’ sugar
  • 2 tablespoons meringue powder
  • 6 tablespoons water
  • 1 drop red food color
  •  
    Preparation

    1. COMBINE ingredients with an electric mixer on low speed for 7-10 minutes, or until the icing loses its shine. If the icing is too stiff, add more water, a teaspoon at a time.

    2. STIR in more food color as needed. Put into piping bag with a small icing nozzle, or a plastic storage bag with the tip cut off (smallest possible opening).

    3. OUTLINE the ears, create the eyes, nose and mouth. Switch to a wider nozzle to fill in the ears.


    FIND MORE OF OUR FAVORITE COOKIE RECIPES & ICE CREAM RECIPES,


    Comments off

    APRIL FOOL’S DAY: Can You Get A Free Drink?

    There may still be time for you to pitch this idea to your favorite watering hole:

    Customers get a free drink on April Fool’s Day if the bartender likes a joke they tell.

    We just learned that two New York City restaurants, Courgette and Mari Vanna, are giving a complimentary drink to ANY joke told to their server: It doesn’t even have to be a good joke.

    We think every April Fool’s Day should be a free drink opportunity…with more demanding standards.

  • If the bartender or server laughs, you get a free drink.
  • If there’s no great response, you get an H.O. for effort—that’s half off your drink.
  • Let’s call it the April Fool’s Day Joke-For-Drink Challenge.
  •  
    Tell the joke, get a laugh, get a drink. Photo courtesy BeerLime.com.
     
    Spread the word at your favorite hangouts. And if there’s not enough time to do it this year, start contemplating now for 4.1.14.

    A priest, a rabbi and your mama walk into a bar…


    Comments off

    The Nibble Webzine Of Food Adventures
    RSS
    Follow by Email


    © Copyright 2005-2024 Lifestyle Direct, Inc. All rights reserved. All images are copyrighted to their respective owners.