THE NIBBLE BLOG: Products, Recipes & Trends In Specialty Foods


Also visit our main website, TheNibble.com.

ST. PATRICK’S DAY RECIPE: Ice Cream Cake

Mint Chocolate Chip Ice Cream Cake

Andes Mints

After Eight Mints
[1] Devil’s food cake and mint chip ice cream (photo Jennifer Davick | Southern Living). [2] Andes Mints (photo courtesy Sweet Factory). [3] After Eight Mints (photo courtesy After Eight | UK).


We’ve been saving this recipe from Southern Living for our St. Patrick’s Day lead-up, when our recipes wear a tinge o’ the green.

Made with a Devil’s Food cake mix (or from scratch, if you like), the ice cream doesn’t have to be mint chip. Those who don’t like mint can tint vanilla chip ice cream, or plain vanilla, with green food color.

The topping is chocolate ganache, chocolate mints and whipped cream. We skipped the chocolate ganache, not wanting to gild the lily (it also saves time and money), and used Chocolate Reddi-Wip to anchor the mints around the rim of the cake (it’s easier to slice than cutting through the pile in the picture).

RECIPE: CHOCOLATE MINT ICE CREAM CAKE

Make the whole cake ahead and freeze until ready to serve.

Prep time is 30 minutes, freezer time is 10 to 12 hours.

Ingredients For 10 to 12 Servings

  • Devil’s food cake mix (plus the other ingredients required—egg, oil, etc.)
  • 1/2 gallon mint chocolate chip ice cream, softened
  • 10 chocolate wafers (e.g. Nabisco Famous), coarsely crushed
  • Chocolate ganache
  • Garnish: Thin chocolate mints (After Eight or Andes)
  • Garnish: Reddi-Wip or other whipped cream
  • Equipment: parchment paper, springform pan
  •  
    For The Chocolate Ganache

  • 1 cup whipping cream (not ultra-pasteurized)
  • 11 ounces bittersweet chocolate pieces
  • 2 tablespoons butter (ideally use a low-moisture brand (European style) with a higher fat content)
  • Optional: 3 tablespoons liqueur of your choice (for this recipe, mint or chocolate liqueur)
  •  
    Preparation

    1. PREHEAT the oven to 350°F. Grease and flour three 8-inch round cake pans. Line with parchment paper. Prepare the cake batter and spoon it into the pans.

    2. BAKE for 12 to 14 minutes or until a wood toothpick inserted in the center comes out clean. Cool in the pans on a wire rack for 10 minutes. Remove from the pans to wire racks, peel off the parchment paper, and cool completely, about 1 hour.

     
    3. PLACE one cake layer in a 9-inch springform pan. Top with one-third of ice cream (about 2-1/3 cups); sprinkle with half the crushed wafers. Repeat with the second layer. Top with the remaining cake layer and ice cream. Freeze 8 to 12 hours.

    4. MAKE the ganache. In a small saucepan, scald the cream. In a small bowl, carefully pour the hot cream over the chocolate pieces. Stir in the butter. Stir in the liqueur. Store in the fridge, sealed in a plastic container, until ready to use.

    5. REMOVE the cake from the springform pan, and place it on a plate or a cake stand. Spread the top with the ganache. Let stand 15 minutes before serving. Garnish as desired before bringing to the table.


    Comments off

    Roast Your Roots: Recipes With Root Vegetables

    While we wait for spring vegetables to appear, we’ve been eating lots of root vegetables. Root vegetables have sustained mankind through millennia of winters, because they last for long periods in cool temperatures.

    Before the advent of modern refrigeration, root cellars provided vital cold storage that kept a family fed through the winter.

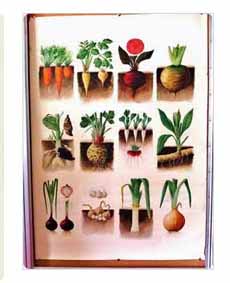
    Growing underground (photo #1), roots are generally storage organs, enlarged to store energy in the form of carbohydrates. These large roots are eaten as vegetables.

    We have two delicious recipes below: Roasted Root Vegetables With Chicken, and Scalloped Root Vegetable Casserole.
     
     
    WHAT ARE ROOT VEGETABLES?

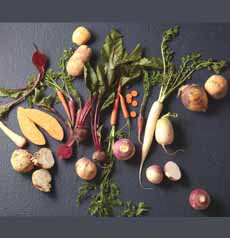
    Root vegetables are plant roots eaten as vegetables (photo #2).

    Beet, carrot, parsnip, potato and sweet potato, radish, and turnip are widely consumed in the U.S.

    Some roots, such as galangal, ginger, horseradish, turmeric, and wasabi, are used for condiments or seasonings. Arrowroot is used as a thickener. Gingseng is used medicinally.

    To give you a perspective on the category, here’s a categorization of the root vegetables more familiar in the U.S.

    True Roots

  • Taproots: beetroot (beet), burdock, carrot, celeriac (celery root), daikon, dandelion, jicama, parsley root*, parsnip, radish, rutabaga, salsify and turnip, and others not well-known in the U.S.
  • Tuberous roots: cassava/yuca/manioc, Chinese/Korean yam, and sweet potato, among others.
  • Bulbs: fennel; garlic, green onion/scallion, leek, onion, shallot and the rest of the Allium family.
  • Corms: Chinese water chestnut, taro.
  • Rhizomes: arrowroot, galangal, ginger, ginseng, lotus root, turmeric
  • Tubers: Chinese artichoke/crosne, Jerusalem artichoke (sunchoke), potato, ube, yam.
  •  
    Roasted taproots and tubers are popular roasted vegetables in American cuisine. Even people who fuss over eating vegetables enjoy the sweetness of the sugars that come out during roasting.
     
     
    TWO WAYS TO ENJOY ROASTED ROOT VEGETABLES

    There are endless recipes, of course; but here are two recipes from Idaho Potatoes with some added glamour.
     
     
    RECIPE #1: ROASTED ROOT VEGETABLES WITH CHICKEN

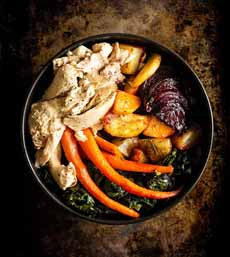
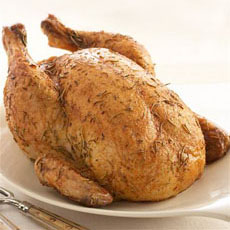
    We like the convenience of this recipe (photo #3). Root vegetables are hardy and can keep for a few weeks. It’s easy to pick up a rotisserie chicken (photo #4) if you don’t have time or inclination to roast one.

    You can use substitute other root vegetables, or create a grain bowl with a bottom layer of a favorite grain.

    Ingredients

  • 4 russet Idaho potatoes, chopped into 1/2 inch cubes
  • 3 carrots
  • 1 turnip, peeled, cut in half lengthwise, and then cut into wedges
  • 1 red onion, cut into wedges
  • 1 cup butternut squash, chopped and peeled
  • 2 beets, rinsed, peeled, cut in half and then cut into wedges
  • 4 teaspoons olive oil, divided
  • Salt and pepper
  • 3 sprigs fresh thyme, removed from stem
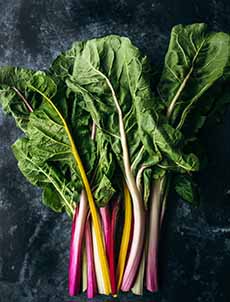
  • 3 cups Swiss chard, removed from stem and chopped (photo #5)
  • 1 garlic clove, minced
  • 1 cup cooked rotisserie chicken, chopped
  •  
    For The Maple Aïoli

  • 3 tablespoons fresh mayo
  • 1 tablespoons maple syrup
  • 1/4 teaspoon cinnamon
  •  

    Root Vegetables Illustration
    [1] An old illustration showing how root vegetables grow (photo ©y Etsy).

    Root Vegetables
    [2] Harvested root vegetables (photo © DIY Naturals).

    Roast Chicken & Vegetables
    [3] Recipe #1, below: roasted root vegetables with chicken (photo © Idaho Potato Commission).

    Whole Roast Chicken
    [4] Rotisserie chicken (photo © McCormick).


    [5] Swiss chard (photo © Heather Barnes | Wesual | Unsplash).

     
    Preparation

    1. PREHEAT the oven to 425°F. Line a baking sheet with foil and spray with cooking spray.

    2. TOSS all of the vegetables in olive oil and sprinkle with salt and pepper. Arrange the vegetables in a single layer on the baking sheet. Sprinkle with thyme. Roast in the oven for 25-30 minutes, until golden and fork-tender, flipping once, halfway through. Meanwhile…

    3. HEAT the remaining olive oil in a skillet over medium heat. Sauté the Swiss chard with the chopped garlic, until wilted, about 10 minutes. Season with salt and pepper to taste.

    4. MAKE the aïoli: Whisk the mayonnaise with the maple syrup and cinnamon until combined. Spoon into a serving dish.

    5. DIVIDE the chard evenly in serving bowls. Top with the roasted vegetables and chicken. Serve with the maple aïoli on the side for dipping.
     
    ________________
     
    *Parsley root is not related to parsley, the herb, but is a beige root vegetable that resembles a parsnip or turnip. The edible leaves that grow above the ground do resemble curly parsley leaves, but taste like celery. Parsley root is also called turnip-rooted parsley. In Germany, it is known as Hamburg parsley, and is a popular winter vegetable in Germany, Holland, and Poland.


    Scalloped Root Vegetables
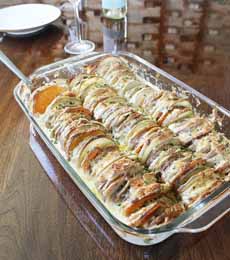
    [6] A three-potato gratin with turnips (photo © Idaho Potato Commission).

    Purple Top Turnips
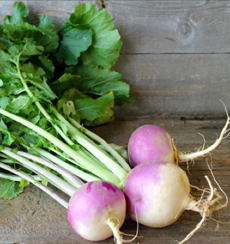
    [7] Turnips (photo © Good Eggs).

    Smithfield Honey Cured Spiral Ham
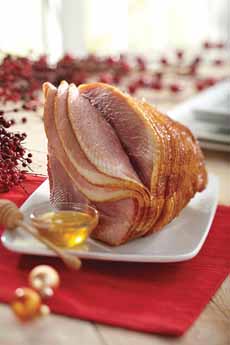
    [8] We served the casserole with a beautiful Smithfield spiral-cut ham (photo courtesy Smithfield).


    RECIPE #2: SCALLOPED ROOT VEGETABLE CASSEROLE

    This casserole (photo #6) reminds us of a tian, a beautiful way to serve summer vegetables.

    It is actually a gratin†.

    This recipe serves a trio of potatoes plus turnips under a cloak of melted cheese. They work together in this recipe because they can be sliced into roughly the same sizes, which cook evenly.

    Ingredients

  • 4 large russet Idaho potatoes, sliced thin, approximately 1/8″
  • 3 red Idaho potatoes, sliced thin, approximately 1/8″
  • 2 sweet potatoes, sliced thin, approximately 1/8″
  • 3 turnips, sliced thin, approximately 1/8″ (photo #6)
  • ½ tablespoon butter
  • 1 small onion, diced
  • 2 garlic cloves, diced
  • 2 packages of whipped chive cream cheese
  • 16 ounces heavy cream
  • 1 teaspoon black pepper
  • Non-stick cooking spray
  • 2 teaspoon of salt, more to taste
  • Garnish: grated Parmesan and diced chives for garnish
  •  
    Preparation

    1. PREHEAT the oven to 400°F. Slice the potatoes and turnips and set them aside in a large bowl.

    2. HEAT 1/2 tablespoon butter over medium heat in a medium, non-stick skillet. Add the onions and garlic; sauté until translucent.

    3. ADD the cream cheese, heavy cream, salt, and pepper. Bring to a simmer and stir until smooth. Turn off the heat.

    4. SPRAY a 9″ x 13″ baking pan with non-stick cooking spray. Place half of the potatoes and turnips in a separate large bowl. Slowly add 1/3 of the cream mixture into the bowl with the potatoes and turnips and mix to coat well.

    5. PLACE the coated potato and turnip slices into the baking pan vertically, using your hands. Make sure the slices are close together (see photo #5). Add another 1/3 of the cream mixture to the remaining potatoes and turnips, coating well. Layer them into the baking dish. Once all the slices are in the baking pan…

    6. POUR the remainder of the cream mixture into the baking pan. Cover the pan with aluminum foil and place in the oven for 30 minutes. After 30 minutes remove the foil and bake for an additional 40 minutes.

    7. REMOVE from the oven, sprinkle on the parmesan cheese and bake for an additional 15-20 minutes. Garnish with the chives right before serving.

    We liked the recipe so much, we’re making it again today!

     
    †WHAT’S A GRATIN?

    Gratin (grah-TAN) is a method of food preparation in which a protein, vegetable or starch is served with a browned crust of grated cheese. The crust may also include breadcrumbs, eggs, and/or butter.

    Gratin originated in France and is usually made in a shallow baking dish. The main ingredient can be baked (roasted) in the oven or cooked on the stovetop. In the latter case, the toppings are then added and the dish is finished in the oven or broiler.

    The baking dish is usually brought to the table piping hot. It’s a perennial favorite: Who doesn’t like their food topped with melted cheese?


    CHECK OUT WHAT’S HAPPENING ON OUR HOME PAGE, THENIBBLE.COM.


    Comments off

    RECIPE: Corned Beef Hash Patties With Eggs

    Our mom loved corned beef and cabbage, and made it year-round in addition to St. Patrick’s Day.

    There were corned beef sandwiches for lunch the next day, and corned beef hash for Saturday breakfasts (Sunday was always bagels and lox).

    But our younger brother, a fussy eater, refused to try it, claiming it looked like dog food.

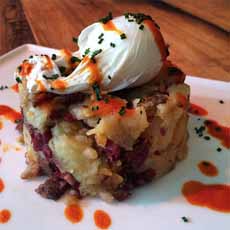
    If only Mom had thought to turn the hash into patties, like the folks at Idaho Potatoes; or to shape it in a food ring mold, like they do at Murray’s Cheese Bar.

    The recipe for the patties follows. If you want to make the hash in a ring, here’s a recipe; you can follow the Eggs Benedict preparation or just make the hash.

    And here’s another recipe, for Corned Beef Hash Eggs Benedict.

    September 27th is National Corned Beef Hash Day.
     
     
    RECIPE: CORNED BEEF HASH PATTIES WITH EGGS

    Instead of cubed potatoes and corned beef, the potatoes are riced, and the corned beef cubes embedded within. The result: smooth patties. Edward, this recipe is dedicated to you.

    Ingredients For 8 Patties

  • 2 pounds Idaho potatoes, peeled and cubed
  • 2 cups leftover corned beef, cubed
  • 2 scallions, chopped green and white parts (substitute onion)
  • 1/3 cup all-purpose flour
  • 1/3 cup whole milk
  • 1 large egg
  • 2 teaspoons kosher salt, plus more to taste
  • 1½ teaspoons black pepper
  • Vegetable oil for frying
  • Option: 1 tablespoon of minced fresh parsley leaves
  •  
    Plus

  • Eggs any style
  •  

    Corned Beef Hash Patties
    [1] A new way to serve corned beef hash: in neat patties (photo and recipe © Idaho Potatoes).

    Elegant Corned Beef Hash
    [2] A fancy approach: Classic corned beef hash shaped in a ring and topped with a poached egg, at Murray’s Cheese Bar in New York City (photo © Murray’s Cheese)..


    Preparation

    1. PREHEAT the oven to 200°F. Place the potatoes in a large pot, add 2 tablespoons of salt, fill with cold water and bring to a boil over medium-high heat. Cook until the potatoes are fork tender about 20 minutes. Drain well and place the potatoes back into the pot to cool for 10 minutes.

    2. USE a potato ricer or grater to rice the potatoes into a large bowl (you should have about 4 cups of riced potatoes). Add the cubed corned beef, chopped scallions, milk, egg and optional parsley to the potatoes, and stir well to combine. Season with salt and pepper.

    3. HEAT a cast iron skillet skillet over medium heat with about ¼ cup of vegetable oil, and form ½ cup of potato mix into a round patty. Fry for 3-4 minutes per side or until it’s a nice medium gold color on each side. Make sure you place no more than 3-4 potato patties at a time in the frying pan.

    4. TRANSFER the cookie patties to a paper towel-lined baking sheet to drain any excess oil. Season with more salt as desired (or allow for salt and pepper seasoning at the table).

    5. KEEP the cooked patties warm in the oven as you cook the eggs. Serve the patties hot as soon as the eggs are ready.
      

    Comments off


    © Copyright 2005-2026 Lifestyle Direct, Inc. All rights reserved. All images are copyrighted to their respective owners.