THE NIBBLE BLOG: Products, Recipes & Trends In Specialty Foods


Also visit our main website, TheNibble.com.

RECIPE: Peanut Butter Pretzel Brownies


[1] Peanut Butter Pretzel Brownies (photo © Bake Or Break via Go Bold With Butter).

Chocolate Pretzel Brownie
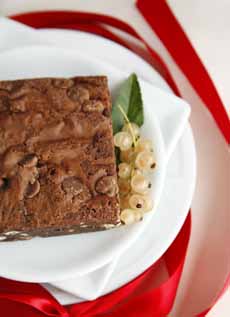
[2] Brownies just might be our favorite finger food (photo by Katharine Pollack | © THE NIBBLE).


Sweet and salty treats and desserts have been a hot combination for a decade or so, beginning with salted chocolate and salted caramel. There’s science behind it:

Each taste bud contains 50 to 100 taste cells, which respond to a particular flavor: sweet, salty, sour, bitter or umami. The cells have a component called the SGLT1 receptor, which transports sugars into the cells when sodium is present.

This is proffered as an explanation to why sweetness is accentuated by salt: The receptors are activated when salt accompanies sugar.

While the receptor is a new finding, the result has been known for centuries. That’s why there’s a dash of salt (or more) in recipes for cakes, cookies, and pies.

The brownie recipe below was developed by Jennifer of Bake Or Break for Go Bold With Butter. It combines bittersweet chocolate and smooth peanut butter with salty, crunchy pretzels pretzels.

Not a peanut butter fan? Check out these Salted Caramel Pretzel Brownies.

> National Brownie Day is December 8th.

> National Peanut Butter Day is January 24th.

> The history of brownies.

The history of peanut butter.


RECIPE: PEANUT BUTTER PRETZEL BROWNIES

Ingredients For 16 2-Inch Brownies

  • 1/2 cup (1 stick) unsalted butter
  • 6 ounces (1 cup) bittersweet chocolate
  • 1 cup all-purpose flour
  • 1/2 teaspoon baking powder
  • 1/2 teaspoon salt
  • 1 cup granulated sugar
  • 2 large eggs
  • 1 teaspoon vanilla extract
  • 1/2 cup creamy peanut butter
  • 1 cup chopped pretzels
  •  
    Preparation

    1. PREHEAT the oven to 350°F. Lightly grease an 8-inch square baking pan. Line with parchment paper (or foil), leaving a couple of inches of overhang on two sides to lift out the brownies. Grease the parchment.

    2. PLACE the butter and chocolate in a microwave-safe bowl. Microwave at half power in 30-second intervals until the butter is melted and the chocolate melts into it when stirred. Combine thoroughly and transfer to a large mixing bowl. Set aside to cool slightly.

    3. WHISK together the flour, baking powder, and salt in a separate bowl. Set aside.

    4. ADD the sugar to the butter/chocolate mixture and mix well. Add the eggs, one at a time, mixing well after each addition. Stir in the vanilla.

    5. PLACE the peanut butter in a small microwave-safe bowl. Heat for 20-30 seconds, or until it can be easily stirred. Add to the chocolate mixture, and mix until combined. Gradually add the flour mixture, mixing until just combined. Stir in about 3/4 cup of pretzels, adding any “crumbs” that splintered off during chopping.

    6. TRANSFER the batter to the pan and spread evenly. Place the remaining pretzels over the top of the batter, and press them down gently into the batter.

    7. BAKE for 40-45 minutes, or until a pick inserted into the center comes out with moist crumbs attached. Cool completely in the pan on a wire rack.

    8. LIFT the brownies from the pan onto a cutting board. Use a sharp knife to cut them into bars.
     

    CHECK OUT WHAT’S HAPPENING ON OUR HOME PAGE, THENIBBLE.COM.


    Comments off

    TIP OF THE DAY: Champagne Jell-O Shots…Or Maybe Beer

    How old can you be and still enjoy Jell-O shots?

    Erica of Erica’s Sweet Tooth adapted this recipe from Bakers Royale.

    Point of accuracy: This recipe is made with plain gelatin, not flavored Jell-O, so it’s not really a Jell-O shot.

    Another point: Everyone responds to the word “champagne,” but pricey champagne at $30 and up is not the best wine to use in recipes. Instead, use another sparkling wine for one-third of the price.

    Don’t Like Champagne?

    If the dad-of-honor prefers beer, substitute fruit beer in the recipe…or go bold with an IPA or stout. Guinness shots, anyone?
     
    RECIPE: CHAMPAGNE JELL-O SHOTS

    Ingredients For 15 Jello Shots

  • 10 ounces plus 5 ounces champagne (or cava, prosecco or other sparkling wine)
  • 1 tablespoon sugar
  • 3 envelopes Knox plain gelatin
  • Optional garnish: white sparkling sugar (sanding sugar)
  •    
    Champagne Jell-O Shots

    Champagne gelatin shots for any festive occasion (photo courtesy Erica’s Sweet Tooth).

     
    Preparation

    1. COMBINE 10 ounces of the champagne with the sugar in a saucepan. Sprinkle the gelatin on top and let it soften for 2 minutes.

    2. PLACE the saucepan over low heat and stir until the gelatin has completely dissolved, about 2-3 minutes. Remove from heat and add the remaining 5 ounces of champagne; stir to combine.

    3. POUR the mixture into a brownie pan or other square/rectangular container, and chill for at least an hour until firm.

    4. CUT: First dip the pan into warm water and use a knife along the sides to gently release the gelatin. Use a sharp knife to cut squares. Before serving, dip the tops in the sparkling sugar and serve with a festive toothpick.

    (Or, for the tongue-in-cheek approach described below, serve a square or two in champagne coupes, with an optional strawberry or raspberry.)


    /home/content/p3pnexwpnas01 data02/07/2891007/html/wp content/uploads/Champagne Cupcakes cookcraftlove 230r
    Champagne cupcakes—to serve with the shots? (Photo courtesy Cook Craft Love.)

       
    RECIPE: RASPBERRY CHAMPAGNE CUPCAKES

    Another celebratory treat: champagne cupcakes. Why are they shown in champagne coupes (photo at left)?

    Decades ago, it was established that the champagne coupe—also called sherbet champagne glasses because they were popularly used to serve scoops of sherbet—were not ideal for sparkling wine.

    The wide surface area of the bowl—allegedly modeled after Marie Antoinette’s breasts—enables the bubbles to dissipate more quickly than they do in a flute or tulip glass.

    While the photo shows them tongue-in-cheek, serving champagne cupcakes instead of champagne, you can serve equally tongue-in-cheek champagne shots in them.

    If you want to bake the raspberry champagne cupcakes in the photo, here’s the recipe from Meaghan of CookCraftLove.com.

    You don’t have to open a new bottle: You can make this recipe with leftover champagne. It doesn’t matter if it’s flat: It will become flat quickly enough when mixed into the batter.

     
    You can serve the cupcakes with a glass of sec or demi-sec champagne, which are sweeter than brut champagne. Here are the levels of sweetness in Champagne.

    If you’re planning to buy champagne, check out our champagne buying tips.


    Comments off

    RECIPE: Hazelnut Crunch Cake Layer Cake

    June 1st is National Hazelnut Cake Day (see all of the food holidays). We used to make one every year with a delicious, but alas discontinued, white chocolate hazelnut cake mix from The King’s Cupboard (which still makes some of the best chocolate and caramel sauces, including organic and sugar-free varieties).

    So we had to search for a recipe, and found this stunner by Ashlae of Oh, Lady Cakes, which is dairy free and vegan.

    Ashlae also does a great job with cookies and other desserts. Take a look at her Facebook photos and decide what you want to bake.

    We are not handy with frosting, so we shy away from cakes that require the skill.

    But while this cake is a beauty, it requires only a “naked cake” frosting—a slick of frosting we applied with a spatula.

    You don’t have to make the hazelnut truffles on top of the cake, either: A sprinkle of hazelnuts will do. (Or, if it’s a party, assign the truffles to someone else.)

    For the truffle recipe, and more delicious photos, see the original recipe.

    If you’d like an easy-peasy hazelnut cake recipe with only 10 minutes of prep work, check out the one below.

    As they say on The Great British Baking Show: Ready, set, bake!

    Below:

    > Hazelnut crunch cake recipe.

    > A super-easy hazelnut cake recipe made with a yellow box mix.

    > The history of hazelnuts.

    Elsewhere on The Nibble:

    > The history of cake.

    > The different types of cake: a photo glossary.

    > The year’s 55 cake holidays.
     
     
    RECIPE: HAZELNUT CRUNCH CAKE

    Ingredients

    For The Hazelnut Cake

  • 3 cups (395g) unbleached cake flour
  • 2 teaspoons (8g) baking powder
  • 1 teaspoon (5g) fine sea salt
  • 3/4 cup (150g) roasted hazelnut oil
  • 1-1/2 cups (305g) light brown sugar
  • 2 tablespoons (25g) hazelnut liqueur
  • 2 cups (420g) hazelnut creamer
  • 1/2 cup toasted hazelnuts, finely chopped (optional)
  •  
    Vanilla Bean Frosting Option 1

  • 3 cups (330g) confectioners’ sugar
  • 1/2 teaspoon vanilla bean powder
  • 3/4 cup (150g) refined coconut oil, melted but not hot
  •  
    Vanilla Bean Frosting Option 2

  • 1 cup (180g) non-hydrogenated shortening
  • 1-2 tablespoons (14-28g) unsweetened almond milk
  • 3 cups (330g) powdered can sugar
  • 1/2 teaspoon vanilla bean powder
  •  
    Plus

  • 1/2 batch salted chocolate truffles (see notes above)
  • Toasted hazelnuts, finely chopped
  •  
    Preparation

    1. PREHEAT the oven to 350°F. Line the bottom of three round 6″ cake pans with parchment paper; then spray with oil and coat with sifted flour; set aside.

    2. SIFT together in a small mixing bowl the flour, baking powder and sea salt; set aside. In a large mixing bowl, combine the oil, sugar, and vanilla extract.

    Alternate between adding the creamer and the flour mixture to the sugar mixture and mixing after each addition; add one-third of the creamer followed by half of the flour and repeat the process ending with the creamer. Whisk batter just until combined (don’t whisk too much or else you’ll overwork the gluten and your cake will be rubbery); then fold in the toasted hazelnuts.


    Hazelnut Layer Cake Recipe
    [1] and [2] A beautiful layer cake topped with chocolate hazelnut truffles, from Ashlae of Oh, Lady Cakes.

    Hazelnut Layer Cake
    [2] Resistance is futile (photo © Oh Lady Cakes).

    Hazelnuts In Bowl
    [3] Hazelnuts in the shell (photo © Loacker USA).

    Shelled Hazelnuts
    [4] Shelled and ready to toast or eat (photo © Better Herbal Health).

    La Tourangelle Roasted Hazelnut Oil
    [5] Roasted hazelnut oil has much more flavor than standard hazelnut oil (photo © La Tourangelle).

     
    3. POUR the batter into the prepared cake pans, level with the back of a spoon, then tap the pans on the counter to release any trapped air bubbles. Bake at 350°F for 36-40 minutes, or until a toothpick comes out clean. Allow the layers to cool in the pan for about 15 minutes then invert onto a wire rack to cool completely. While the cake layers are cooling…

    4. PREPARE the vanilla bean frosting. Ashlae prefers the coconut oil recipe but cautions that it does dry out pretty quickly and is somewhat unstable: It melts if the room temperature is higher than 80°F. Option #2, with shortening, stays soft for a while.

  • For the coconut oil frosting (option 1): Sift the powdered sugar and the vanilla bean powder into a large bowl. Slowly whisk in the coconut oil until smooth.
  • For the shortening frosting (option 2), add the shortening and almond milk to a large mixing bowl and, using a hand mixer on high speed, beat just until combined. Sift the powdered sugar and vanilla bean powder over top then beat until smooth and creamy.
  •  
    Alternatively, you can use vanilla buttercream.

    5. ASSEMBLE the cake: Level the layers, then place one layer on a cake stand or plate. Add a generous portion of frosting with a wide spatula. Repeat with remaining layers and frosting. Using an offset spatula, smooth the frosting around the cake. Garnish with the chopped hazelnuts and truffles. Serve, adding one of the remaining truffles to slices that didn’t get one of the garnish truffles.

    The cake will keep in an airtight container for up to three days. Ashlae cleverly uses a large pot topped off with a silicone lid.
     
     
    A Pan Of Hazelnut Cake Squares
    [6] Here’s the recipe for these hazelnut squares, the opposite of the fancy layer cake. It starts with a box of yellow cake mix, and it doesn’t need icing—we enjoy it à la mode. And, it takes just 10 minutes prep (photo © Taste Of Home).


    THE HISTORY OF HAZELNUTS

    The hazelnut, the fruit of the hazel tree, originated in Asia Minor, and is mentioned in Chinese manuscripts dating back 5,000 years. It is also called cobnut or filbert, depending on to species.

    The European hazel, Corylus avellana, was one of the first temperate shrubs to colonize the land after the retreat of the ice sheets, some 11,700 years ago [source].

    In northeastern Europe, hazelnuts were of vital importance from the Mesolithic (Middle Stone Age) into the Bronze Age, 8,000 to 3,000 years ago.

    In 1995, evidence of large-scale Mesolithic nut processing, some 8,000 years old, was found in a midden pit on the island of Colonsay in Scotland. The nuts were radiocarbon dated to circa 6000 B.C.E.

    On the other side of the pond, the American hazelnut and the beaked hazelnut were eaten by indigenous peoples on the continent.

    Mesolithic peoples competed with the wild boar and numerous other mammal and bird species for the nuts.

    Because hazelnuts are such a rich source of fats, protein, and carbohydrates, they’re an excellent energy source.

    The Greeks and the Romans spread the cultivation of the nut over Europe [source].

    There are references to hazelnuts in ancient Greek and Roman writings. The Greek philosopher Theophrastus (372-287 B.C.E.) described the benefits of hazelnuts, and the Bible lauds hazelnuts for their nutritional and healing powers* [source].

    Today, the main producing countries are Turkey (with 70% of global production), Italy, Spain, and the U.S.

    Ferrero SpA, the maker of Nutella and Ferrero Rocher, uses 25% of the global supply of hazelnuts [source].
     
    Hazelnut Tree Branch
    [7] Grow your own! Hazelnut trees are successful in most soil types, in zones 4-9. Here’s more information (photo © Gardener’s Path).
     
    ________________

    *In Genesis 30:37, “And Jacob took him rods of green poplar, and of the hazel and chesnut tree; and pilled white strakes in them, and made the white appear which was in the rods” (it is spelled that way, with no middle “t.”) [source]
     

    CHECK OUT WHAT’S HAPPENING ON OUR HOME PAGE, THENIBBLE.COM.


    Comments off


    © Copyright 2005-2026 Lifestyle Direct, Inc. All rights reserved. All images are copyrighted to their respective owners.