|
Beets are an unsung Valentine’s Day food. Not only are they deep red but they’re punny, as in “My heart beets for you.”
Our tip today includes three beet recipes: a hot side dish, a first-course salad and a beet-and-quinoa side.
The first recipes is from Williams-Sonoma. It’s adapted from the cookbook Williams-Sonoma New Flavors for Vegetables, by Jodi Liano.
Beets and fresh goat cheese, garnished with fresh herbs, are one of our favorite ways to enjoy beets. Orange—juice, zest or both—is a wonderful complement. In this recipe, the ingredients combine in a most delicious way. Enjoy it as a side dish with any protein, or on a vegetarian plate with barley, brown rice, quinoa or other whole grain.
RECIPE: ROASTED BEETS WITH ORANGE &
GOAT CHEESE
Ingredients For 4 Servings
1 orange
6 beets, about 1-1/2 pounds, in assorted colors, greens removed
3 tablespoons extra-virgin olive oil
2 garlic cloves
Sea salt and freshly ground pepper, to taste
2 ounces fresh goat cheese
1-1/2 teaspoons minced fresh chives
1-1/2 teaspoons minced fresh flat-leaf parsley
1/2 teaspoon minced fresh tarragon
Preparation
1. PREHEAT the oven to 400°F.
2. FINELY GRATE the zest from the orange and set aside. Halve the orange and place one half in a baking dish just large enough to hold it and the beets in a single layer. Add the beets and drizzle with 2 tablespoons of the olive oil. Add the garlic cloves, sprinkle lightly with salt and pepper and toss well. Cover the dish with aluminum foil and roast until the beets are tender when pierced with a sharp knife, about 45 minutes.
|
|
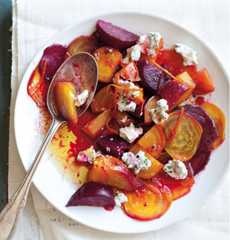
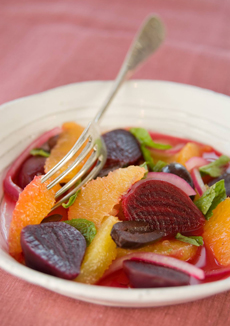
Top: Beet and goat cheese salad from Williams-Sonoma. Bottom: Beet, orange and red onion salad from Chef Ingrid Hoffmann. |
3. STIR together in a small bowl the goat cheese, chives, parsley, tarragon and a pinch each of salt and pepper. Refrigerate until serving.
4. REMOVE the beets from the oven and let cool. Using the dull side of a paring knife, gently scrape off the beet skins, then cut the beets into slices about 1/4 inch thick. Arrange the slices on a platter. Reserve the cooking liquid.
5. LINE a strainer with a damp paper towel and place over a bowl. Pour the cooking liquid through the strainer and squeeze the roasted orange half to release any juice. Whisk in the remaining 1 tablespoons of olive oil and the juice from the remaining orange half to make a dressing. Taste and adjust the seasonings. Let the dressing cool to room temperature.
6. DRIZZLE the beets lightly with the dressing, then sprinkle lightly with salt and pepper. Top the beets with small spoonfuls of the herbed goat cheese, garnish with the orange zest and serve immediately.
|
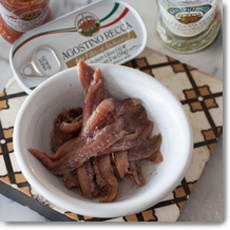

Anchovies with beets? Who’d have thought? It’s an unusual but delightful pairing of beets and anchovies. Top Photo courtesy Vital Choice; bottom photo courtesy Love Beets.
|
|
BEET SALAD, A FIRST COURSE
From Love Beets, producers of ready-to-eat vacuum-packed beets, comes this seemingly unusual combination of beets and smoked anchovies. If you and your Valentine are anchovy fans, serve this salad as a first course.
While there are no greens in this recipe, we served it on a bed of sliced endive and radicchio to make it more of a traditional salad. (We were looking for frisée instead of the endive/radicchio, but the store didn’t have it.)
RECIPE: MARK HIX’S BEET SALAD WITH
SMOKED ANCHOVIES
Ingredients For 4 Servings
17.5 ounces of cooked beets
1 can of smoked anchovies, drained
For The Dressing
2 shallots, finely chopped
1 tablespoon chopped chives
½ tablespoon white wine vinegar
3 tablespoons olive oil
Salt and pepper to taste
Optional greens: mesclun, frisée or other favorite
|
|
Preparation
1. CUT the beets into ¼-inch slices and arrange them on plates or on a serving dish.
2. MAKE the dressing, combining the ingredients. Spoon the dressing over the beets. Arrange the anchovies on top of the dressed beets and serve.
RECIPE: QUINOA AND ROASTED BEET SALAD
Here’s another warm side dish that combines beets with one of today’s trending ingredients, quinoa. It’s from Alter Eco Royal Pearl Quinoa. It uses the beet greens, too: a delicious green that should never be discarded!
Ingredients
4 cups cooked quinoa
1 bunch of beets (3 large, 4 medium or 5 small), roasted
3/4 to 1 pound beet greens (the greens from 1 generous bunch)
Salt to taste
1 to 2 tablespoons extra virgin olive oil (to taste)
2 garlic cloves, minced
2 teaspoons caraway seeds, lightly crushed
2 ounces goat cheese, crumbled or diced (1/2 cup)
Preparation
1. SCRUB and roast the beets. Once they are cooled, remove the skins and cut into 1/4-inch dice. Set aside.
2. BLANCH the greens in a large pot of generously salted water or steam them above an inch of boiling water until wilted, one to two minutes. Refresh with cold water, squeeze dry and chop.
3. HEAT the olive oil over medium heat in a large, heavy skillet. Add the garlic. Cook, stirring, until fragrant, 30 seconds to a minute. Add the caraway, beet greens and salt and pepper to taste. Stir over medium heat for 30 seconds to a minute until the greens are nicely infused with the garlic and oil.
4. ADD the beets and quinoa. Toss together until the ingredients are well combined and the quinoa is heated through and colored with beet juice. Taste and adjust salt and pepper. Transfer to a wide serving bowl or platter, and sprinkle the goat cheese over the top.
Is your heart beeting in anticipation?
|
|