|
We wager that anyone who likes veggies looks forward to vegetables cooked outdoors on the grill, for as long as the weather allows. Asparagus, bell peppers, corn, eggplant, onions, portabella mushrooms, tomatoes and zucchini are popular.
But why not try vegetables you’ve never grilled before?
Previously we’ve recommended grilled cabbage, grilled cauliflower and grilled romaine for a Caesar Salad.
Today, for your consideration: Belgian endive and Chinese bok choy (both grown in California).
WHAT IS ENDIVE?
Endive is one of the vegetables that were once available in the late fall. Once imported from Europe, it is now grown year-round in California.
Endive can be grilled, added to salads, or used as “boats” to hold finger foods at parties. You can even make a type of Tarte Tatin using endive instead of apples.
Endive, Cichorium endivia, is a member of the chicory genus in the Asteraceae family. The genus includes other bitter-leafed vegetables, including escarole, frisée and curly endive and radicchio. It has a crisp texture and a sweet, nutty flavor with a pleasantly mild bitterness. It can be served raw or cooked.
Endive is pricey because it’s one of the most difficult vegetables to grow. There’s a two-step growing process:
The seeds are planted and grow into a leafy green plant in 150 days.
They are then harvested, the leafy tops are cut off and the deep roots are dug up and placed in cold storage, where they enter a dormancy period.
The dormant roots are removed from cold storage for their second growth, which takes 28 days in dark, cool, humid forcing rooms (similar to a mushroom growing facility).
The control over the initiation of this second growing process allows for the year-round production of endive.
You can sometimes find good prices on endive, especially when the edges of the tips start to brown, reducing the aesthetic. Since they brown on the grill anyway, it’s an impetus to grill.
Bonus: A leaf of endive has just one calorie! It’s a good source of potassium, vitamins, and minerals, high in complex fiber, and promotes digestive health.
Here’s an easy recipe from Endive.com, which has many more endive recipes.
RECIPE #1: GRILLED ENDIVE
Ingredients
3-4 heads endive, sliced lengthwise
1 tablespoon olive oil
Optional: chopped fresh rosemary
|
|
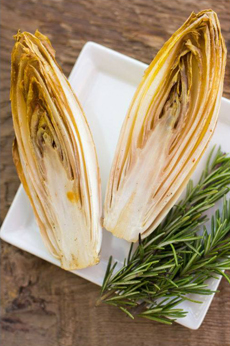
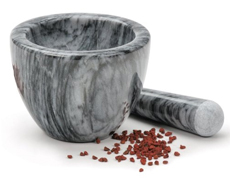
Top: Endive hot off the grill. Bottom: This is what endive looks like when it’s pulled from the ground. The huge taproot is grown from seeds, harvested, placed in dormancy, and then re-planted to grow the endive heads. This technique enables endive, once a cool-weather vegetable, to be grown year-round. Photos courtesy Endive.com. |
|
Preparation
1. PREHEAT the grill over a medium flame. Brush each endive half with olive oil and place on grill, cut side down. After 8–10 minutes, flip and cook another 12-15 minutes, turning occasionally and lowering the flame if needed until the endives soften.
2. SEASON with salt and pepper and garnish with chopped rosemary. You can serve it hot off the grill or at room temperature.
3. VARIATION: You can also toss cooled grilled endive into a salad. Cut it into one-inch slices; mix with arugula, watercress, or other bitter green; and toss with an olive oil-lemon dressing. Garnish with crumbled chèvre or feta cheese and roasted nuts.
|

Grilled bok toy and lamb patties. Photo courtesy Good Eggs | San Francisco. |
|
RECIPE #2: GRILLED MISO BOK CHOY & LAMB PATTIES
Bok choy, a member of the powerful cruciferous* vegetable family (Brassica), has even more nutrients than some of its cousins (see the list below).
This easy dinner is a cultural fusion: Chinese bok choy (also called pak choi and Chinese cabbage) meets Middle Eastern lamb patties. The bok choy doubles as a salad and a vegetable side; the miso butter gives it a celestial flavor. The fresh herbs are the icing on the cake.
The recipe, from Good Eggs, takes 15 mins active time and 10 minutes cooking time.
Ingredients For 2-3 Servings
1 pound ground lamb
½ cup of feta cheese, crumbled
1 egg
3 tablespoons fresh oregano, roughly chopped (substitute 3 teaspoons dried oregano)
1½ teaspoons salt
1 cup Greek yogurt
1 clove garlic, mashed into a paste
3 tablespoons fresh mint, roughly chopped
Olive oil
3 tablespoons salted butter, at room temperature
3 tablespoons miso
3 heads bok choy, sliced in half lengthwise and rinsed
Lime wedge
|
|
Preparation
1. COMBINE the lamb, feta, egg, oregano, salt, and egg in a mixing bowl. Mix well with clean hands and form into patties about 1” thick and 3” wide. Set aside.
2. MIX the yogurt, garlic, mint, 1 teaspoon of olive oil, and a pinch of salt in a small bowl. Taste and adjust salt to taste (not too salty, as you’re also using salted butter). Set aside.
3. MIX the butter and miso in a small bowl with the tines of a fork. Melt two tablespoons of the mixture in a cast iron pan over high heat. When melted and hot, tip the pan to coat the bottom of the pan with the mixture.
4. ADD the bok choy cut side down and sear until it is a deep golden brown, about 4-5 minutes. Flip and cook on the back side for about a minute. Remove from the pan and squeeze a bit of lime over the bok choy. Return to the pan to finish cooking. When the bok choy is finished…
5. WIPE the pan clean, add a tablespoon of olive oil, and place the pan over high heat. When the oil is hot…
6. ADD the lamb patties, leaving 1” in between each patty. Cook over high heat for about 4 minutes until the patty is golden brown. Flip to the other side and repeat. When both sides have good color…
7. CHECK for doneness by inserting a sharp knife into the center of a patty. If the center has a flush of light pink, they’re ready. If the center is still dark pink, pop them in the oven (or toaster oven) at 350°F for 2-3 minutes.
8. SERVE with the minted yogurt and bok choy. If desired, garnish with a sprig of mint or oregano.
________________________
*The botanical family Brassicaceae, also known as the brassicas, cabbage family, cauliflower family, and mustard family, consists of nutritional powerhouses that are packed with potent, cancer-fighting phytonutrients (antioxidants). Brassica members include arugula, bok choy, broccoli, Brussels sprouts, cabbage, collard greens, cauliflower, horseradish/wasabi, kale, kohlrabi, mizuna (Japanese mustard), mustard greens, radish, rapeseed/canola, rapini, rutabaga, tatsoi and turnips, among others.
CHECK OUT WHAT’S HAPPENING ON OUR HOME PAGE, THENIBBLE.COM.
|
|