THE NIBBLE BLOG: Products, Recipes & Trends In Specialty Foods


Also visit our main website, TheNibble.com.


TIP OF THE DAY: Leprechaun Pie

St. Patrick's Day Pie

Grasshopper Ice Cream Pie
Top: Use a cookie cutter to make cut-outs or shape marzipan shamrocks on a pie crust (photo courtesy American Pie Council). Bottom: Our favorite: a Grasshopper Ice Cream Pie (photo courtesy Taste Of Home). The recipe is below.


Make a Leprechaun Pie for St. Patrick’s Day.

What’s a Leprechaun Pie? It’s anything you want it to be, as long as it has a St. Pat’s theme: green color and/or shamrock decorations, Irish cream liqueur for adults.

Just pick a “base” pie and decorations. Most of these recipes are so easy, you can enlist a willing tween or teen to do the prep work.

LEPRECHAUN PIE OPTIONS

  • Your favorite two-crust pie with shamrock cut-outs or add-ons on the top crust (top photo).
  • Bailey’s pudding pie with green whipped cream (recipe).
  • Grasshopper pie (mint with chocolate accents, recipe).
  • Key lime pie (recipe—add a touch of green food color to tint the yellow filling green).
  • Mint ice cream pie (bottom photo, recipe below)
  • Pistachio pudding pie (very easy, no-bake recipe).
  •  
    Decorations

    If your pie has no top crust, you can decorate the surface with:

  • Green baking chips
  • Green sprinkles
  • Green-tinted marzipan
  • Green whipped cream
  • Lucky Charms cereal
  • Kiwi slices
  • Lime zest (especially nice atop the whipped cream)
  •  
    RECIPE: ICE CREAM GRASSHOPPER PIE

    You can make this pie (photo above) in 10 minutes plus freezing time, using store-bought mint chocolate chip ice cream and a chocolate cookie crust.

    If you don’t like mint, add 2 tablespoons of Irish cream liqueur to softened vanilla ice cream. You can also tint the vanilla green with food color.

     
    Ingredients

  • 2 pints mint chocolate chip ice cream, softened
  • 1 chocolate crumb crust (8 inches—store-bought or made with the recipe below)
  • 5 Oreo cookies, chopped
  • 1/3 cup chocolate-covered peppermint candies (e.g. Junior Mints)
  • Chocolate hard-shell ice cream topping
  •  
    Preparation

    1. SPREAD the ice cream into the pie crust. Sprinkle with the cookies and candies.

    2. DRIZZLE with the ice cream topping and freeze until firm. Remove from the freezer 15 minutes before serving.
     
    RECIPE: CHOCOLATE COOKIE CRUST

    Ingredients

  • 1-1/2 cups plus 1 tablespoon chocolate wafer crumbs, divided (about 32 wafers)
  • 1/4 cup sugar
  • 1/2 stick (1/4 cup) unsalted butter, melted
  •  
    Preparation

    1. COMBINE the wafer crumbs, sugar and butter in a bowl. Pat the mixture onto the bottom and up the side of a buttered 8- or 9-inch pie plate.

    2. BAKE in the middle of a preheated 450°F oven for 5 minutes. Set aside to cool.


    Comments off

    FOOD FUN: Lucky Charms Pudding Parfait

    Lucky Charms Parfait
    Lucky Charms Parfait for St. Patrick’s Day. Photo courtesy Elegant Affairs Caterers.
     

    We love this idea from Elegant Affairs Caterers: a St. Patrick’s Day dessert or snack with Lucky Charms!

    Just use a green filling layer: pistachio Jell-O pudding, vanilla pudding or whipped cream tinted green, mint chip ice cream, etc.

    RECIPE: LUCKY CHARMS PARFAIT FOR ST. PATRICK’S DAY

    Ingredients

  • Cake layer: brownie or chocolate cake cubes, crushed chocolate cookies or non-chocolate alternative
  • Filling layer: green pudding, whipped cream, ice cream
  • Optional: chocolate sauce or other dessert sauce
  • Garnish: Lucky Charms cereal
  • Optional garnish: gold foil chocolate coins
  •  
    Preparation

    1. PLACE the optional chocolate coin at the bottom of a sundae or parfait dish. You can use any other glass vessel, from a mug to a goblet wine glass.

    2. ALTERNATE layers of cake, filling and optional dessert sauce.

    3. GARNISH and serve.

     
    This is not just kid stuff. Adults will love it, too: It’s magically delicious!
      

    Comments off

    TIP OF THE DAY: Brazilian Cheese Bread, Pão de Queijo

    On a recent trip to a churrascaria to indulge in the salad bar, our colleague Hannah Kaminsky discovered something more memorable than the jumbo asparagus and whole cloves of caramelized garlic: pão de queijo, Brazilian Cheese Bread.

    Not a conventional bread (no kneading required), pão de queijo (pow de KAY-zoo) is a Brazilian variation of gougères (goo-ZHAIR)—airy cheese puffs made from savory choux pastry mixed with grated Gruyère cheese.

    A key difference: Pão de queijo is made from gluten-free flour, either yucca (a.k.a. cassava or manioc) or tapioca flour. This makes pão de queijo gluten free, and also more dense and chewy (much like savory, baked mochi, Hannah notes).

    They’re delicious with beer, wine and cocktails.

     
    RECIPE: BRAZILIAN CHEESE BREAD (PÃO DE QUEIJO)

    Ingredients For 2 Dozen Puffs

  • 1 cup whole milk
  • 1/2 cup vegetable oil
  • 1 teaspoon salt
  • 2 cups (10 ounces) sour* cassava flour or tapioca flour
  • 2 eggs
  • 1 to 1-1/2 cups Parmesan cheese
  •  
    Preparation

    1. PREHEAT the oven to 450F. Lightly grease two mini muffin pans.

    2. COMBINE the milk, oil, and salt in a 2-quart saucepan and bring to a gentle boil over medium heat, whisking occasionally until large bubbles form.

    3. REMOVE the pot from the heat and add the flour, stirring until it is fully incorporated (it will be gelatinous and grainy). You don’t need to worry about over-mixing the dough, since there’s no gluten to toughen. Pause as needed to scrape down the sides of the blender to ensure that everything is thoroughly incorporated. Once the dough is completely smooth…

    4. TRANSFER the dough to the bowl of a mixer fitted with a paddle attachment. Beat at medium for a few minutes until it is smooth. When it is cool to the touch…

    5. WHISK the eggs in a small bowl; then mix into the dough on medium speed. Incorporate half of the eggs first, incorporate fully and add the second half.

    6. BEAT in the cheese with the mixer on medium. The dough will become very sticky.

    7. DISPENSE the dough into the muffin cups, filling 3/4 of the way to the top. Dip your spoon or scoop in water to prevent sticking.

    8. LOWER the heat to 350°F and bake for 25-30 minutes, until puffy and lightly golden. Remove from the oven and let cool on a rack for a few minutes. Don’t be alarmed if some of the centers fall as they cool.

    9. ENJOY them warm and crisp. Leftover puffs can be kept in an airtight container for up to a week and re-crisped in a warm oven or toaster oven.
     
    *Use sweet (untreated) cassava flour if you can’t find the sour version. The sour style provides a nuance of dlightly fermented flavor.

      Brazilian Bread

    Brazilian Bread

    Cassava Flour

    Tapioca Flour
    Top and second: Brazilian Cheese Bread photos © Hannah Kaminsky | Bittersweet Blog. Third and fourth: Check natural food stores or Latin American markets; or order online.

     
    CASSAVA FLOUR VS. TAPIOCA FLOUR: THE DIFFERENCE

    Both cassava flour and tapioca flour are made from the cassava root. However, the process and end result differ.

  • Cassava flour, a staple ingredient Brazil and Portugal, is made from the root of the cassava plant by peeling, drying and grinding the whole root. Called polvilho in Portuguese, it can be either sour (untreated) or sweet (treated). It has more dietary fiber than tapioca flour, so has broader applications (for example, you can make cassava flour tortillas and other flatbreads that need the fiber to hold together).
  • Tapioca flour, also called tapioca starch, is obtained through a process of washing and pulping the whole cassava, not just the root. The wet pulp is squeezed to extract a starchy liquid; the water is evaporated, yielding tapioca flour.
  •  
    Among the gluten-free flour options, cassava and tapioca flours are most like wheat flour. Unlike almond or coconut flour, they have a mild, neutral flavor and are powdery like wheat flour—not grainy or gritty.

    They can be replaced for wheat flour on a 1:1 basis in many recipes. Note, though, that when mixed with liquid, the dough turns gelatinous and sticky. Keep a bowl of water and paper towels handy for rising your fingers and utensils.

    You can find these flours in health food stores and natural food stores such as Whole Foods Markets; and of course, online.
      

    Comments off

    RECIPE: Guinness BBQ Sauce

    Cheeseburger With Potato Skins

    Guinness Ribs
    Add Guinness stout to your BBQ sauce. Photos and recipe courtesy Tony Roma’s.

      Tony Roma’s is giving a St. Patrick’s Day twist to ribs and burgers, with Guinness BBQ Sauce.

    You don’t need the luck of the Irish to get some: Here’s the recipe, which combines the dark, malty flavors of Ireland’s favorite beer, Guinness stout, with the sweet and savory flavors of good barbecue sauce.

    Don’t want to cook? Head to the nearest Tony Roma’s restaurant for Irish Baby Back Ribs and the Irish Burger.

    If you don’t need as much sauce, cut back the recipe. Or, gift some to friends and family.
     
     
    RECIPE: TONY ROMA’S GUINNESS BBQ SAUCE

    Ingredients For 2½ Quarts Sauce

  • 1½ quarts ketchup
  • 3 bottles (12 ounces each) Guinness
  • 4 ounces molasses
  • 2 tablespoons minced roasted garlic
  • 1 tablespoon Worcestershire sauce
  • 1 teaspoon steak seasoning (see below)
  • 2 ounces apple cider vinegar
  • 1 teaspoon black pepper
  •  
    Preparation

  • HEAT the ketchup, Guinness, molasses, garlic, Worcestershire sauce, steak seasoning, vinegar and black pepper over low heat for 12-15 minutes.
  • That’s it!
  •  
    RECIPE: STEAK SEASONING

    You can buy steak seasoning or make your own.
     
    Ingredients

  • 3 tablespoons kosher salt
  • 3 tablespoons paprika
  • 2 tablespoons pepper
  • 1 tablespoon garlic powder
  • 1 tablespoon onion powder
  • 1 tablespoon thyme
  •  
    Optional Ingredients

  • Cayenne pepper, cumin, chili powder, mustard powder or whatever you like.
  •  
    Preparation

  • COMBINE the ingredients in a medium bowl; gently whisk together. Store in an airtight jar in a dark place away from heat.
  •  
    To season meat prior to grilling:

  • RUB the steaks, chops or chicken with olive oil; then generously coat with the seasoning prior to grilling.
  •   

    Comments off

    TIP OF THE DAY: Cold-Pressed Juice

    “What is cold-pressed juice,” our aunt asked us recently, “and should I be drinking it instead of Tropicana?”

    While we don’t focus on health foods, we’ll give the topic a bit of attention.

    Cold-pressed juicing has existed for decades among health-food devotées, and generated attention in the 1990s as more sophisticated home juicers came onto the market.

    But it has become much more visible over the last few years as some celebrities (Gwyneth, Kim et al) have publicized their juice fasts for dieting and/or health.

    This engendered the current juicing fad, made more visible by the proliferation of shops and delivery services selling pricey cold-pressed juice. (By the same token, buying produce at retail for pressing juice at home is not inexpensive.)
     
    SHOULD YOU SWITCH TO COLD-PRESSED JUICE?

    If you’re a juice drinker, or are thinking about it, know that there is little scientific evidence to support the claim that cold-pressed juice contains more nutrients than pasteurized juices, or those you could hand-squeeze at home. However, when the juice is unfiltered and cloudy, it indicates a higher level of fiber.

    What is known is that any juice begins to lose nutrients immediately after squeezing, and should consumed quickly if you want to capture every iota of nutrition. Those juices made commercially under high pressure processing (HPP) hold their nutrients longer. Hard-core juicers argue that cold-pressed is better than HPP. Here’s the argument.
     
    PRESSING JUICE AT HOME

    There are two main categories of home juicers:

  • Centrifugal juicers (top photo) have an upright design; the produce food is pushed into a rapidly spinning mesh chamber with sharp teeth on the bottom (like a blender). The teeth shred the produce into a pulp, and the centrifugal motion pulls the juice out of the pulp and through the mesh filter.
  • Masticating juicers (second photo) are horizontal in design and higher in price. Produce is pushed into the top of the tube, where it is crushed and squeezed. Because of the slower crushing and squeezing action, these juicers are better at processing leafy greens and wheatgrass, a limitation of centrifugal juicers. The process extracts more juice in general.
  • Commercially cold-pressed juice (HPP) uses a hydraulic press, crushing the produce under extremely high pressure with cold water to counter the heat generated by the process (heat destroys nutrients; the water does not mix with the juice). This gives the juice a refrigerated shelf life of 30 days or so, compared to only 2 to 4 days for those extracted without high pressure.
  •  
    OUR AFFORDABLE SOLUTION

    Before we had ever heard the term “cold-pressed juice,” we were hooked on a Red Jacket Orchards, a family juice brand produced in New York’s Finger Lakes region that’s delicious, nutritious, unfiltered and affordable.

    They’ve been selling cold-pressed apple juices and blends for 50 years. We’re not a committed juicer; we just love the refreshing flavor as a glass of juice or a cocktail mixer.

    We like every flavor, but are hooked on Joe’s Half & Half.

    The company sells it online; use the store locator to find a retailer near you. Online, three 32-ounce bottles are $31, including shipping.


    Centrifugal Juicer

    Masticating Juicer

    Cold Pressed Juice

    Red Jacket Joe's Half & Half
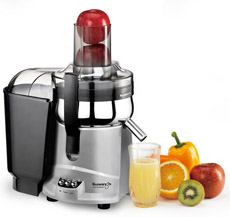
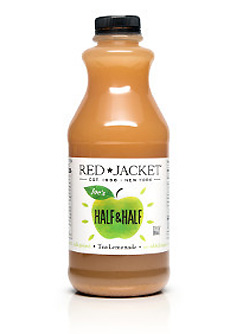
    Top: The Kuvings NJ-9500U Centrifugal Juice Extractor, $149 on Amazon.com. Second: A masticating juicer from Omega, $299.99 at Amazon.com. Third: Cold-pressed juice at Trader Joe’s. Bottom: Red Jacket, a brand that’s been quietly selling cold-pressed juice for 50 years.

     
    That’s a lot more affordable than the 16-ounce bottle of cold-pressed juice at the juice shop on the corner!


    Comments off

    The Nibble Webzine Of Food Adventures
    RSS
    Follow by Email


    © Copyright 2005-2024 Lifestyle Direct, Inc. All rights reserved. All images are copyrighted to their respective owners.