THE NIBBLE BLOG: Products, Recipes & Trends In Specialty Foods


Also visit our main website, TheNibble.com.


TIP OF THE DAY: Pan De Muerto For El Día De Los Muertos


The Mexican holiday, El Día De Los Muertos, is celebrated on November 1st and 2nd. A celebration of the Life and Death of loved ones who have passed over to the other side, it has many festive traditions to honor them.

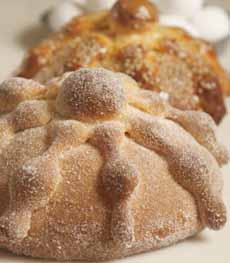
One we rarely see in mainstream U.S. food stores is pan de muerto (also also called pan de los muertos, bread of the dead). Pan de muerto is eaten on the holiday: at gravesite picnics, or in front of the home altar to the deceased.

These sweet yeast loaves or rolls are fragrant with anise seed, orange zest (sometimes orange blossom water) and cinnamon, and are topped with sugar. Since the deceased can’t eat the food, the aromatic ingredients enable them to enjoy the scent.

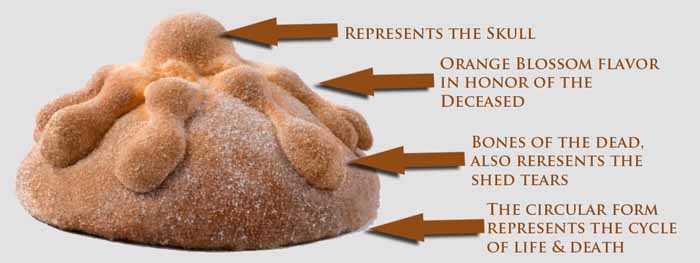
In some regions the breads are decorated with bone-shaped pieces of dough, which represent the deceased. They are usually placed in a circle to portray the circle of life.

Loaves may also be shaped into skulls, animals or even shaped to resemble the deceased.

A tear drop can also be added to represent the Aztec goddess Chimalma’s tears for the living (El Día De Los Muertos derives from an Aztec tradition).

Another tradition is for the baker to wear decorated wrist bands, originally worn to protect his/her wrists from the hot stove or oven.

Different regions have different traditions, as do individual families. In some regions, pan de muertos is eaten beginning two months or so before the official holiday.

During the holiday, everyone eats pan de muerto as well as the deceased’s favorite foods.

Today’s tip: Look for the bread in Latin American food stores. If there are none near you, consider baking your own, with your own touches, using the recipe below as a starter.

  • For our own family touch, we left off the sugar topping (photo #3), but add raisins and dried cranberries to the dough (we just love raisin sweet breads).
  • You can add sanding sugar or decorating sugar (photo #5). In Mexico City, some communities use pink sugar. In the Mixquic community of the city, the bread is made with sprinkles and sesame seeds (photo #4).
  • As a hack, you can purchase brioche rolls or challah rolls, brush the tops with a bit of melted butter and sprinkle with some sugar.
  •  
    RECIPE: PAN DE MUERTOS

    This recipe (photo #1) was developed by Dionne Baldwin of Try Anything Once Culinary for Zulka sugar.

    The strips of dough that run vertically around the bread resembles the bones. See the illustration below for all significant elements.

    (A mini-tip: At THE NIBBLE, we use Zulka sugar exclusively. It’s minimally processed; and if you use sugar as a topping (e.g. on cereal or atop baked goods), you can taste the difference.)

    Prep time is 3 hours 20 minutes, cook time is 35 minutes.
     
    Ingredients For 3 Loaves

  • ½ cup granulated sugar
  • Zest of one large orange
  • 3 teaspoons anise seeds
  • ¾ teaspoon salt
  • 6½ cups flour
  • ½ cup water
  • ½ cup milk
  • 2 ¼-ounce packets active dry yeast
  • 3 eggs
  • ½ cup butter, softened
  • ¼ cup orange juice
  • Melted butter for brushing the top of the baked loaves
  • Garnish: granulated sugar for sprinkling
  •  
    Preparation

    1. ADD the sugar and orange zest to the bowl of a stand mixer add. Mix for 30 seconds using the paddle attachment. Add in the anise seeds, salt and flour.

    2. COMBINE the water and milk in a microwave-safe bowl. Microwave for 45 seconds, then test with a thermometer to make sure the temperature is at 90°F or lower. Add the yeast and stir together. Let the mixture rest for 10 minutes. Then pour the milk and yeast mixture into the dry ingredients along with the eggs, butter and orange juice.

      Pan De Muertos
    [1] Pan de muerto, a tradition for El Día De Los Muertos. The recipe is below (photo courtesy Try Anything Once Culinary).

    Pan De Muertos
    [2]With a bit of dexterity, your dough can resemble bones (recipe, using orange blossom water, from UVC Blog).

    Pan De Muertos
    [3] This version leaves off the sugar topping (photo courtesy Hot Bread Kitchen).

    Pan De Muertos
    [4] A variation with a sesame seed garnish (here’s the recipe from the New York Times).

    Pan de Muertos
    [5] A variation shaped like a skull, with colored sugar (here’s the recipe from Epicurious).


    3. MIX everything together on low using the dough hook. Once the ingredients are combined, knead for 8 minutes. Add the flour 1 tablespoon at a time if needed. The dough should be tacky, sticky, but not coming off on your finger when you poke it. The dough should roll on the bottom of the bowl without sticking.

    4. LIGHTLY OIL a clean bowl and let the dough rise in a warm place for two hours or until the dough doubles in size. After rising, gently punch down the dough and remove from the bowl. Turn out onto a clean, dry flat surface to form the loaves.

    5. DIVIDE the dough into three equal pieces. Pull off a handful of dough from each piece and set the handfuls aside. Form each large piece into a ball by pulling the sides down and pinching together underneath the dough ball.

    6. FORM each large piece of dough into a ball by pulling the sides down and pinching together underneath the dough ball.

    7. RETURN to the handfuls of dough set aside. Make the pieces that cross over the bread to resemble bones with a ball for the top. Pull off a small piece from each handful and roll into a long strip for each loaf. Cut the strip into 2-3 pieces, long enough to stretch from one side of the loaf to the other, tucking the ends underneath. Lay the pieces on top of the loaf, crossing in the center. Do the same with the last two handfuls. Leave the small dough balls aside for now.

    8. PLACE the formed loaves on baking sheets lined with parchment paper or silicone baking mats, and let them rise in a warm place for an hour. Preheat the oven to 350°F.

    9. PLACE one of the small balls atop of each loaf. Press down on top of each ball with your palm, pushing it into the loaves.

    10. BRUSH room temperature water on top of each loaf. Bake for 35-40 minutes or until the bread is a light brown color. Remove from the oven and let the loaves cool on a wire rack.

    11. BRUSH melted butter on top of the cooled loaves and sprinkle sugar on top.
     
     
    Pan De Muerto
    An explanation of the tradition from UVC Blog.

    Comments off

    RECIPE: A Chocolate Dirt Cake Pot For National Chocolate Day

    Dirt Cake Flowerpot
    [1] A different way to enjoy chocolate on National Chocolate Day (photo The Venetian | Las Vegas).

    Halloween Oreos
    [2] Halloween-ify it with season Oreos (photo Walmart).

    Halloween Lollipops

    [3] Trade the flower lollipop for chocolate spooky pops (photo Melville Candy).


    October 28th is National Chocolate Day, and pastry chefs nationwide are outdoing themselves.

    Most of the recipes sent to us are beyond the skill of home cooks, but we found something fun from The Venetian hotel in Las Vegas.

    There, from the Yardbird Southern Table, we received a more sophisticated version of that childhood favorite, dirt cake.

    Dirt cake is an American invention made from crushed Oreo cookies and pudding, to create edible earth or mud. The garnish is gummy worms, figuratively inching their way through the dirt. (See the history of dirt cake below.)
    It’s a simple dessert, whether made by Mom or a pastry chef. Each cook can add a spin:

  • Container: Early versions were created in small plastic kid’s sand pails, that contained multiple portions. You can use a pie plate or baking pan (preferably glass), casserole dish or trifle dish.
  • Individual containers: Use a small flower pot, rocks glass or julep glass for individual servings.
  • Instead of chocolate pudding: cream cheese pudding, ice cream, Marshmallow Fluff or Cool Whip.
  • Instead of chocolate: White dirt cake (an oxymoron? perhaps “sand cake”?), with white sandwich cookies (like Vienna Wafers) or vanilla wafers and vanilla pudding.
  • “Gravel”: Our personal touch, using M&Ms, toffee bits, chocolate chips or other candy on the bottom of the container, atop the cake.
     
    For a Halloween twist, use Halloween Oreos (the filling is orange—photo #2) and a Halloween lollipop (skull on a stick, etc.—photo #3).
  •  
     
    RECIPE: MISSISSIPPI MUD FLOWER POT ICE CREAM CAKE

    The Venetian’s version is essentially a flowerpot ice cream cake: ice cream, nuts, Marshmallow Fluff, chocolate cake. The Fluff is used to create the lollipop, but you can use it as a layer inside the dish.

    If you have the patience to do that (we don’t), great. Otherwise, buy a flower lollipop.

    We also purchased a chocolate pound cake loaf instead of baking a chocolate cake.

    Ingredients Per Serving

  • 8 Oreo cookies
  • 1 cup of pecans
  • 1 slice of unfrosted chocolate cake
  • 1 scoop chocolate ice cream
  • 1 cup of Marshmallow Fluff or mini marshmallows
  • Garnish: gummy worms
  • Optional garnish: small mint leaves
  • Optional: small flower pot, rocks glass or julep glass
  • Preparation

    1. CRUMBLE the cake and pat into the bottom of the dish. Add the optional candy layer.

    2. CRUSH the Oreos and pecans into fine crumbs using a food processor. Alternatively, place the cookies in a re-sealable plastic bag and crush with a rolling pin. Set aside.

    3. ADD the layer of ice cream on top of the cake. Cover with the Oreo-pecan “dirt.”

    4. ADD the lollipop and garnish with gummy worms and/or mint leaves.
     
    To Make The Marshmallow Lollipops

    Whisk 1 cup of Marshmallow fluff in a bowl. Let it sit for 5 minutes. Then create six circles and join them into a flower shape on a lollipop stick (photo #1). Color with a sprinkle of decorator sugar. Let harden.
     
     
    THE HISTORY OF DIRT CAKE

    Here’s the chronology thanks to Food Timeline.

    Recipes evolve over time. Dirt cake evolved from Mississippi Mud Pie, which dates to the mid-1960s.

    Likely culinary ancestors are Elizabethan-era Trifle (cake and whipped cream), 19th century Viennese torts, 1900s double fudge brownies, 1920s Black Bottom Pie, and 1950s novelty ice cream cakes.

    The earliest print reference suggests it was concocted by the wife of a rising star chef based in Long Beach, California, circa 1965.

    Perhaps she was inspired perhaps by Mud Pie and gummy worms, the latter a relatively new candy phenomenon imported from Europe (the history of gummy candy).

    The Mud Pie, also known as Mississippi Mud Pie and Louisiana Mud Pie, was originally a no-bake, frozen, fudge-topped or -swirled ice cream pie in a chocolate cookie crumb pie crust.

    The minute a recipe gets into a cook’s hands, there’s a chance that changes will be made. With Mud Pie today, ice cream flavors vary; some recipes incorporate marshmallow or whipped cream. “Adult” versions are laced with liqueur.

    Mud Pie became a phenomenon in 1970s, when it hit mainstream restaurants such as The Chart House restaurant chain. It became a “signature” dessert during the chocoholic 1980s.”

    The concept evolved into a children’s dessert, dirt cake, garnished with gummy worms.

    Mud Cake, a baked dessert, came later.

    Comments off

    TIP OF THE DAY: Pommes Anna, As A Salad Course

    October 27th is National Potato Day. For your nibbling pleasure, we present a classic of French cuisine.

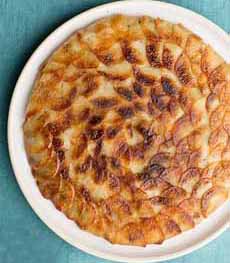
    Pommes Anna (photo #1), sometimes known in English by the less melodic Anna Potatoes, is a French potato casserole beloved for its crispy edges. It is presented as a beautiful round, then served in slices.

    It’s a special-occasion dish (think ahead to Thanksgiving and Christmas) that can also be served for a family dinner.

    Slices of waxy potatoes are overlapped in a casserole dish, covered with clarified butter and baked. For maximum crispness, the entire contents are turned upside down three-fourths of the way through cooking (the recipe below skips this step but if you’re comfortable flipping the entire casserole, go for it).

    Some people season the dish with garlic and rosemary. In the recipe below, the folks at Castello Cheese cooked the potatoes in a rectangular dish to cut into “fingers” (photo #2), and added their specialty: blue cheese. You can substitute gruyère, or use half and half of two cheeses.

    Today’s tip: Serve this rich, buttery potato dish as first course, placing a slice on a plate with a green salad tossed with Dijon vinaigrette.

    The clean, crispness of the salad and acidity of the vinaigrette are a good counterpoint to the buttery, melt-in-your-mouth potatoes. Provide a peppermill for a spicy accent.

    We like to put our food in historic context. So first…
     
     
    THE HISTORY OF POMMES ANNA

    Pommes Anna (pronounced PUM AH-nuh) was the creation of Adolf Dugléré, chef at a Parisian restaurant called Café Anglais.

    The restaurant opened in 1802 at the corner of the Boulevard des Italiens and the Rue de Marivaux, in the 13th arrondissement. It was named in honor of the Treaty of Amiens, a peace accord signed between Britain and France.

    Its early clientele were working folks: coachmen and domestic servants. It later became frequented by performers and patrons of the nearby opera house.

    In 1822 the new proprietor, Paul Chevreuil, turned Café Anglais into a fashionable restaurant with a reputation for roasted and grilled meats. It was after the engagement of chef Adolphe Dugléré that the cuisine achieved high acclaim, and was then frequented by the wealthy and the aristocracy.

    The interior of the building was elaborately decorated with furniture in mahogany and walnut woods, and mirrors with gold leaf patina. There were 22 private rooms and lounges.

    One food historian noted that “…the Anglais was a great supping place, the little rabbit hutches of the entresol [mezzanine] being the scene of some of the wildest and most interesting parties given by the great men of the Second Empire” [source].

    Pommes Anna is just one the chef’s enduring contributions to French gastronomy. The dish was named after Anna Deslions (photo #4), an actress and famed courtesan of the Second Empire (1852-1870), who held regular gatherings at the café. (One of her patrons was Prince Napoléon, cousin of Napoléon III [source].)

    Anna is said to be the model for Emile Zola’s Nana. She was no elegant courtesan, though. She was rough, vulgar, very low-born…and made no apologies.

    She was no beauty either: plain-looking and chunky, not talented as an actress but with “something that takes the place of everything else.” Thinly-veiled, Zola describes her as having “the deadly smile of a man-eater” [source].

    What happened to her? She blew through a fortune in cash, gold and jewels, was dropped by millionaire after millionaire, and ultimately became yesterday’s news.

    But in her heyday, she was a good customer of Café Anglais, and she ostensibly loved her potatoes and butter. Hence: Pommes Anna.
     
     
    RECIPE: POMMES ANNA WITH EXTRA CREAMY DANISH BLUE CHEESE

    With or without gruyère, this dish is has been called Scalloped Anna Potatoes in the U.S. Some restaurateurs also call it Anna Potato Pancake.

    We prefer its more elegant given name: Pommes Anna (photo #2).

    Ingredients for 4 servings

  • 2.2 pounds waxy potatoes, washed, peeled, very thinly sliced and patted dry
  • 2/3 cup butter, melted
  • 1/3 cup Castello Extra Creamy Danish Blue cheese, cut into 1/2-inch cubes
  • Salt and freshly ground black pepper, to taste
  •  
    Preparation

      Pommes Anna
    [1] Classic Pommes Anna. Here’s the recipe from Food Network.

    Pommes Anna
    [2] Pommes Anna with added cheese, a recipe from Castello (below). Serve it with an herb or mesclun salad.

    Individual Pommes Anna
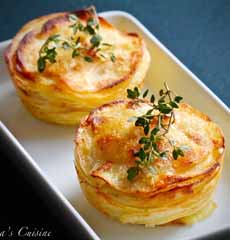
    [3] Individual Pommes Anna have been attributed to Escoffier. Here’s a recipe from Lena’s Cuisine.
    Anna Deslions
    [4] Anna Deslions, the inspiration for Pommes Anna (photo courtesy Victorian Paris | WordPress).

    Anna Deslions - Pommes Anna

    [5] The “real” Anna Deslions was a bit more common (photo courtesy Regis Iglesias).

     
    1. PREHEAT oven to 425°F. Generously grease the bottom of an ovenproof pan or baking dish with 2 tablespoons of melted butter.

    2. ADD the remaining butter and cheese cubes to a medium saucepan over medium-low heat. Stir until the cheese melts.

    3. ARRANGE the potato slices in the pan overlapping each other; brush with the butter/cheese mixture and season with salt and pepper as you go. Cover with parchment paper or a lid, and bake for 45 minutes to an hour. Test with a skewer to see if the potatoes are tender.

    4. SERVE immediately or refrigerate until ready to use. To reheat, turn the pommes out of the pan and with a sharp knife, cut into the desired pieces, and warm in a 325°F oven for 10 to 15 minutes.
      

    Comments off

    TIP OF THE DAY: Squid Ink Pasta (Really Cuttlefish Ink)

    Squid Ink Linquine
    [1] Somewhat spooky: squid ink linquine with baby octopus. Here’s the recipe from Jultchik (needs translation).

    Squid Ink Pasta Cavatelli
    [2] Squid ink cavatelli maya be the creepiest pasta choice: Cavatelli look like grubs or maggots. This dish is from Marlow Bistro in New York City.

    Squid Ink Pasta Shells
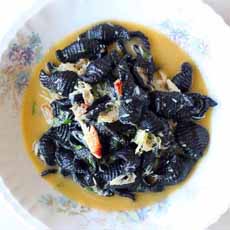
    [3] Here, squid ink shells are an option. These are in citrus-butter sauce, from Kindred restaurant in North Carolina. We added our own spooky touch by dotting the top with rounded spoonfuls of gooey-green avocado purée and served the dish with optional red chile flakes.

    Squid Ink Risotto

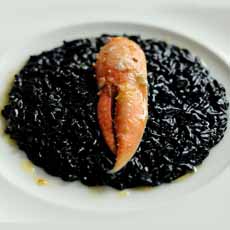
    [4] Squid Ink Risotto. Here’s the recipe from Chef Andrew MacKenzie | Great British Chefs.

      As a coloring agent in pasta, squid ink—actually cuttlefish ink—has no detectable flavor. But the color is dramatic, especially against a red or white sauce.

    Whether you’re cooking for a family or a gourmet crowd, squid ink pasta is especially noteworthy during Halloween season.

    The pasta needs no special garnish—squash or carrots sliced into pumpkin shapes, radish or hard-boiled egg “eyeballs”e.g.—to have a holiday impact (but…feel free).

    Squid ink pasta and risotto are elegant at any time of the year.

    One of our go-to party dishes: squid ink angel hair pasta topped with pan-fried scallops and pink vodka sauce. It’s simple to make, with high optics.
     
     
    WHAT IS SQUID INK?

    Squid is an English language misnomer for what is actually cuttlefish, or seppia in Italian.

    Cuttlefish are cephalopods like squid, but are much a smaller and have a bony internal shell. They taste like squid, but are distant cousins.

    Cuttlefish thrive in warmer waters, such as the Mediterranean. They’ve long been a staple food along the coastlines of Greece, Italy and Spain.

    Since earlier generations could afford to waste nothing, uses for every part of everything were pursued.

    Cephalopods, including squid and cuttlefish, have an ink sac. The ink is a dark pigment, released into water as an escape mechanism.

    We don’t know how many thousands of years ago the ink was first used in food, but we do know that in Greco-Roman times the cuttlefish was a source for ink. It is mentioned by Aristotle.

    The cuttlefish provided:

  • Flesh for eating.
  • Ink for writing. (Trivia: The sepia tone associated with old photographs references the faded tone of writing inks made from cuttlefish ink.)
  • Pigment for food coloring—mostly pasta and rice.
  • Bird nutrition: Its dried internal shell, the cuttlebone, rich in calcium, is added to bird cages so birds can grind their beaks on it and ingest the calcium.
  •  
    Cuttlefish Ink Vs. Squid Ink

    Cuttlefish ink is actually better for food color: It’s more viscous than squid ink; and far better on the palate, according to those who have made sauces with both.

    Italian cookbook author notes the difference between the two:

    “To the Italian palate, the harsh, pungent ink is the least desirable part of the squid. As Venetian cooks have shown, it’s only the mellow, velvety, warm-tasting ink of cuttlefish—seppie—that is suitable for pasta sauce, risotto, and other black dishes.” (Marcella Hazan, Essentials of Classic Italian Cooking, 1992)

    The ink is also used in a popular sauce for seafood dishes and pasta. It contains chunks of seppia, olive oil, sautéed garlic and/or onions, tomato paste, white wine, parsley and pepper. Here’s a recipe.

    (Culinary note: In Italy, grated cheese is never served with seafood pasta dishes.)
     
     
    MAKING YOUR OWN SQUID INK PASTA

    If you make your own pasta, you can buy the ink.

    We’ve been able to buy squid ink pasta dough at a local ravioli shop, and have also bought their squid ink ravioli filled with pumpkin.

    It’s a great Halloween surprise: cut into the black pillow and get an explosion of orange! For maximum color impact, place them the cooked pasta on top of the sauce.
     
     
    SQUID INK PASTA RECIPES

  • Black Linguine With Kalamata Olive Pesto
  • Seared Scallops & Squid Ink Pasta With Peanut Sauce
  • Squid Ink Linguine & Clams
  • Squid Ink Linguine With Shrimp
  • Squid Ink Pasta With Chile Oil & Lemon
  • Squid Ink Spaghetti With Chorizo & Basil
  • Squid Ink Pasta With Crab & Garlic Cream
  • Squid Ink Pasta With Garlic & Cherry Tomatoes
  • Squid Ink Pasta With Pumpkin, Sage & Brown Butter
  •  

    Comments off

    TIP OF THE DAY: 25 Uses For Carrot Tops

    A while back, we published an article on how to repuspose carrot peelings. Why throw them out, when you can turn them into something delicious, packed with nutrients?

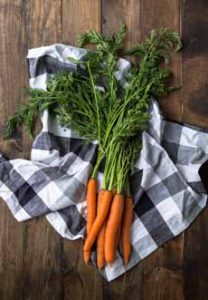
    The same is true with the leafy green carrot tops (photo #1).

    Why buy freshly-harvested carrots at the farmers market, only to cut off and toss the glorious, frilly leaves?

  • The same is true with other root vegetables—beets, carrots, radishes and turnips, among others. (Irony: The leaves of root vegetables tend to be more even nutritious than the roots themselves!)
  • The stems of broccoli, cauliflower, chard, herbs, kale and mushrooms are needlessly tossed…
  • As are the leaves of broccoli, cabbage, celery, and fennel fronds.
  •  
    In America, we have too much food and we waste much of what would be readily consumed elsewhere. Think of how good you’ll feel when you do what top chefs are doing all over the country: turning kitchen scraps into good food.

    If you don’t want to eat the tops, stems and leaves yourself, at least find the nearest neighbor with a bunny, gerbil or hamster (or, a home cook who loves to make soup).

    Today’s focus is those lovely, leafy carrot tops.

    First off: There is a long-circulating myth that carrot tops are poisonous. They are not poisonous!

    Some people are allergic to carrot tops, just as some are allergic to avocado, corn, eggs, even red meat.

    While some vegetable parts are toxic*, especially if eaten raw, enjoy carrot tops raw or cooked to your heart’s content. Here’s a longer explanation.

    Ready To Cook With Carrot Tops?

    Think of carrot tops as parsley or dill: Use them in the same way.

    Carrot tops have a very concentrated carrot flavor with a bit of bitterness. If you don’t like the bitterness, blanch them for a moment.
     
     
    10 WAYS TO USE CARROT TOPS

    1. Chimichurri

    Chimichurri is the national sauce (salsa) of Argentina. Very popular with steak (Argentina’s national protein as it were), it is made from parsley, minced garlic, olive oil, vinegar and red pepper flakes.

  • Grilled Steak With Carrot Top Chimichurri
  • Maple Garlic Roasted Carrots With Carrot Top Chimichurri
  •  
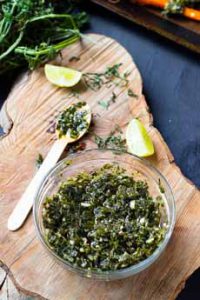
    2. Gremolata

    Gremolata is a popular Italian condiment for meat, fish and other foods: the bitterness of parsley with the bright acidity of lemon and the zestiness of garlic. You can substite other bitter herbs…or carrot tops.

  • Roasted Carrots With Carrot Top Gremolata
  • Roasted Roots With Carrot Top Gremolata
  •  
    3. Harissa

    Harissa is both a flavor enhancer and a condiment. In Tunisia, Morocco and across North Africa, harissa flavors almost all of the local cuisine.

    It’s main ingredient is hot chiles, but in this recipe, carrot tops are added in to create a carrot soup garnish (it could be any thick purée or creamy soup).

  • Carrot Top Harissa Dip & Sauce
  • Turmeric Rosted carrot Soup With Carrot Top Harissa
  •  
    4. Hummus

    Add even more nutrition to the popular dip and spread, which people have been enjoying since the 12th century or earlier (the history of hummus).

  • Carrot Top Hummus With Cumin
  • Carrot Top Pesto Hummus
  •   Carrot Tops
    [1] Such lovely greens: How can you throw them away? Photo courtesy Naturally Ella. See her recipe for gremolata.

    Carrot Pesto
    [2] While the carrots roast, turn the tops into a sauce. Here’s the recipe from Jessica In The Kitchen.

    Carrot Top Hummus
    [3] Add carrot tops to the hummus; then dip carrot sticks for a double-carrot snack. Here’s the recipe from The Almond Eater.

    Carrot Soup With Carrot Harissa
    [4] You can snip the carrot greens onto the tops of stews, grains and vegetables. Here, they’re combined with spices to make “carrot top harissa.” Here’s the recipe from What’s Cooking Good Looking.

     
    5. Pesto Sauce

    Substitute the carrot leaves for basil or other herb. The stems are tougher, but when ground into a pesto they work well.

    Consider combining the carrot leaves with basil, spinach, arugula or other green.

  • Carrot Top Pesto Recipe With Pasta
  • Carrot Top Dressing Recipe With Basil & Parmesan
  • Carrot Top Mint Pesto
  • Cashew Carrot Top Pesto
  •  
    6. Salad

    You can snip raw carrot tops into any green salad, or use them to add flavor to a protein salad (chicken, egg, tuna, etc.) instead of dill or celery leaves.

    Dress your green salad or bean salad with them: Add minced carrot tops to your vinaiagrette (we especially like them with a Dijon vinaigrette).

    In these two recipes, a chickpea salad is an ideal host for carrot greens. You can do the same with a bean salad: three bean, green bean, etc.

  • Carrot Greens & Chickpea Salad
  • Warm Carrot Top Salad With Chickpeas
  •  
    7. Sautéed Greens

    Broccoli rabe, collards, kale, mustard greens: Any greens can be sautéed with carrot tops and garlic in olive oil.

  • Sautéed Carrot Greens & Kale
  • Sautéed Carrot Greens—simply oil, lemon juice, salt and pepper
  •  
    8. Sandwiches

    Add the carrot greens along with lettuce, or instead of it. We frequently use arugula, spinach, basil or watercress instead of lettuce. The carrot tops fit right in.

    They also have a place on a sandwich or burger without lettuce: with a sliced of tomato, pimento or sundried tomatoes in olive oil.

  • Grilled Cheese With Roasted Carrots & Carrot Top Pesto
  • Veggie Burgers With Carrot Tops
  •  
    9. Soups & Stews

    Add carrot tops for flavor. You can even make a carrot top soup!

  • Carrot Top Soup
  • Roasted Vegetable Broth With Carrot Tops
  • Tuscan Carrot Top Soup
  •  
    10. Wild Card!

  • Carrot Top & Apple Green Juice
  • Carrot Top Tabouli
  • Curried Carrot Fritters With Carrot Tops
  • Daal With Carrot Greens
  •  
    When you present your recipes to family and friends, let them know you used carrot tops. They’ll be impressed, and tipped off to the fact that something bound for the scrap heap is better on the plate!

    ________________

    *Raw kidney beans, lima beans, rhubarb leaves; stone fruit pits; apple seeds; and others. Most will just make you ill, but can kill people with compromised systems. The worst is unprocessed cassava. “One pound of bitter, unproccessed cassava will kill a cow and has killed humans in the past,” says an article on the topic.


    Comments off

    The Nibble Webzine Of Food Adventures
    RSS
    Follow by Email


    © Copyright 2005-2024 Lifestyle Direct, Inc. All rights reserved. All images are copyrighted to their respective owners.