THE NIBBLE BLOG: Products, Recipes & Trends In Specialty Foods


Also visit our main website, TheNibble.com.


RECIPE: Caramelized Onion & Apple Galette

This is such a nice fall recipe, we’ve made it several times—and we’re just a few weeks into fall.

Savory and sweet combine in this galette: caramelized onions and apples.

A galette (gah-LET) is a rustic, round, open-face pie, made without a pie pan. It is flat, with a turned-up crust that wraps around the filling to create a “dough pan.”

Called crostata in Italian and rustic pie or rustic tart in English, the concept hails from the days before people had pie plates, and the days after that when only the kitchens of the wealthy had them.

The precursor of the galette probably dates from the Neolithic Age, now called the New Stone Age, which lasted from about 10,200 B.C.E. to between 4,500 and 2,000 B.C.E. Thick cereal pastes—barley, oats, rye, wheat—were sweetened with honey and spread on hot stones to cook.

This recipe comes from Good Eggs, and was inspired by Alice Waters’ onion tart recipe in The Art of Simple Food.

Good Eggs adds this tip:

To save time, take the semi-homemade route. Use ready-made pie dough for the crust. It’s the perfect base for the recipe, and you’ll still have the fun of shaping it.
 
 
RECIPE: CARAMELIZED ONION & APPLE GALETTE

Ingredients

  • 1 disk of pie dough, large enough for a 9” pie*
  • Flour for dusting
  • 4 tablespoons butter
  • 6 medium onions, peeled and thinly sliced
  • 3 sprigs of fresh thyme, plus extra for garnish
  • Salt to taste
  • 1 egg, beaten
  • ________________

    *If you’re using a frozen crust, it should be defrosted, but still cool.

      Caramelized Onion Galette
    [1] This savory-sweet galette can be served as a first course, with cocktails, or as a light lunch with a green salad. We served it for dessert with a cheese plate:a great idea (photo courtesy Good Eggs).

    Apples and Onions
    [2] Apples and onions make a savory-sweet pie (photo courtesy Cubit’s Organic Living).


    Preparation

    1. PREHEAT the oven to 375°F. Heat the butter in heavy-bottomed pot, add the onions and thyme sprigs; then sauté over medium heat until the onions are caramelized, about 20 to 30 minutes. Salt to taste. Remove from the heat and let cool. Meanwhile…

    2. ROLL out the chilled pie dough on a well-floured surface, into a 12- to 14-inch circle (about 1/4 inch thick). Don’t worry if your shape isn’t perfect” any irregularities just add to the homemade charm!

    3. TRANSFER the rolled-out dough to a baking sheet lined with parchment paper and let it firm up in the fridge for about 10 minutes. Spread the cooled onions over the center, picking out the thyme sprigs. Leave a good inch or two around the edge so you have ample dough to fold up around the onions.

    4. FOLD up the edges, making sure there are no holes. You can freestyle it, or you can use a pinch-and-fold method as shown in the photo. Once the galette is wrapped up, coat the folded edges with beaten egg, using a pastry brush or your fingers.

    5. BAKE for 40 to 50 minutes, or until the crust is golden brown on the bottom. Let it cool slightly, garnish with a pinch of fresh thyme and serve warm.
      

    Comments off

    RECIPE: Pull-Apart Cheese Bread, Or Halloween Brain Bread?

    Pull Apart Cheese Bread
    [1] .

    Provolone Cheese

    [2] Provolone, originally made in a round or oval shape, is now made in loaves and wheels as well (photo courtesy DiBruno Brothers).

      Bel Gioioso, the Wisconsin-based Italian cheesemaker, sent us this pull-apart cheese bread recipe.

    A boule (ball)-style Italian pull-apart bread, it’s made with provolone cheese, marinara sauce, garlic and seasonings.

    We renamed it “brain bread” for the Halloween season.

    For snacking, with a beer, or at the dinner table, it’s a special treat that’s actually easy to make—you start by buying a sourdough boule.

    The recipe was developed for Bel Gioioso by Amy of BellyFull.net.

    Prep time is 20 minutes, cook time is 25 minutes.
     
     
    RECIPE: PULL-APART PROVOLONE & MARINARA BREAD

    Ingredients For 6 Servings

  • 1 pound round boule-style loaf of sourdough
  • 6 slices provolone cheese, cut into 1/2-inch pieces
  • 1/2 cup (1 stick) unsalted butter, melted
  • 1/4 cup marinara sauce
  • 2 large garlic cloves, minced
  • 1/2 teaspoon garlic powder
  • 1/4 teaspoon onion powder
  • 1/2 teaspoon dried Italian seasoning (recipe below)
  • Garnish: chopped fresh parsley, to garnish
  •  
    Preparation

    1. PREHEAT the oven to 375F. Tear off a large enough piece of foil to wrap around the loaf. Coat the foil with nonstick spray and place on a baking sheet.

    2. CUT the loaf of bread into 1-inch-wide slices with a serrated knife, leaving about 1/4-inch of the base of the bread intact (i.e., cut the slices down to the bottom quarter-inch, but don’t slice through the bottom). Repeat the cuts in the opposite direction to create a cross-hatch/cubed pattern (photo #1). Place the bread on the foil.

     
    3. PRESS the provolone pieces between all the slices of bread. In a small bowl, whisk together the butter, marinara, minced garlic, garlic powder, onion powder and Italian seasoning. Gently pry apart the bread pieces and drizzle the mixture over the loaf evenly, making sure to get into all the seams and cover all the pieces.

    4. WRAP the bread up in the foil. Bake for 15 minutes. Open up the foil, increase oven temperature to 425°F, and bake another 10 minutes until the cheese is melted and the bread is golden brown. Let stand 5 minutes before serving. Sprinkle with parsley, pull apart the pieces and serve.
     
     
    RECIPE: ITALIAN SEASONING

    If you don’t have Italian seasoning, it’s easy to make it by combining:

  • 1-1/2 teaspoons dried oregano
  • 1 teaspoon dried marjoram
  • 1 teaspoon dried thyme
  • 1/2 teaspoon dried basil
  • 1/2 teaspoon dried rosemary
  • 1/2 teaspoon dried sage
  •   

    Comments off

    TIP OF THE DAY: Homemade Bagels

    October 16th is World Bread Day. To celebrate the occasion, our colleague Hannah Kaminsky fulfilled a long-time goal: making homemade bagels.

    She finally found a recipe that overcame a barrier:

    “Traditional recipes call for lye, which is threatening enough to send me straight to the bakery, rather than the kitchen,” says Hannah.

    But then, a revelation: “I joined forces with Chef Philip Gelb and lucked into one of his bagel baking classes.”

    “Baking soda stands in for the caustic lye, reducing the risk of severe bodily harm right off the bat. Believe it or not, the rest is fairly standard procedure: a vigorous mixing, resting and rising, shaping and baking are all that separate you from savory satisfaction.

    “Bagels can take shape either by punching out the centers with a quick jab of the fingers, or rolled into snakes and connected at the ends. Personally, I prefer to poke out the middles, as there’s less danger of them coming undone in the bubbling water bath.

    “Purists will argue about what makes for the best bagels, but this much I know is true:

    “Nothing beats the ones coming out of your own oven, hot and fresh, just barley cool enough to slice. Such beauty needs no further toasting to perfect, just a thick schmear of hummus or cream cheese.”

    Hannah’s favorite bagel topping: everything.

    Advice from Chef Gelb and Hannah: The bagels are best served within 15 minutes of emerging from the oven. Plan for an amazing brunch! But first:

    The history of bagels.
     
     
    RECIPE: CHEF PHILIP GELB’S HOMEMADE BAGELS

    Ingredients For 12 Bagels

  • 1 teaspoon active dry yeast
  • 4 tablespoons rice malt, barley malt, or agave, divided
  • 2 cups warm water (105°F)
  • 1 teaspoon salt
  • 2 cps whole wheat flour
  • 3 cups all-purpose flour
  • 1 tablespoon olive oil
  • 1-1/2 teaspoons baking soda
  • Toppings of choice: dried garlic, dried onion, sesame seeds, poppy seeds, and/or coarse salt
  •  
    Preparation

    1. COMBINE the yeast, 1 tablespoon of malt and the warm water in a large bowl. Let the yeast proof until the surface becomes foamy, about 5 minutes. Whisk in the salt. Add the whole wheat flour and 2 cups of the all-purpose flour, stirring with a wooden spoon until incorporated.

    2. PLACE the dough on a sturdy, clean surface and slowly work in the rest of the all-purpose flour. Knead for 10 minutes or until smooth and elastic.

      Making Bagels
    [1] Using fingers to poke a hole in the bagel (all photos courtesy Hannah Kaminsky | Bittersweet Blog).

    Boiling Bagels
    [2] Boiling the bagels prior to baking.

    Baking Bagels
    [3] Hot and fragrant from the oven.

    Bagel Hummus Sandwich

    [4] Hannah’s well-deserved reward: a hummus and vegetable sandwich for lunch.

     
    3. COAT the dough with olive oil, place in a bowl and cover tightly with a clean dish towel. Let it rise until the dough has doubled in volume, about 1 hour; though time may vary greatly due to temperature and altitude. After the dough has doubled…

    4. KNEAD it lightly for 1 minute. Divide the dough into 12 equal parts. Roll each piece into a log and then fold it into a circle, firmly pressing the seam together. Place each bagel on a lightly floured surface, cover with a clean towel, and let rise until doubled; about 1 hour. Meanwhile…

    5. PREHEAT the oven to 500°F and place a baking stone inside, if you have one. Otherwise, the bagels can be baked on a standard sheet pan.

    6. BRING 3 quarts of water to a boil in a large pot; add the baking soda along with the remaining 3 tablespoons of malt. The baking soda is necessary to properly texture and brown the bagels. After the bagels finish their second rise…

    7. BOIL each bagel for 1 minute on each side, keeping the water at a consistent, rapid boil. Now your bagels are ready to bake.

    8. TOP them with any or all of the seasonings your heart desires, patting them gently into the top to make sure they adhere. Transfer the bagels carefully to the baking stone or sheet pan, and bake for about 15 minutes.
     
     
    ABOUT CHEF PHILIP GELB

    Chef Philip Gelb is the founder of Sound & Savor, a catering/personal chef business in the San Francisco Bay area.

    In addition to catering and cooking classes, he hosts a very popular twice-monthly series of dinner/concerts that pair cuisine with the music of world-renowned musicians.


    Comments off

    RECIPE: Calle Dão Coconut Rum Flan

    Coconut Pineapple Flan
    [1] Un bonito postre (a beautiful dessert): coconut rum flan at at Calle Dão| NYC.

    Gosling's Rum Bottles
    [2] When you’re done with the flan, treat yourself to a Dark ‘N’ Stormy, mix dark rum with ginger beer. Fill a tall glass with ice, add the juice of half a lime, and your desired proportions of rum and ginger beer. The Dark ‘N’ Stomy recipe is copyrighted by Gosling’s (photo courtesy Gosling Brothers Limited).

    Whole Pineapple

    [3] Did you know that you can boil the skin/rind of the pineapple into a healthy drink? Here’s the recipe (photo courtesy Produce Marketing Guide).


    Calle Dão is a Cuban-Chinese fusion restaurant, with two locations in New York City.

    Why Cuban-Chinese fusion?

    In this town, there are plenty of restaurants serving “comidas chinas y criollas,” which commemorate Havana’s once-thriving El Barrio Chino (Chinatown). There, as the Cuban and Chinese cultures mixed, a fusion cuisine emerged.

    One of our favorite dishes at Calle Dão is this coconut rum flan with two special accents: pineapple jam and passionfruit caramel.

    A blend of coconut milk, sweetened condensed milk, evaporated milk and cream cheese create the silky flan. It is accessorized with the homage to Chinese cuisine: fried rice vermicelli noodles.

    This is a restaurant-sized recipe, but it is easy to cut it in half. Or better yet, make it along with a friend or two, and divide the tasty results.

    The recipe takes a bit of work, but goes quickly when you share the labors.

    Ingredients For 20 Servings

    For The Flan

  • 2 cups + 1 cup granulated sugar
  • 1/4 cup water
  • 2 tablespoons corn syrup
  • 2 cans sweetened condensed milk
  • 2 cans evaporated milk
  • 1.5 cups coconut milk
  • 4 tablespoons dark rum
  • 1/4 cup kosher salt
  • 24 ounces cream cheese
  • 18 egg yolks
  • 12 egg whites
  •  
    For The Pineapple Jam

  • 2 pineapples
  • 2 cups granulated sugar
  • 2 cups water
  • 1/2 teaspoon kosher salt
  • 1 teaspoon ground cinnamon
  • 2 tablespoons fresh lemon juice
  • 2 tablespoons dark rum
  •  
    For The Passionfruit Caramel

  • 2 cups granulated sugar
  • 1/2 cup water
  • 2 tablespoons light corn syrup
  • 1/2 teaspoon kosher salt
  • 1 cup passionfruit purée (make or buy)
  •  
    Optional Garnish

  • Rice vermicelli noodles
  •  

    Preparation

    If you want to top your creation with the fried rice vermicelli shown in the photo, you can make them in advance and keep them in an airtight container. See step 7.

    1. PREHEAT the oven to 325°F. Make the flan: Place 2 cups sugar, the corn syrup and water in a medium sauce pan. Place over medium-high heat. Cook until the sugar begins to melt, swirling the pan. Continue cooking until it is melted and medium-dark brown, about 5 minutes. Remove from the heat and pour the caramelized sugar into individual aluminum molds. Let cool.


    2. WHISK together remaining 1 cup sugar, salt, egg yolks, rum, sweetened condensed milk and evaporated milk in a large bowl, until combined. In a blender, combine the cream cheese, coconut milk and egg whites on low until smooth and combined. Add into egg yolk mixture. Pour into the metal ramekins with the cooled sugar in them.

    3. TRANSFER to a deep pan (roasting pan, hotel pan). Pour water around the ramekins about halfway up their sides. Bake in a 325°F oven until flan is almost set (it will appear loose in center but continue cooking as it cools), about 20 minutes. Transfer the pan to a wire rack until water cools, then transfer the ramekins to a wire rack to cool.

    4. MAKE the pineapple jam. Cut the pineapple by removing the skins and tops. Grate the flesh with a box grater. Place the grated pineapple in a large sauce pan with the sugar, salt, water and cinnamon. Cook over medium heat until the liquid has reduced by half and the pineapple has softened and become translucent. Add the rum and lemon juice; cool and store.

    5. COMBINE the passionfruit caramel ingredients in a medium sauce pan and heat over medium heat. You are looking to thicken this mixture, not caramelize it. This will take about 10-15 minutes.

    6. TEST the thickness of the sauce by dropping a small amount on a plate and placing it in the fridge for a few minutes. Based on how it drips down the plate, you can tell the thickness of the sauce. You want it to only drip slightly when completely cooled. Cool and store until ready to serve.

    7. FRY the vermicelli noodles at 350°F until they puff up. Place on paper towels and sprinkle with sugar and a dash of salt. If you don’t want to use the noodles, consider adding a garnish in a contrasting color, e.g., a sprig of herbs or a strawberry half.

    8. ASSEMBLE: Place each flan on a plate or in a serving bowl. Add one or two tablespoons of pineapple jam. Drizzle with the passionfruit caramel.
      

    Comments off

    TOP PICK OF THE WEEK: Superseedz Organic Flavored Pumpkin Seeds & More Good-For -You

    1. SUPERSEEDZ ORGANIC, SHELL-LESS PUMPKIN SEEDS

    We have long been a fan of Superseedz, the best pumpkin seeds we’ve ever had.

    Now, the line has added organic varieties (photo #1).

    Editor’s Note: Those seeds growing inside a thick-skinned squash are safe from surface pesticides, but consumers want what consumers want: the word “organic” on the package.

    The flavors include:

  • Organic Dark Chocolate & Sea Salt Gourmet Pumpkin Seeds
  • Organic Garlicky Dill Gourmet Pumpkin Seeds
  • Organic Pink Himalayan Salt Gourmet Pumpkin Seeds
  •  
    Eat them from the bag, toss them onto cottage cheese or yogurt, pasta (photo #2) or grains. Garnish salads and, with the new Dark Chocolate Sea & Salt flavor, garnish cupcakes and other desserts.

    In addition to the crunchy great taste, you’ll be adding protein, magnesium and iron.

    Don’t overlook the regular line:

  • Sweet Flavors: Cinnamon & Sugar, Coco Joe, Maple Syrup & Sea Salt
  • Savory Flavors: Curious Curry, Really Naked, Sea Salt, Somewhat Spicy and Super Spicy
  •  
    Allergen-friendly, Superseedz are gluten free, nut free, egg free, dairy free, fish and shellfish free and soy free (except for the curry flavor). They have up to 9g of protein per ounce, and provide 15% RDI of iron and zinc.

    For guilt-free snacking, see them all at Superseedz.com.
     
     
    2. AQUASANA CLEAN WATER MACHINE

    If you prefer filtering your tap water to purchasing water—whether to please your palate or to eliminate contaminants—you may have tried a Britta or ZeroWater pitcher filtration device, or even a larger countertop unit.

    But if you’re kitchen-space-challenged as we are, you have neither space in the fridge nor on the counter top for one—without sacrificing something else.

    Thanks to Aquasana, we no longer have that limitation. The company, which specializes in water filters for sinks and showers—plus handsome individual water bottles with built-in filters—has come up with a space saver countertop unit that nicely hugs the side of the kitchen counter next to the fridge (photo #3).

    The Clean Water Machine has the same Aquasana professional filtration system that keeps the good minerals dissolved in your tap water (calcium, magnesium, potassium). It filterd out 99% of asbestos, chlorine and lead, and 96% of 62 other harmful contaminants, including pesticides and pharmaceuticals.

    Just 4.5 inches wide and 17 inches long, the Aquasana Clean Water Machine dispenses a gallon of filtered water by the glassful or the pitcherful, and includes a glass carafe (photo #4) to bring to the table.

    The device is electric, and claims to remove “10x more contaminants than leading gravity pitchers.”

    Instead of slowly trickling through the filter via gravity, Aquasana’s electricity-driven motor filters a half gallon in a minute.

    Two filters, each making 320 gallons of clean water, are included.

  • A light lets you know when the filter needs to be changed.
  • A second pitcher lets you keep a space-saving pitcher in the fridge, or wherever else you want it.
  •  
    Aquasana Clean Water Machine is available in black or white, and is sold at retailers including Costco, e-tailers and from the company website.

    The list price is $129.99 ($124.99 at Costco), but today the Aquasana website offered us a 30% discount on anything.


    Superseedz Organic
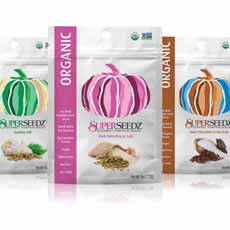
    [1] Superseedz: one of our favorite snacks and garnishes, available in snack and family packs (photo courtesy Superseedz).

    Pumpkin Seeds On Pasta
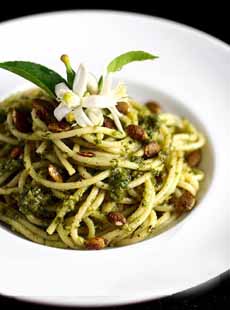
    [2] Superseeds as a garnish: Add crunch, flavor and nutrition (photo courtesy Superseedz).

    Aquasana Clean Water Machine
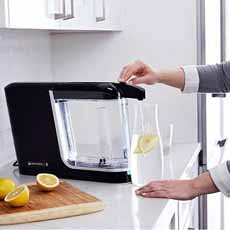
    [3] The space-saving Aquasana Clean Water Machine fits snugly against the fridge (photo courtesy Aquasana).

    Aquasana Carafe

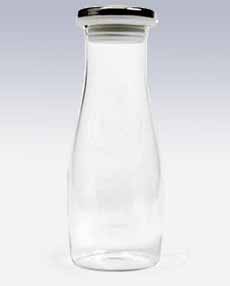
    [4] You can bring the built-in pitcher to the table, or fill the graceful carafe, included (photo courtesy Aquasana).


    Leonardo's Pizza Sauce

    Pasta Sauce
    [5] and [6] Leonardo’s Pizza Sauce (photos courtesy Leonardo’s).


    3. LEONARDO’S PIZZA SAUCE

    The majority of commercial pasta and pizza sauces are made with average tomatoes—those with no natural sweetness (they’re cheaper for the manufacturers).

    As a result, the sauces are are typically sweetened with sugar or corn syrup, resulting in hidden sugar that no one needs, plus a sauce that often tastes sugary.

    Many Americans have grown to accept that everything from mustard to vinaigrette has added sugar. Personally, we dislike sugary notes in savory food, and eschew the practice of adding sugar.

    When we find an NSA (no sugar added) brand that tastes really good—like a tomato sauce should—we give it a shout-out.

    In 1990, Leonardo’s Pizza began as one pizzeria in Burlington, Vermont. It got so much attention, People’s Choice Awards, professional and Yelp reviews, that it opened more pizzerias in New England.

    When home-baked pizza began trending, Leonardo’s bottled their sauces for home cooks, in:

  • Original
  • Asiago
  • Chipotle
  • Garlic
  •  
    Pizza sauce is typically thinner than pasta sauce, so it spreads evenly and flatly on the crust (chunkier sauce is designed to cling to strands of pasta). Leonardo’s aims to give you the best:

    “We hunt for the most delicious vine-ripened tomatoes. We gather the finest cheese we can lay hands on. And we combine them with extra virgin olive oil and selected spices. This produces intense flavors, setting a strong foundation for your homemade pie.”

    We had fun pairing the sauces:

  • Topping the Asiago Pizza Sauce with a thick layer of cheese and fresh basil.
  • Topping the Chipotle Pizza Sauce spicy with andouille sausage and oregano.
  • Topping the Garlic Pizza Sauce with roasted garlic cloves and fresh thyme.
  •  
    You can also use the sauces as simmer sauces for beef, chicken, fish or tofu; and of course, on pasta, grains or vegetables.

    Buy the sauces online from Leonardo’s, or from these retailers.


    Comments off

    The Nibble Webzine Of Food Adventures
    RSS
    Follow by Email


    © Copyright 2005-2024 Lifestyle Direct, Inc. All rights reserved. All images are copyrighted to their respective owners.