THE NIBBLE BLOG: Products, Recipes & Trends In Specialty Foods


Also visit our main website, TheNibble.com.

TOP PICK OF THE WEEK: St Pierre Bakery Brioche & Belgian Waffles

Brioche Nutella St Pierre Bakery
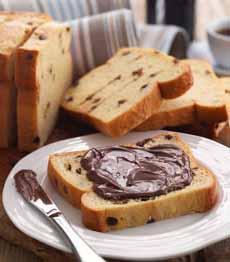
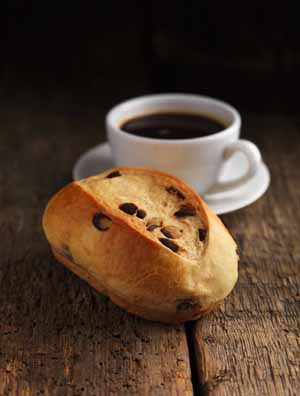
[1] Delicious brioche can be eaten plain or with a spread, here Nutella (all photos © St Pierre Bakery).

Chocolate Chip Brioche Roll St Pierre Bakery
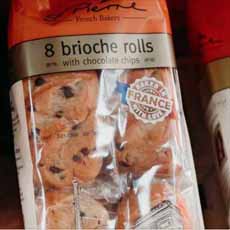
[2] A more elegant breakfast pastry: a chocolate chip brioche roll.

Ham Sandwich On Waffle
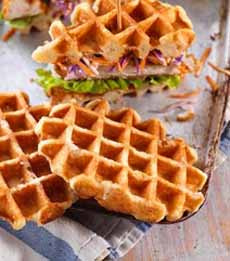
[3] Individually-wrapped waffles in butter or cinnamon-sugar flavors can be grab-and-go snacks, warmed for breakfast, topped for dessert, or turned into sandwiches like this ham and cheese on a butter waffle.

St Pierre Brioche Rolls
[4] Look for the bright orange swath on the package (photo courtesy St Pierre Bakery).


It’s rare that we go gaga for bakery products from the supermarket, but we have developed quite a fondness for the brioche and breakfast pastries from St Pierre Bakery (they don’t use a period after St).

Brioche (bree-OASH) is a light, slightly sweet bread made with eggs, yeast, and butter. Richer than a standard loaf of bread, brioche is used as a breakfast bread, for French toast, and in combination with luxurious first courses such as foie gras and smoked salmon.

Here’s more about brioche.

Better supermarkets have carried brioche hamburger and hot dog rolls for some time, and loaves of sliced brioche have appeared in the last couple of years: plain, chocolate chip, and raisin.

The St Pierre brioche line, from the United Kingdom, has recently begun importing into the U.S., and we’re very happy. We’re a sucker for brioche, breakfast pastry, pain au chocolate and Belgian waffles. Thank goodness that most of the line is individually wrapped, for [in our case] portion control.

Whether to start the day, as a coffee break, or turned into dessert, all of the products are free of GMOs, HFCS, and hydrogenated oils. All of the snack or grab-and-go items are individually wrapped.

St. Pierre Bakery has declared March 14th as National Brioche Day.
 
 
ST PIERRE PRODUCT LINE

The line of 20 different products is baked using authentic French and Belgian recipes (not all items are available in any single retailer). One bite and you’ve transported away from supermarket toast and coffee shop pastries.

In addition to brioche hamburger, slider, and hot dog rolls, there are:

  • Brioche Baguettes (individual)
  • Brioche Loaves, sliced, butter (i.e. plain) and chocolate chip
  • Brioche Rolls (oblong), plain or chocolate chip
  • Brioche Swirls, round pastries with crème pâtissière custard or chocolate chip
  • Brioche To Share, vanilla brioche with crème pâtissière custard filling or chocolate chips
  • Belgian Waffles with cinnamon
  • Brioche Waffles with butter or chocolate chips
  • Chocolate and Hazelnut Filled Crepes
  • Mini Croissants, butter or chocolate chips
  •  
     
    OUR FAVORITE

    We didn’t try the whole line but liked everything we tried, and will definitely buy them again and again.

    If we had to make one choice, we admit: We became hooked on the Belgian Waffles.

    Baked in Belgium, the batter includes the traditional pearl sugar that is caramelized during baking to provide a sweet crunch in every bite. They’re:

  • A quick breakfast pastry, warm or room temperature.
  • A yummy coffee break snack.
  • An easy dessert topped with ice cream and fruit.
  • A great base for “build your own waffle” party with the works.
  •  
     
    FIND ST PIERRE NEAR YOU

    There’s a store locator on the company website.
     
     
    CHECK OUT THE DIFFERENT TYPES OF WAFFLES

    Yes, we’ve created a photo glossary off all the different waffle types.
     
     
    CHECK OUT THE HISTORY OF WAFFLES

    How old do you think they are? And who invented the waffle iron?


    CHECK OUT WHAT’S HAPPENING ON OUR HOME PAGE, THENIBBLE.COM.


    Comments off

    FOOD 101: For National Mocha Day, The History Of Mocha

    September 29th is National Mocha Day. It’s also National Coffee Day, celebrating mocha’s parents—coffee (the other is chocolate.

    What is mocha (MO-kuh), and where did it come from?
     
     
    MOCHA HISTORY

    The coffee bean, which was first discovered growing wild in Ethiopia, was not extensively cultivated until the 15th and 16th centuries. Then, extensive planting of the trees was undertaken in the Yemen region of Arabia (the history of coffee).

    From Yemen, the drinking of coffee and trading of coffee beans spread throughout the Arabian peninsula, and later, beyond Arabia to Europe. Al Mokha was the main port of Yemen, where most of the trading occurred.

    When coffee-growing expanded around the world, it was noted that the coffee made with Al-Mokha beans had a chocolatey nuance, and those beans became known as mokha/moka. The term was in use by 1773.

    At some later point, a cook combined coffee and chocolate flavors into beverages and desserts, and called the flavor mocha*. It’s been with us ever since.

    Today, the flavor profile is used in everything from:

  • Artisan marshmallows (photo #3)
  • Cake, fillings and frostings
  • Cocktails (mochatini, anyone?)
  • Hot and iced coffee
  • Ice cream, ice cream sandwiches and ice pops (photos #1 and #2)
  • Mocha chip cookies and bar cookies
  • Mousse and pudding
  • Pie
  • Shakes and floats…
  •  
    and any other food you’d like to make with the two flavors.

    For a quick mocha fix:

  • Add chocolate chips to a scoop of coffee ice cream.
  • Scoop coffee ice cream atop a brownie.
  • Add a scoop of chocolate ice cream to an iced coffee with milk.
  •  
     
    HOW ABOUT A MOCHA LATTE?

    A mocha latte, also called a caffè mocha, is a variation of the basic caffè latte. Like a latte, it is typically one third espresso and two thirds steamed milk. (Add chocolate syrup to a cappuccino and you have mochaccino. Cappuccino is made with less milk than latte.)

    To make a mocha, some chocolate is added: chocolate syrup, cocoa powder, sweetened cocoa powder (cocoa mix powder), etc. It can be dark or milk chocolate.

    A latte is typically one-third coffee and two-thirds milk. You can change the proportions to your liking.
     
    RECIPE: MOCHA LATTE

    Ingredients Per Mug

  • 2 tablespoons chocolate syrup
  • 1/3 cup brewed espresso (or coffee)
  • 2/3 cup steamed milk
  • Optional: 1/8-1/4 teaspoon vanilla extract
  • Optional garnishes: whipped cream, grated chocolate, instant cocoa mix powder, mini chocolate chips, cinnamon
  •  
    Preparation

    1. PLACE the chocolate syrup in the bottom of the mug. Add the espresso and vanilla extract and stir to combine.

    2. ADD the steamed milk. You can stir lightly, or leave the coffee and milk in layers.

    3. GARNISH as desired. Some coffee houses drizzle chocolate syrup atop the whipped cream.

    Caramel syrup makes it a caramel mocha latte. Mint extract instead of vanilla makes a mint mocha latte; and it’s the same with hazelnut extract, orange extract, raspberry extract, etc.

    For adults, there’s the Irish mocha latte (add Irish whiskey), the Baileys mocha latte, rum mocha latte, etc.

      Mocha Ice Pops
    [1] Mocha ice pops, a combination of coffee and chocolate. Here’s the recipe from Go Bold With Butter.

    Mocha Chunk Ice Cream
    [2] Mocha chunk ice cream. Here’s the recipe from King Arthur Flour.

    Mocha Marshmallows
    [3] Mocha marshmallows. Here’s the recipe from A Cozy Kitchen.

    Mocha Latte
    [4] Mocha latte in a Bormioli cup (photo courtesy Bormioli).

     
    You can also pre-rim the mug with instant cocoa mix, grated chocolate, etc.
     
     
    MOCHA TRIVIA

  • Moka java coffee beans are a blend of Moka beans (acidic, winey, chocolatey) and the rich, full-bodied beans from Java. (Note that it’s difficult to generalize about bean flavors, because they very based on microclimate, seasonal weather and processing.)
  • A moka pot is the classic Italian stove top espresso-maker (here’s a photo). There are three parts. Water goes into the base, and ground coffee is placed in a metal filter cup on top of the base. The pot is put on top of the stove, and boiling water goes through the coffee in the base and into the top section, from which it is poured.
  •   

    Comments off

    TIP OF THE DAY: 25 “Double” Pie Or Tart Garnishes

    Pecan Pie
    [1] Pecan pie with whipped cream and caramel corn (photo courtesy Edwards Desserts).

    Chocolate Tart
    [2] Chocolate tart à la mode with chocolate sauce and a salted peanut counterpoint (at Le Colonial | New York City).

    Pie With Caramel Sauce
    Pumpkin pie with an easy garnish: caramel sauce and walnuts (photo courtesy King Arthur Flour).

    Pumpkin Pie With Meringue
    [4] Pumpkin pie with a bit more effort: torched meringue, plus pepitas and finely-crushed shortbread crumbs (photo courtesy Bien Cuit | Brooklyn).

    Key Lime Pie With Lime Zest
    [5] Key lime pie with whipped cream and fresh lemon zest (here’s the recipe from Mom On Time Out).


    The two popular pie garnishes are ice cream and whipped cream. Sometimes, a dessert sauce is swirled on the plate. Maybe a mint leaf.

    But we’ve been inspired to add an extra layer of flavor.

    Our inspiration was this simple idea from Edwards Desserts.

    For photo #1, their contributor, Kate Arends of Wit & Delight, topped the pie with whipped cream—normal procedure—plus the unexpected additional garnish of caramel corn.

    The recipe follows, as well as our 25 ideas for “double garnishes” for pies and tarts, below.
     
    RECIPE: EDWARDS GEORGIA PECAN PIE
    WITH A DOUBLE GARNISH

    Ingredients

  • Pecan pie (Edwards frozen pie or your own homemade)
  • Homemade whipped cream
  • Pinch of sea salt
  • Caramel corn
  •  
    While Kate also adds caramel sauce to the pie—a triple garnish—we think adding a very sweet topping to a very sweet pie scores too high on the cloying meter.
     
    Preparation

    1. THAW the frozen pie. Drizzle pie with optional caramel sauce.

    2. TOP with homemade whipped cream, caramel corn and a pinch of sea salt.
     
    Editor’s note: If you have a red or pink sea salt, like alaea red volcanic salt, kala namak, Peruvian pink sea salt or pink Himalayan salt, it makes a great color contrast.)
     
     
    25 “DOUBLE GARNISHES” TO ADD TO YOUR PIE

    In addition to the ice cream or whipped cream, add another flavor with one or more of the garnishes below.

    As you peruse the list, match up your flavors. For example, crystallized ginger may go well with chocolate pie but not with grasshopper pie, which is a chocolate-mint combination.

    You don’t want your garnishes to be too sweet. Thus, no caramel sauce or crushed toffee on the pecan pie.

    You can use triple garnishes and even quadruple garnishes, if they’re simple and don’t overwhelm. Go for different textures and colors.

    It’s not gilding the lily; it’s food fun!

  • Baking chips: butterscotch, chocolate, mint, etc.
  • Candied citrus peel: lemon, lime, orange, grapefruit (recipe)
  • Candy: Hershey’s kiss, mini M&Ms, mini PB cups, chocolate-covered coffee beans
  • Cereal: Granola or Chocolate Frosted Flakes
  • Chocolate: curls, shavings, grated chocolate
  • Chocolate covered: nuts, strawberry
  • Chocolate novelties: coin, leaf, solid round ball (with or without the foil wrap), seasonal (e.g. flower, leaf, Christmas tree)
  • Coconut: plain or toasted
  • Crunch: chocolate covered or regular mini pretzel, chocolate covered potato chips
  • Crystallized ginger: chopped
  • Crown garnish: a whole cookie or sliced star fruit (carambola), inserted into the ice cream or whipped cream
  • Crumbs: cookie or pie crust
  • Dessert sauce: butterscotch, caramel, chocolate, crème anglaise, dulce de leche, fruit purée, etc.
  • Dried fruit: raisins, dried cherries or cranberries
  • Fresh fruit: raspberry or small strawberry…and O.K., a mint leaf
  • Frosted grapes (recipe)
  • Fruit chips: apple, banana, pear
  • Marron glacées: whole, halved, diced
  • Nuts: sliced, crushed, candied (recipe)
  • Pomegranate arils
  • Popcorn: caramel, chocolate or other sweet flavor
  • Salty: a salted caramel (whole or half), peanuts, mini pretzel, potato chip
  • Seasonal candy: candy corn, cinnamon candy, crushed peppermints, Easter egg malt ball, seasonal-wrapped Kisses, etc.
  • Tang: crème fraîche (recipe), slightly sweetened sour cream
  • Toffee bits
  • Zest: lemon, lime, orange
  •  
    Have we left your favorite off the list? Let us know!
     
    WHIPPED CREAM SUBSTITUTES

  • Crème fraîche
  • Flavored yogurt
  • Marshmallow cream
  • Mascarpone
  • Sour cream, plain or lightly sweetened
  •  
     
    CHECK OUT THE DIFFERENT TYPES OF PIE IN OUR PIE & PASTRY GLOSSARY.


    Comments off

    RECIPE: Bake A Cake With Beer

    Another cake following on the heels of yesterday’s pound cake recipe?

    Yes, because September 28th is National Drink Beer Day. We’re not only suggesting a beer to drink; we’re giving you a cake recipe that uses the same beer, witbier.

    Belgian witbier, also known as white beer, bière blanche, or simply witte (photo #3), is a barley/wheat, top-fermented beer brewed mainly in Belgium and The Netherlands. It gets its name from the suspended yeast and wheat proteins, which cause the beer to look hazy or white. Here’s more about it.

    Witbiers have notes of citrus and coriander that make them an ideal pairing for fruit desserts. The herbs can also go into the dessert; for example, lemon sorbet with a pinch of coriander, or this cake recipe.

    Examples of American craft witbiers/wheat beers for both baking and drinking with the cake, in alphabetical order: Allagash Brewing Company White, Avery Brewing Company White Rascal, New Belgium Brewing Company Fat Tire Belgian White, Samuel Adams Cold Snap (photo #2) and UFO White Ale.

    CHECK OUT THE DIFFERENT TYPES OF BEER IN OUR BEER GLOSSARY.
     
     
    RECIPE: BLOOD ORANGE WITBIER CAKE

    A citrus sour cream frosting complements the rich, slightly tangy flavor of this fine-grained cake (photo #1).

    The recipe was developed by Lori Rice for King Arthur Flour. Prep time is 30 minutes, bake time is 54 to 57 minutes.

    Ingredients For One 8-1/2″ Loaf Cake

    Ingredients For The Cake

  • 1-3/4 cups all-purpose flour
  • 1-1/2 teaspoons baking powder
  • 1/4 teaspoon fine sea salt
  • 1/4 teaspoon ground coriander
  • 8 tablespoons (1/2 cup) unsalted butter, softened
  • 1-1/4 cups granulated sugar
  • 1 teaspoon grated blood orange zest
  • 2 large eggs
  • 1 tablespoon blood orange juice
  • 1/2 cup witbier (see *footnote below)
  •  
    Ingredients For The Frosting

  • 2 tablespoons sour cream
  • 1/2 teaspoon grated blood orange zest
  • 1 cup confectioners sugar
  • 2 teaspoons blood orange juice
  • Pinch of fine sea salt
  • Pinch of ground coriander
  •  
    ________________

    *When baking with beer, pour out the amount in a measuring glass and let it sit for 5 minutes to allow the foam to settle.
    ________________
     
    Preparation

    1. PREHEAT the oven to 350°F. Grease and flour an 8-1/2″ x 4-1/2″ loaf pan.

    2. WHISK together the flour, baking powder, salt and coriander in a small bowl. Set aside.

    3. BEAT together in a large bowl with electric beaters on low, the butter, sugar and orange zest until light in color. Add the eggs one at a time, mixing at medium-high speed until the first is absorbed, before adding the next.

      Witbier White Ale Pound Cake
    [1] This flavorful cake has accents of blood orange, coriander, and witbier (photo courtesy King Arthur Flour).

    Samuel Adams Cold Snap Beer

    [2] Samuel Adams Witbier, a seasonal brew called Cold Snap, may be the easiest to get your hands on. We have more recommendations below (photo courtesy Protech NYC.)

    Witbier
    [3] A glass of witbier to drink with the cake. These specially designed witbier/wheat beer glasses are from Spielgau.

     
    4. SCRAPE down the bowl and add 1/4 cup of the dry ingredients. Mix until combined, then add the orange juice and half of the beer.

    5. ADD half of the remaining dry ingredients, mix to combine, then add the remaining beer and the rest of the dry ingredients. Gradually raise the speed to medium-high and mix for 30 to 45 seconds, until smooth.

    6. POUR the batter into the prepared pan. Bake for 54 to 57 minutes, until the cake just begins to pull away from the edge of the pan, and a paring knife inserted in the center comes out clean. Remove the cake from the oven and let it cool for 30 minutes in the pan on a rack.

    7. MAKE the frosting: Mix together the sour cream and orange zest. Whisk in the confectioners sugar, orange juice, salt and coriander. The frosting will have a pourable yet thick consistency that will be able to sheet a bit down the sides of the cake.

    8. TIP the cake out of the pan and drizzle with frosting while still slightly warm. Let cool completely before slicing. Store leftover cake at room temperature in plastic wrap for up to three days. Freeze for longer storage.
      

    Comments off

    RECIPE: Pineapple Pound Cake & The History Of Pineapple

    Pineapple Pound Cake
    [1] Pineapple pound cake recipe (photos #1 and #2 plus recipe © Hannah Kaminsky | Bittersweet Blog).

    Pineapple Pound Cake
    [2] If you don’t use a glaze, serve it à la mode.

    Whole Pineapple
    [3] Pineapples are ready to use when you buy them. They don’t ripen after they’re picked (photo © Produce Marketing Guide).


    Since the pineapple first reached Europe in the 15th century, it has been considered a symbol of hospitality.

    Pineapple was extremely costly, given its long voyage from the tropics. If you offered guests a pineapple, you were a generous host indeed. (The history of pineapple is below).

    Pineapples remained costly. If you recall the play and film Cabaret, in 1930s Berlin, when Herr Schultz brings Fräulein Schneider a pineapple during their courtship, she demurs that it is too generous a gift.

    > The history of pineapple is below.

    > Here’s the history of pound cake.

    Thanks to Hannah Kaminsky of Bittersweet Blog, for allowing us to republish her “pineapple story” and pineapple pound cake recipe. The story follows.
     
     
    THE INSPIRATION FOR PINEAPPLE POUND CAKE

    “Reaching for the heavy brass door knocker standing guard at the entry of my childhood home, I never once questioned why it was fashioned after a pineapple. Design flourishes were not the first priority for the architects who constructed this traditional, simple New England colonial.

    “It could have been any shape, but of all the possible symbols to display to guests, the first thing that they grasp upon arrival is this tropical fruit.

    “It was because, I discovered, the pineapple was a symbol of generous hospitality. Pineapples, a delicious delight for Europeans (see the painting at the bottom), crossed the ocean in round-trips.

    “If the ships were slowed by bad weather, the fruit could rot; hence the great prices. To have such wealth that one could offer these esteemed fruits to visitors spoke of one’s prosperity and generosity.”

    The symbolism stuck. Today the average person can buy a fresh pineapple, and anyone can buy canned slices and pineapple juice.

  • You can add pineapple to cocktails and pizza, upside-down cakes and salsa; grill or roast it.
  • Add it to recipes with chicken, pork, rice, shrimp and squash, skewers, fruit salad, and anything called sweet-and-sour.
  • Make jam and fudge, sorbet and ice pops and cheese balls.
  • Dry or candy slices or smaller pieces.
  •  
    Wile one can still install a pineapple door-knocker, eating the pineapple may be the way to go.
     
     
    RECIPE: ROASTED PINEAPPLE POUND CAKE

    Ingredients For 1 Loaf (8-10 Servings)

  • 1-3/4 cups all-purpose flour
  • 1 cup granulated sugar
  • 1 teaspoon baking soda
  • 1/2 teaspoon baking powder
  • 1/2 teaspoon salt
  • 1/2 teaspoon ground ginger
  • 1 fresh pineapple
  • 1/2 cup olive oil (for butter see *footnote)
  • 1/2 cup full-fat coconut milk or cow’s milk†
  • 1-1/2 teaspoons apple cider vinegar
  • 1 teaspoon vanilla extract
  • Preparation

    1. MAKE the pineapple purée. Heat the oven to 400°F. Peel, core and dice the fruit before spreading the pieces evenly inside a casserole or baking dish. A good amount of juice will be expressed, so you need a vessel with fairly high sides. Bake, stirring every 15 minutes for 60 to 70 minutes, until caramelized. Cool completely before pureeing in a blender or food processor. Yield should be about 1-1/2 cups purée.

    This step can be done in advance. If refrigerated overnight, bring to room temperature before mixing into the recipe.

    If you have leftover purée, you can whip up a quick glaze by stirring in brown sugar and a pinch of cinnamon to taste. Cook the glaze in a pot on the stove until the sugar granules dissolve. Then drizzle or slather on top of the cooled loaf.

    2. MAKE the cake. Preheat the oven to 350°F (or lower the temperature from step #1. Lightly grease and flour an 8 x 4-inch loaf pan and set aside.

    3. STIR together in a large bowl the flour, white sugar, baking soda, baking powder, salt and ginger. Add the pineapple purée, oil, milk, vinegar and vanilla, mixing thoroughly until the batter is fairly smooth. It’s perfectly fine to leave a few lumps, rather than risk over-mixing and creating a tough crumb.

    4. BAKE for 60 to 75 minutes or until a toothpick inserted in the center comes out clean. You may want to tent the loaf with foil half-way through the baking process if you fear it will turn out too dark. Remove the foil as soon as it comes out of the oven and let the cake cool in the pan for at least 30 minutes. Turn out onto a cooling rack to finish cooling, and serve either warm or at room temperature.

    —Hannah Kaminsky
    ________________

    *Using olive oil instead of butter is a vegan option and a healthier option with fewer saturated fats (olive oil has 1.9 g/tablespoon, butter has 7 g/tablespoon). However, you can substitute melted butter for oil in a 1:1 proportion. However, while the butter provides buttery flavor, oil creates a moister cake.

    †If you would like to add the coconut flavor to cow’s milk, use 1/2 teaspoon coconut extract.
     
     
    King Charles II With Pineapple Painting
    [4] Charles II is presented with the first pineapple grown in England (1675 painting by Hendrik Danckerts, via Wikipedia).
     
     
    PINEAPPLE HISTORY

    The pineapple is indigenous to South America, believed to have originated around southern Brazil and Paraguay. The natives of that region carried the pineapple throughout South America via trade. It eventually reached the Caribbean, Central America and Mexico, where it was cultivated by the Mayas and the Aztecs.

    The first Europeans to see pineapples were Christopher Columbus and his crew, on the Caribbean island of Guadeloupe, in 1493. Columbus called them piña de Indes, pine of the Indians (because of its visual relation to pine cones). He brought them back to King Ferdinand in Spain. The exotic fruits were an instant hit in the royal court of Spain.

    The Portuguese took the fruit from Brazil to India by 1550. The Spanish introduced pineapple to Guam, Hawaii, The Philippines and Zimbabwe. It was brought to northern Europe by the Dutch, from their colony in Surinam.

    Given the time it took to go back and forth across the Atlantic to replenish the supply, King Ferdinand gave the order to perfect a hothouse, so the tropical plant could be grown in Spain.

    But that took almost 200 years. Even in the late 17th century, when they could be grown in a hothouse, pineapples remained so uncommon and coveted that King Charles II of England posed for an official portrait, in which he received a pineapple as a gift (photo #4).

    The gardeners of King Louis XV of France finally presented him with a pineapple that had been grown at Versailles, in 1733. Catherine the Great of Russia relished the pineapples grown on her estates.

    What to give the monarch or aristocrat who had everything? A pinery, the special hothouse created to grow pineapples. By the second half of the 18th century, the production of pineapples on British estates had become a great rivalry between wealthy aristocrats.

    Down to lesser wealthy mortals: A pineapple centerpiece on a formal dining table said much about a family’s affluence and rank in society. Guests were delighted just to see them.

    They weren’t eaten there: They were so expensive and so much in demand that confectioners would often rent them by the day (source)!

    By the latter 19th century, pineapple was being grown in Hawaii, largely in gardens. Large-scale cultivation by U.S. companies began in the early 1900s.
     
    Pineapple In The 20th Century

    Captain John Kidwell is most often credited with founding Hawaii’s pineapple industry, when he began crop development trials in 1885.

    However, in 1899 James Drummond Dole arrived and started a pineapple plantation, incorporated as the Hawaiian Pineapple Company, the following year. By 1901 he had pineapple crops on Oahu. Later, canneries were built.

    Del Monte was originally the name for private label coffee, made for the Hotel Del Monte in Monterey, California. It expanded into fruit distribution, and arrived more than 15 years after Dole to grow pineapples in Hawaii.

    By the middle of the 20th century there were eight pineapple companies in Hawaii, employing more than 3,000 people and growing 80% of the world’s pineapple.

    Today, Costa Rica, Brazil, and the Philippines grow nearly one-third of the world’s pineapples. India, Thailand, Nigeria, China, Indonesia, Mexico and Colombia are the next largest producers.

    Hawaii isn’t even on the Top 10 list. Del Monte moved its cultivation to Costa Rica; and by 2013, Dole grew only about 0.1% of the world’s production.


    CHECK OUT WHAT’S HAPPENING ON OUR HOME PAGE, THENIBBLE.COM.


    Comments off

    The Nibble Webzine Of Food Adventures
    RSS
    Follow by Email


    © Copyright 2005-2026 Lifestyle Direct, Inc. All rights reserved. All images are copyrighted to their respective owners.