THE NIBBLE BLOG: Products, Recipes & Trends In Specialty Foods


Also visit our main website, TheNibble.com.


RECIPE: Maple Pound Cake

Maple Pound Cake
[1] Making this pound cake in a bundt pan provides eye appeal (photo courtesy King Arthur Flour).


[2] Always buy pure maple syrup. The “pancake syrup” sold in grocery stores is corn syrup with artificial maple flavoring. Here’s an explanation of the differences (photo Miguel Andrade | Wikipedia).


While maple-flavored foods can be served year-round, they have fallen into the fourth-quarter slot, a time period that highlights everything made with maple and pumpkin.

Going with the tradition, we decided to feature this maple pound cake for fall. If we had featured it in July, would you have been interested?

This pound cake can be dressed up for dessert. We like creme anglaise as a dessert sauce (recipe), or a scoop of vanilla or maple walnut ice cream.

Most often we enjoy it plain, as a snack or a brunch cake.

Prep time is 25 minutes, bake time is 45 to 50 minutes.
 
 
RECIPE: MAPLE POUND CAKE

Ingredients For The Cake

  • 2 cups unbleached cake flour
  • 1 teaspoon baking powder
  • 1/4 teaspoon baking soda
  • 1 teaspoon salt
  • 3/4 cup (12 tablespoons) unsalted butter, softened
  • 2/3 cup light brown sugar, packed
  • 2 large eggs
  • 1/2 cup maple syrup
  • 1 cup sour cream
  • 1 teaspoon vanilla extract
  • 1/4 teaspoon maple flavor; optional, for enhanced maple flavor
  •  
    For The Glaze

  • 2 tablespoons unsalted butter
  • 1/4 cup maple syrup
  • 1/4 cup dark rum or water
  •  
    Preparation

    1. PREHEAT the oven to 350°F. Lightly grease a 9- or 10-cup bundt-style pan.

    2. COMBINE the flour, baking powder, baking soda and salt in a medium bowl.

    3. BEAT together the butter and brown sugar in a separate bowl, until light and fluffy. Add the eggs one at a time, beating for a minute or two and scraping the sides and bottom of the bowl between additions. Mix in the maple syrup.

    4. ADD half the flour mixture, followed by the sour cream, vanilla and maple flavor, and finally the remaining flour mixture. Mix until just combined, scraping the sides and bottom of the bowl between each addition.

     
    5. SCOOP the batter into the prepared pan and bake for 45 to 50 minutes, until a cake tester or toothpick inserted in the center comes out clean. Allow the cake to cool for 10 minutes in the pan, then turn it out onto a serving plate. While the cake is cooling…

    6. MAKE the glaze. Combine the ingredients in a medium saucepan. Bring the glaze to a rapid boil, then reduce to a simmer and cook for about 5 to 8 minutes, until it thickens to a syrupy consistency. Remove the pan from the heat.

    7. BRUSH the hot glaze over the warm cake. Allow the cake to cool completely before serving.

    8. STORE unsliced at room temperature for several days; freeze for longer storage.
     
     
    MAPLE SYRUP HISTORY

    Maple trees are indigenous to the U.S. In cold climates, the trees store starch in their trunks and roots before winter; the starch is then converted to a form of sugar, that rises in the sap in late winter and early spring.

    Early Native Americans, like the Algonquians of the Northeast, discovered the sweet sap inside maple trees, and processed it into syrup.

    At the beginning of the spring thaw, they made V-shaped incisions in tree trunks using stone tools, and inserted reeds or concave pieces of bark to run the sap into buckets.

    The first stage of concentrating the sap was by dropping hot cooking stones into the buckets to remove some of the water, or by leaving them outside overnight and removing the layer of ice that formed on top. Sugar bushes—stands in the forest—provided working spaces.

    Over time, processing improvements were developed. By the time European settlers arrived, the technique was to boil the sap over an open fire for a long time, until it concentrated into syrup.

    The Native Americans taught the Europeans how to make the syrup. The settlers improved the process by using augers to drill tapholes in the trunks, and by making wooden spouts to drain the sap into buckets.

    During the 17th and 18th centuries, Europeans used the maple syrup as a source of sugar, in both liquid and crystallized forms. It was local and free for the making, while cane sugar had to be imported from the West Indies.

    Today, maple syrup harvesters use plastic tubing (photo) to transfer the sap from the tree to the sugar shack, the building where it’s boiled into syrup.

    Here’s more on the production of maple syrup.


    Comments off

    TIP OF THE DAY: The New Deviled Egg Isn’t Deviled

    We love this idea from food photographer and creative cook Melina Hammer, via Handsome Brook Farm.

    Handsome Brook Farm is a pioneer in organic pasture-raised eggs, with distribution on the East Coast. We can assure you that in blind tastes tests two years apart, organic eggs were the clear winner over other eggs.

    Which brings us back to Melina Hammer’s inspiration for today’s tip. When we saw her egg garnishes (photo #1), we said: Wow, what a better idea than deviled eggs. Who needs mayo calories when you can add flavor like this?

    For holiday entertaining, summer picnics, anytime: Exercise your creative egg garnishing skills.
     
     
    35 GARNISHES FOR YOUR EGGS

    While you can use a single garnish, combine them for a visual, textural and taste sensation.

    You’ll have to cut some items to size. Don’t be afraid to slice and dice.

  • Anchovy (photo #2)
  • Avocado Slice/Guacamole
  • Baby Arugula
  • Bacon/Canadian Bacon
  • Bean Dip/Other Dip
  • Capers/Caperberry (photo #3)
  • Caviar: Salmon, Tobiko, Etc. (Affordable Caviars)
  • Chili Paste
  • Chow-Chow, Corn Relish, Pickle Relish
  • Chutney (photo #4)
  • Crème Fraîche or Sour Cream
  • Dijon Mustard/Flavored Dijon (Types Of Mustard)
  • Flaked Canned Tuna Or Salmon
  • Flavored Mayonnaise
  • Gherkins, Thinly Sliced
  • Herbs: Chives, Cilantro, Dill, Parsley
  • Honey/Spicy Honey
  • Hummus
  • Marinated Grape Tomato Half
  • Mesclun, Lightly Dressed
  • Microgreens
  • Minced chives
  • Mostarda
  • Pâté Cube
  • Pesto
  • Pickled Jalapeño
  • Pickled Onions
  • Pickled Mushroom
  • Pico De Gallo Salsa
  • Radishes, Thinly Sliced
  • Roasted Red Pepper Strips
  • Small Shrimp Or Crabmeat
  • Sliced Olives
  • Smoked Salmon
  • Tapenade
  •  
     
    ABOUT THE BOILED EGGS

    Melina calls her 6-minute eggs custard eggs, after the creamy consistency of the centers (photo #1). We like them too.

    Boil a couple and see how you like the consistency.

      Decorated Hard Boiled Eggs
    [1] Garnished hard-boiled eggs from food photographer Melina Hammer.

    Dish Of Anchovies
    [2] Anchovy fillets are a good contrast with the bland eggs. Roll them or cut them to size (photo courtesy Vital Choice).

    Caperberries
    [3] A single caperberry is more weildly than multiple small capers (photo Elvira Kalviste | THE NIBBLE).

    Tomato Chutney
    [4] Tomato chutney. You can use sweet or savory chutney to garnish (photo courtesy Food TV).


    Comments off

    TOP PICK OF THE WEEK: Rare Artisan Fruitcakes From Robert Lambert

    White Fruitcake
    [1] Robert Lambert’s artisan fruitcakes are available in dark and white (shown) styles. The candied fruits are made by hand (all photography courtesy Robert Lambert).

    Aged Fruitcake
    Three vintages of Robert Lambert fruitcakes: 2018 at top, 2017 in the center and 2016 at bottom.


    Some people cringe at the word “fruitcake.”

    That’s because their experience is limited to mass-produced versions loaded with yucky neon candied fruit.

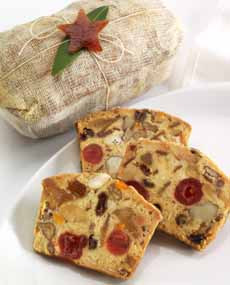
    If you’ve never had artisan fruitcake, made by loving hands by a gifted baker, treat yourself to one from Robert Lambert, now on sale.

    These are the best fruitcakes you can buy. All of the candied fruit is made by hand. There’s nothing processed or artificial.

    Robert Lambert’s small-batch fruitcakes are made in Marin County, California, using local fruits and rare varieties he painstakingly sources. They sell out quickly, so buy them now, even if you want them as Christmas or Thanksgiving gifts. The fruitcakes don’t go stale.

    In fact, Mr. Lambert sells aged fruitcakes. In addition to purchasing the current 2018 “vintage,” you can also buy 2017 and 2016.

    Aged fruitcake? Yes, fruitcakes including figgy pudding are typically aged for five weeks or longer, so the flavors can meld.

    Then there’s extra-long aging. Mr. Lambert explains:

    “Over time the flavors radiate out from the moisture of the fruits and peels. They intersect and form new flavor compounds. This intensifies the complexity.

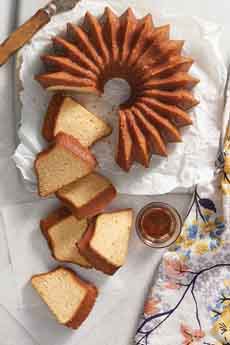
    “In the 2-year-old cake (at the bottom of photo #2), that process is complete.”

    As with the 2018 vintage, the aged cakes are available in both dark and white flavors*.

    > Fruitcake toss day is January 3rd.

    > National Fruitcake Day is December 27th.

    > The history of fruitcake is below.
     
     
    SOMETHING NEW FOR THE 2018 SEASON

    Robert Lambert’s 2018 cakes all contain candied shekwasha† peel, a rare Japanese citrus. Tangy and voluptuous, it has a fruity, floral, tropical flavor with notes of lemon and pineapple—“as unique as jasmine or magnolia,” says Lambert, “an unforgettable addition to the symphony of flavors these cakes embrace.”

    Since Mr. Lambert’s artisan products are limited in production, head to the website now to secure yours. At $65, $75 and $85 respectively, based on vintage, they are well worth it.

    We assure you that everything else Mr. Lambert makes is equally delicious. He has the lead for the number of “Top Pick of The Week’ products we’ve recommended.
     
     
    BEVERAGES WITH FRUITCAKE

    Rich, dense fruitcake needs little garnish. Some people use whipped cream, although we prefer a dab of mascarpone or crème fraîche.

    To add some color, we like a piece of candied orange peel; although a few plain, julienned pieces work, too.

    We love a good cup of black tea with our fruitcake, or a spiced tea like Bigelow’s Constant Comment (which is also available in a decaffeinated version and a green tea version).

     
    Port is the wine of choice, but other choices include:

  • Fruity or sweeter beers: cranberry ale, fruit beer and seasonal fruitcake beer, pumpkin ale, and May wine.
  • Sweet oloroso sherry.
  • Madeira, 5 or 10 years old (e.g. Bual).
  • Whiskey aged in sherry casks, like The Macallan.
  •  
     
    A BRIEF HISTORY OF FRUITCAKE

    The earliest known recipe for fruitcake dates to ancient Rome, and included pine nuts, pomegranate seeds and raisins.

    By the Middle Ages, honey, preserved fruits and spices had been added and the cake was enjoyed throughout Europe. Recipes varied widely by region, incorporating local ingredients.

    In the 16th century, sugar from the Caribbean—and the discovery that sugar could be used to preserve fruits—made fruitcakes more affordable and popular. Wedding cakes were often fruitcakes.

    Everything was delicious for a few centuries.

    But the industrial production of prepared foods that followed World War II led to low-priced and not-great-tasting fruitcakes.

    Following European tradition, people still gave them as Christmas gifts, but few recipients enjoyed eating them.

    Many people regifted their fruitcakes; thus the joke from comedian Johnny Carson, that there was only one fruitcake in the world and it got passed from person to person.

    Buy or bake yourself a really good fruitcake and see why it deserves its place among the most delicious and looked-forward-to Christmas foods.

    ________________

    *The main difference between a white fruit cake and a dark fruit cake is the sugars. Traditional dark fruit cake is made with brown sugar and molasses. White fruit cake is made with white granulated sugar.

    Shekwasha, Citrus depressa, is also called shequasar, Taiwan tangerine, flat lemon, hirami lemon, or thin-skinned flat lemon. It’s a small, green citrus fruit rich in flavonoids, and native to Taiwan and Okinawa.


    CHECK OUT WHAT’S HAPPENING ON OUR HOME PAGE, THENIBBLE.COM.


    Comments off

    TIP OF THE DAY: Check The Hidden Sugar (Added Sugar) In Your Food

    With Halloween coming up, most of us will be nibbling more candy than usual.

    At least when you eat candy, you know that you’re eating sugar, and can monitor your intake.

    But added sugars have infiltrated our lives in a food intake way in a covert way, from sugar-laden products like barbecue sauce, to sugar sneaked into pasta sauce to compensate for less-than-ideal tomatoes.

    So today’s tip is a “public service announcement”: some pointers from Dr. Nimali Fernando, a Fredericksburg, Virginia-based physician who explains why we may not be aware of our sugar intake.

    According to the American Heart Association:

  • Adults should consume no more than 40 grams of added sugar a day.
  • Children should consume less than 25 grams of added sugar per day, which is equivalent to 6 teaspoons.
  • Children under the age of 2 should not have any sugar-added foods or beverages.
  •  
    That includes not only the sugar you put onto oatmeal and into tea, but the hidden added sugars, which can comprise the majority of sugar grams consumed daily.

    Added sugars are those sugars that have been used by the food industry to enhance a food’s flavor. These are processed sugars, compared to the natural sugars in a piece of fruit.

    While a piece of fruit is a good nutritional choice, packaged “fruit snacks” (the kind that come look like soft candy, for example) have added sugars.

    Even some foods that seem healthy may contain “hidden” added sugars, making it important to get to know the terms and become label-readers.

    “Added sugars” do not include sugars that naturally occur in food, for example, the fructose in fruits or the lactose in milk.

    Here’s what to watch out for:
     
     
    1. CONFUSING FOOD LABELS

    Figuring out how many added teaspoons are in a food product is not straightforward.

  • First, food labels report sugar in grams. So remember this equation the next time you look at a label: 4 grams of sugar = 1 teaspoon of sugar.
  • To further complicate things, food labels historically have not broken down added sugar versus naturally occurring sugar.
  • So when we look at a label on a sweetened fruit yogurt, it’s often unclear how much of the sugar comes from natural milk sugars (lactose) and fruit (fructose) versus how much extra sugar the food company has added.
  • Fortunately, by the end of 2018 most food labels will be updated to break down total sugar vs. added sugar which will make reading a label more straightforward.
  •  
     
    2. SMALL PORTION SIZES

    A food label may not look indicate that the product has a large amount of sugar per serving.

    But if you look closely you may notice that the serving size is much smaller than what you may actually eat.

  • Take the example of cereal. A typical serving size for cereal may be a half a cup, while most people will actually eat a cup or more. If there are two teaspoons of sugar in a serving, but you can eat three servings, that 2 teaspoons quickly multiplies to 6 teaspoons.
  • What looks like an individual bottle of a soft drink often comprises two servings.
  • That single brownie or cookie from the convenience store may also be two portions.
  • And, who ever ate only 1/4 cup of ice cream, the portion size given on ice cream nutrition labels?
  •  
     
    3. SWEETENING WITH “HEALTHIER” SUGARS

    Sweeteners like honey, agave and maple syrup may make a food appear healthier, but that doesn’t mean they actually are. Don’t be fooled.

    While they may be more natural than refined sugar, and their glycemic index may be lower, manufacturers are still adding sugar calories to the product.


    Sugar Bowl
    [1] You can see sugar in a sugar bowl, but not when it’s hidden in processed foods (photo courtesy Hannah Kaminsky | Bittersweet Blog).

    Brown Sugar
    [2] Brown sugar and raw sugar have just as many calories and glycemic index as white sugar (photo Matteo Pescarin | SXC).

    Corn Syrup
    [3] It’s the same with corn syrup and high fructose corn syrup (photo courtesy The Cupcake Project).

    Maple Syrup
    [4] And the same with maple syrup and honey (photo courtesy Federation Des Producteurs Acericoles Du Quebec).


    4. USING SWEETENERS THAT DON’T SOUND LIKE SUGAR

    Sometimes it can be hard to spot sugar in an ingredient list. That’s because there are so many different types of sugar: “White sugar” and “brown sugar” are the two that most people consider to be “sugar.”

    One nutrition source reports that sugar can be spotted with as many as 61 different names.

    Sweeteners that behave like white sugar include barley malt, corn syrup (and HFCS), dextrose, golden syrup, maltose, molasses, rice syrup and brown rice syrup.

    Using different sweeteners in the same product is a great tactic to hide sugar, as nutrition labels require that the ingredients be listed by weight in decreasing order. By listing different sugar types (that may not sound like sugar in the first place), different sweeteners can appear further down on the list, making it seem like there is less sugar.

  • Know the sneakiest foods. There are some foods that seem to have hidden sugars in them more often than others.
  • Be aware of and read the labels carefully on such foods as granola bars, breakfast cereals, yogurt, fruit snacks, and juice.
  • Juice is trickier because technically the sugar in juice is considered naturally occurring. However, since most juice is processed, their sugars act more like a processed food. There is nothing natural about a child drinking the equivalent of 5 apples worth of sugar.
  • Apple juice, popular with children, contains no fiber to help slow down the absorption the way there is when we eat an apple. Skip the juice and stick with water for hydration and whole fruit for fiber and nutrients instead.
  •  
     
    CHECK OUT THE
    DIFFERENT TYPES OF SUGAR
    IN OUR SUGAR GLOSSARY


    Comments off

    RECIPE: Potato & Chorizo Paella

    Potato Paella
    [1] A hearty dinner dish, this paella has a twist: potatoes (photo courtesy Black Gold Farms).

    Red Potatoes
    [2] Red potatoes (photo courtesy Good Eggs).

    Vegan Paella
    [3] It’s easy to make a vegan paella, since the recipe uses no dairy products. This version replaces meat with cauliflower florets (photo courtesy Blossom Restaurant | NYC).

      There’s no saffron rice in this potato and chorizo paella, but white rice is augmented with sliced red potatoes, and turmeric adds a yellow tinge to the rice and potatoes. Serve it for a hearty dinner or for crowd gatherings.

    The recipe was created by Black Gold Farms, fourth-generation family farm and grower of potatoes.

    The recipe uses chorizo as the protein, mixed with onion, garlic, peas, bell pepper, and cilantro.

    You can tailor the recipe as you like, adding other paella proteins such as chicken, clams, mussels, and shrimp.

    Prep time is 10 minutes, cook time is 45 minutes.

    There are more paella recipes below.
     
     
    RECIPE: POTATO & CHORIZO “PAELLA”

    Ingredients For 6 Servings

  • 1 pound Black Gold Farms red potatoes, thinly sliced
  • 3 tablespoons olive oil, divided
  • 12 ounces chorizo sausage, sliced
  • 1 small red onion, finely chopped
  • 1 red bell pepper, finely chopped
  • 2 cloves garlic, minced
  • 1 teaspoon ground turmeric
  • 1 teaspoon smoked paprika
  • 1-1/4 cups short-grain rice
  • 1/2 teaspoon salt
  • 1/4 teaspoon pepper
  • 3/4 cup dry white wine
  • 4 cups lower-sodium chicken broth, divided
  • 1-1/2 cups canned diced tomatoes
  • 2 bay leaves
  • 1 cup frozen peas, thawed
  • 1/4 cup fresh cilantro leaves
  • Optional: lemon or lime wedges, for serving
  •  
    Preparation

    1. HEAT half of the oil in a high-sided skillet or large saucepan set over medium heat. Cook the sausage for about 5 minutes or until golden and crispy. Transfer to a plate. In the same pan…

    2. HEAT the remaining oil. Cook the onion, red pepper, garlic, turmeric, and smoked paprika for about 3 minutes or until slightly softened. Stir in the rice, salt, and pepper; cook for about 3 minutes or until well coated.

    3. STIR in the wine; cook for about 5 minutes or until almost no liquid remains in the pan.

     
    4. ADD 2-1/2 cups broth, the tomatoes and bay leaves; bring to boil. Stir in the potatoes; bring to a simmer. Simmer for 30 to 35 minutes or until rice and potatoes are tender, adding additional broth as the liquid is absorbed.

    5. STIR in the peas in the last 5 minutes of cooking. Cover and let stand for 10 minutes. Remove the bay leaves; top with chorizo and cilantro. Serve with optional lemon wedges (a squirt before eating brightens the dish).
     
     
    TIPS
    Use a short-grain rice, such as paella rice, bomba, or Valencia. Alternatively, use arborio rice.

    Substitutes:

  • Substitute chicken broth for wine.
  • Substitute parsley for cilantro.
  • Substitute a pinch of saffron threads for turmeric.
  •  
     
    MORE PAELLA RECIPES

  • Paella History & Grilled Paella Recipe
  • Paella With Rabbit & Chicken
  • Paella Valenciana & Paella Mixta Recipes
  • Easy Shrimp Paella Recipe
  • Other Uses For A Paella Pan

  • Quick Quinoa Paella
  •  
    March 27th is National Paella Day.


    CHECK OUT WHAT’S HAPPENING ON OUR HOME PAGE, THENIBBLE.COM.


    Comments off

    The Nibble Webzine Of Food Adventures
    RSS
    Follow by Email


    © Copyright 2005-2024 Lifestyle Direct, Inc. All rights reserved. All images are copyrighted to their respective owners.