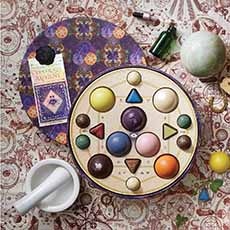
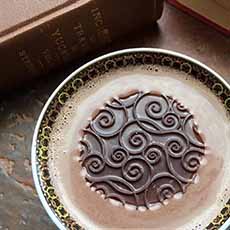
THE NIBBLE BLOG: Products, Recipes & Trends In Specialty Foods


Also visit our main website, TheNibble.com.


COCKTAIL RECIPE: Black Pepper Dirty Martini

For those who like things hot and spicy, here’s a variation on the Dirty Martini: Add black pepper heat!

You get the salty brine from the olives, and heat from the pepper.

You can purchase pepper-infused vodka like Absolut Peppar (photo #2), or infuse plain vodka with peppercorns (instructions below).

(Pepper vodka is also great in Bloody Marys.)

The olives in the photo are Lindsay Small Organic Olives, but if your crowd likes to pile on the heat, look for chile-stuffed olives (there are plenty on Amazon).

Stuffed olives tend to be green olives; but use black olives

Ready to spice things up?
 
 
RECIPE: BLACK PEPPER DIRTY MARTINI

Ingredients For 1 Drink

  • 2½ ounces black pepper-infused vodka
  • ½ ounce black olive brine
  • ½ ounce dry vermouth
  • ½ tablespoon ground black pepper
  • Lemon slice
  • Garnish: olives of choice
  •  
    To Infuse Your Own Pepper Vodka

  • 1/8 teaspoon lightly crushed black peppercorns
  • 1 cup vodka (to infuse your own vodka)
  •  
    Preparation

    1. INFUSE the vodka. Place the vodia and the crushed peppercorns in an airtight container and seal. (Or, make an entire 750ml bottle’s worth with 2 tablespoons of peppercorns.)


    [1] A pepper-infused Dirty Martini (photo and recipe © Lindsay Olives).


    [2] Absolut Peppar vodka, infused with black pepper (photo © Absolut).

     
    2. ALLOW the vodka to infuse for 1-3 days for optimal taste (if infusing a full bottle, allow 7 days). For a shortcut, allow to infuse for 6-12 hours. Strain the solids from the vodka and store indefinitely.

    3. MAKE the martini: Start by rimming a coupe or martini glass. Place the ground pepper in a small dish, run lemon wedge along edge of the glass, then dip the glass into the pepper and twist to rim. Set aside.

    4. COMBINE the remaining ingredients (except garnish) In a mixing glass with ice, add vodka, olive brine, and vermouth, and stir until chilled. Strain into prepped glass and garnish with an olive.
     

    THE HISTORY OF THE DIRTY MARTNI

    While the Dirty Martini may seem to have arisen in the last 20 years, it actually is much older.

    There are at least two claims, one from the East Coast and one from the West Coast; and both stories may be true.

    According to David Wondrich, cocktail historian and author, Dirty Martini’s history begins in 1901, when John E. O’Connor served a Martini with muddled olives at the Waldorf Astoria.

    However, using olive brine doesn’t appear in the written record until 1930. The drink, called the Perfect, consisted of half gin, half vodka, dry vermouth, three types of bitters and one teaspoon of olive brine.

    The Perfect dropped out of sight until after World War II, transforming into a Dirty Martini recipe requiring two parts gin, one part vermouth and a teaspoon of olive brine [source]. That’s our modern Dirty Martini.

    But where did it go? We hadn’t heard of it until about 20 years ago, when a colleague ordered it at a bar. We, an olive lover, ordered one of our own.

    The garnish, then and still, is blue cheese-stuffed olives. Some like it hot, and opt for jalapeño-stuffed olives.

    Don’t like blue cheese or chiles? Classic pimento-stuffed olives do just fine.

    Here’s the history of the original Martini.

    We found a more fanciful story on Leaf TV.

    The story credits Jerry Thomas, a famous 19th century bartender and author of the 1862 volume, The Bartenders Guide, as the inventor of Martinis, and subsequently the Dirty Martini.

    Thomas worked at the Occidental Hotel in San Francisco. One day, he was supposedly asked to mix up “something special” by a prospector who was about to journey to Martinez, California.

    There is scant detail, but Thomas purportedly added olives to the drink. The prospector paid using a gold nugget.

    The truth is out there!


    Comments off

    TIP OF THE DAY: Cucumber Sandwiches…And Tea

    Have you ever had a cucumber sandwich?

    It’s an English tradition that was likely arrived in the U.S. in the 1800s, along with the concept of afternoon tea, a formal light meal, traditionally served at 4 p.m.

    The high-class snack, meant to tide over wealthy people who didn’t eat dinner until 8 p.m. or later.

    Cucumber sandwiches were served at Queen Victoria’s Golden Jubilee in 1887, were enjoyed by the Raj of India in the late 1800s, and were referenced in Oscar Wilde’s play, “The Importance of Being Earnest,” as a “reckless extravagance” (cucumbers were pricey before they became more available in the Edwardian era).

    The traditional cucumber sandwich is composed of paper-thin slices of cucumber (no peel) placed between two thin slices of crustless, lightly buttered bread.

    You can make the traditional dainty tea sandwiches (photo #2), smaller canapés, or full-size luncheon sandwiches (some people leave the on the crusts for those).

    You can cut the sandwiches into triangles, squares, fingers, circles or other cookie cutter shapes.

    > More cucumber recipes.

    > June is National Cucumber Month. June 14th is National Cucumber Day.

    > The history of cucumbers.
     
     
    AMERICAN VARIATIONS

    Some Americans replaced the butter with cream cheese (the latter invented in 1872 in New York), some leave the peel on the cucumber and some don’t cut the cucumbers paper-thin (egad!).

    The English traditionally use bread from a Pullman loaf—a whole loaf sliced thin (photo #5; called pain de mie in France).

    There are numerous variations below.

    Our personal cucumber sandwich is made on Pepperidge Farm Very Thin Bread, which is available in White and Whole Wheat. We use the best butter (Finlandia, Plugra, Vermont Creamery) and snipped dill, the perfect herb to complement cucumbers.

    Other Americanizations include:

  • Different bread (e.g. brown bread, whole wheat [photo #3])
  • Smoked salmon and cucumber
  • Chicken (photo #4), crab, egg or tuna salad and cucumber
  • Fresh herbs
  •  
     
    IT’S CUCUMBER SANDWICH SEASON

    Warmer weather beckons to cool-as-a-cucumber sandwiches for:

  • Light lunch or snack
  • Party fare
  • Patio or poolside nibbles
  • Picnics
  • Tea parties
  •  
     
    CUCUMBER SANDWICH RECIPE

    It’s a no brainer, but we give you the traditional recipe plus ways to modernize it.

    First, a note about the cucumbers:

    English cucumbers were bred in the U.K. to create a cucumber more desirable for cucumber sandwiches.

    It has tender flesh, with a thin, edible peel and tiny or no seeds. Some stores sell it as a burpless cucumber, European cucumber, hothouse cucumber or seedless cucumber.
     
    Ingredients

  • Thin-sliced bread
  • Butter, softened
  • Cucumbers, thinly sliced
  • Seasonings (sea salt, freshly-ground pepper, snipped chives, dill, mint, parsley, tarragon)
  •  
    Preparation

    1. PEEL or score lengthwise the dark green peel of the cucumber. If you have an English cucumber or other thin-skin variety, cut a thin slice and see if you enjoy it with the peel on. You can easily get very thin slices using a mandoline. It’s all up to you.

    2. PLACE the cucumbers between paper towels and tamp them to allow some of the moisture to drain. You can then salt them lightly—which also removes moisture—the longer the better (30 minutes to 3 hours). When ready to prepare the sandwiches:

    3. THINLY BUTTER the slices of bread all the way to the edges. This edge-to-edge technique prevents the bread from becoming damp with cucumber moisture. NOTE: If you have an unsliced loaf, freezing it before you cut it helps you make even slices.

    4. TOP the bottom slice with cucumber and any other ingredients. If using smoked salmon, chicken salad, sliced egg, etc., it should go on the bread first. See the modern variations below.

    5. SLICE the sandwiches as you like: crusts off, triangles, fingers, squares, etc.
     

    MODERN VARIATIONS

  • Avocado, thinly sliced
  • Baby arugula or watercress
  • Chutney (mixed with mayonnaise for spreadability as needed)
  • Compound butter
  • Crunchy sea salt
  • Dash of Worcestershire sauce in the softened butter
  • Flavored cream cheese (e.g. mix in finely diced olive, garlic-herb, pimento, mushroom, scallion, smoked salmon)
  • Flavored mayonnaise
  • Hard boiled egg, thinly sliced
  • Homemade mayonnaise
  • Lemon zest in the butter or atop the cucumbers
  • Lemon sliced paper thin
  • Sweet onion, thinly sliced
  • Sprouts
  • Tomato, thinly sliced
  • Radish, thinly sliced
  • Soft cheese: Boursin or other spreadable cheese
  • Sour cream or crème fraîche (optionally with garlic powder)
  •  
     
    DON’T FORGET THE TEA

    Any tea goes with cucumber sandwiches; brew your favorite hot or iced tea.

    But if you prefer a Sauvignon Blanc or an IPA, go for it.
     
     
    TEA PARTY IDEAS

  • Afternoon Tea Party
  • Iced Tea Party
  •  


    [1] Square-cut cucumber tea sandwiches (photo © James Petts | CC-BY-SA-2.0).

    [2] Triangle-cut cucumber tea sandwiches ( photo © B. Hofack | iStock).


    [3] Whole wheat is a better-for-you option (photo © Nata V. Kusidey | iStock).


    [4] Cucumber and chicken salad tea sandwiches sliced in fingers (photo © Olgna | iStock).


    [5] English cucumbers. You can grow your own with seeds from Burpee (photo © Burpee).


    [6] The British use a pullman loaf for their sandwiches (photo © King Arthur Flour).


    [7] Use the best butter you can find (photo © Plugra).


    Comments off

    FOOD FUN: Chocolate For The Poker Player


    Know how to hold ‘em, fold ‘em, or eat ‘em (photo © Woodhouse Chocolate).


    For the poker player, two edible chips from Woodhouse Chocolate, an artisanal chocolatier in the Napa Valley.

    Actually, their Poker Chip Peanut Butter Cups.

    Specially decorated in a card suit motif and presented in a poker chip styled box; as the chocolatier says: The perfect snack whether you hold ’em or fold ’em.

    Each set of two peanut butter cups is $8.00.

    Get them at WoodhouseChocolate.com.

    Don’t tarry: These are a limited edition item for Father’s Day.

    There are also boxes of chocolates that are special for Father’s Day.


    Comments off

    Beautiful Donut Toppings (Or Are They Art?) For National Donut Day


    Who took the two missing doughnuts?> A larger version of the photo is below (photo © Brooke Lark | Unsplash).

       
    The first Friday in June is National Doughnut Day (or Donut, if you prefer—the difference is below).

    You don’t have to create doughnut art, as in the photo, photographed by Brooke Lark.

    You can simply buy some plain doughnuts and decorate them yourself. Or, set up a DIY doughnut tray for snacking or dessert and let everyone garnish his/her own.
     
     
    DONUT TOPPINGS

    Pick up toppings for the doughnuts, such as:

  • Icing, to affix the toppings (recipe below)
  • Berries
  • Kiwi
  • Seasonal fruits for slicing
  • Your favorite cupcake toppings
  • Herbs and edible flowers for garnish
  •  
    Preparation

    We took the path of plain doughnuts from the store, plus blueberries, raspberries and homemade cream cheese icing (recipe below).

    Instead of piping the icing as in the photo, we had butter knives on the table so each person could spread as much or as little icing as desired.

    If you make your own icing, you can add a few drops of food coloring. For more fun, create two batches in different colors.

     
    RECIPE: CREAM CHEESE ICING

    This recipe can be made up to 5 days in advance and refrigerated. Bring it to room temperature before frosting.

    The difference between frosting and icing is in the sugar.

    Icing is made with confectioners’ sugar (also called icing sugar), frosting is made with granulated sugar (table sugar). The two words are often used interchangeably, but that doesn’t make it correct!

    Ingredients

  • 1 package (8 ounces) cream cheese (not lowfat or fat-free), softened
  • 1/2 cup unsalted butter, softened
  • 3 cups confectioners’ sugar
  • 1 teaspoons pure vanilla extract
  • 1/8 teaspoon salt
  • 1/8 teaspoon salt
  • Optional: food coloring
  •  
    Preparation

    1. BEAT the cream cheese and butter with an electric mixer, in a large bowl. When smooth….

    2. ADD the sugar, vanilla, salt and optional food coloring. Beat on low for 30 seconds, then on high for 2 minutes.
     
     
    DONUT HISTORY: WHO INVENTED THE DONUT / DOUGHNUT?

    Check it out.

    You’ll also discover the difference between donut and doughnut.


    Comments off

    TIP OF THE DAY: How To Cook Lobster

    This guide to boiling live lobster is from Joe Bowab, CEO of Lobster Anywhere, which ships whole live lobsters and frozen lobster tails and other parts nationwide.

    Lobster, “the king of crustaceans,” is the most luxurious seafood. For us, it’s often the reason many lobster lovers head to a restaurant.

    But if it’s just steamed, why can’t you save money and cook live, whole lobsters at home?

    You can! And you don’t need to be a skilled chef to do so.

    If you know how to do it, it’s easy to prepare the mouth-watering, high-protein delicacy in your kitchen.

    Master the art of boiling lobster with this easy-to-follow guide.
     
     
    YOUR GUIDE TO BOILING A LIVE LOBSTER
     
    1. BUY TOP LOBSTER. It all starts with choosing high-quality lobster meat. Many of us are tempted to buy lobster tails in the supermarket. Even if it’s in beautiful packaging, that does not necessarily mean it’s the highest quality lobster.

    This is because premium lobster meat isn’t generally available in supermarkets, due to the fact that most meat that is cut into parts is mass-produced. This results in lower quality.

    The best way to go is to buy whole, live lobster locally or online. Only live, fresh lobsters ensure the highest quality.

    If you buy a lobster from the tank, look at the underbody of the lobster, particularly the claws. They should be a vibrant red. A live lobster should have no odor.

    Also look for long antennae. Lobsters that have been there for a long time often have their antennae nibbled down by other lobsters.
     
     
    2. BOIL YOUR LOBSTER

    Lobsters can be cooked in various ways, but top chefs will always boil them. It doesn’t take long to prep and cook, and it’s a beautifully presentation.

    You may be surprised to learn it takes just 6 minutes to boil a 1-pound lobster. Add 3 minutes per pound for each additional pound thereafter.

  • A small lobster is 1-2 pounds.
  • A medium lobster is 2.5-3 pounds.
  • A large lobster is 3-4 pounds.
  •  
    The cooking time is the most important factor. It makes the world of difference when it comes to taste. Make sure you use a timer and keep a close eye on the lobster.

  • 1 pound: 5-6 minutes
  • 1-1/4 pound lobster: 7-8 minutes
  • 1-1/2 pound lobster: 8-9 minutes
  • 2 pound lobster: 10-12 minutes
  • 3 pound lobster: 12-14 minutes
  • 5-6 pound lobster: 18-20 minuts
  •  
    (If you choose to boil lobster tails, the cooking time is between four and five minutes.)

    You will know if your lobster is overcooked, if the meat is too firm and rubbery. Don’t be too disappointed if this happens. You will get it right next time.

    Of course, this depends on the size of the lobster, so watch out in case you under-cook, or even worse, over-cook. You never want to overcook lobster as it will ruin the taste and texture.

    Simply remember to keep an eye on it and you’ll be just fine.
     
     
    3. COOKING THE LOBSTER

    1. FILL a pot large enough for your lobsters, one-half to two-thirds full of cold water. Note: Use about 1 gallon of water per lobster so it is deep enough to submerge the lobsters by at least 3 inches. Otherwise, use two smaller pots.

    2. ADD 2 tablespoons of salt for each quart of water. If you’re lucky enough to have access to seawater for boiling the lobster, even better. Then you can skip the salt.

    3. BRING the water to boil over high heat. Make sure it is bubbling hot.

    4. TURN down the heat; then pick up the lobster by holding the upper side of the thorax between your thumb and middle finger (or use tongs).

    5. HOLD the underside of the body away from you: Lobsters have a tendency to flip their jointed tail, splattering the boiling water.

    6. PLACE the live lobsters in head first, one at a time, making sure to completely submerge them.

    7. COVER the pot tightly and immediately return to a boil.

    8. START the timer as soon as the water starts to boil again. You need to make sure you use a timer and prevent the water from boiling over. Once the time is up…

    9. CAREFULLY REMOVE the lobsters from the pot with tongs. Be careful: The boiled lobsters will be extremely hot.

    10. PLACE them in a bowl for five minutes to cool before you can begin to unshell the meat. You will know that the lobster is done because the meat has turned from translucent to white.

    11. PIERCE the shell. When a lobster boils it retains a lot of water. Once you take it out of the pot, pierce the body and tail with a knife to help drain the water.
     
     
    4. THE CONDIMENTS

    Boiled lobster is usually served with clarified butter (see how to make it in the footnote), lemon wedges, salt and pepper. You can try them all to determine what tastes best for you.

    If you can find Indian ghee locally, you can substitute it for clarified butter. Here’s the difference between ghee and clarified butter, and how to make ghee.
     
     
    5. READY TO EAT?

    Head to LobsterAnywhere.com to order your fresh Maine lobster.

    Tell your family to prepare for a treat!


    live lobsters
    [1] Some live lobsters have red or orange color in their shells, some are all dark as in photo #2; there are many colorations (photo © Lobster From Maine).


    [2] For the ultimate luxury, pair Champagne with your lobster. Any other sparkling or still white wine is fine, as is a beer (photo © Champagne Bureau).

    Live Lobster
    [3] The claws of live lobster are banded with strong elastic, so they can’t bite (photo © I Love Blue Sea [now part of Vital Choice]).


    [4] A boiled lobster, ready to eat. When cooked, lobsters and other crustaceans turn red. This is due to the way certain biochemicals react to heat. Lobsters and crabs have a pigment called astaxanthin in their shells (photo © Aldi).


    [5] Ready to eat (photo © David Todd McCarty | Unsplash).

     
    ________________

    *Clarified butter, also called drawn butter, is unsalted butter that has been slowly melted, evaporating much of the water and separating the milk solids. All that remains is pure liquid golden-yellow butterfat. Because the milk solids have been removed, clarified butter has both a long shelf life (it will keep from going rancid longer) and a high smoke point (it can be used in frying without burning). To clarify butter, melt unsalted butter in a saucepan over low heat. Skim the froth from the top and carefully pour off the clear liquid, leaving the milky residue behind.

    Clarified butter is also served with crab meat. Why clarify the butter instead of simply serving a melted stick of butter? By heating and separating the butterfat from the solids and water that naturally occur in butter (clarifying), you get a much richer and intense butter flavor than if you were simply to use melted butter.

    Check out the different types of butter.


    Comments off

    The Nibble Webzine Of Food Adventures
    RSS
    Follow by Email


    © Copyright 2005-2024 Lifestyle Direct, Inc. All rights reserved. All images are copyrighted to their respective owners.