|
We were first introduced to The Laughing Cow Cheese when we were in high school.
A friend who had enjoyed them France found them in the U.S., brought some for lunch and gave me a wedge.
We were delighted by the wedges of soft cheese wrapped in foil, and the red tab that neatly opened it.
We loved not just the novelty of the wedges, but the flavor.
The wedge (now called Original Creamy) tasted a bit like cream cheese; and what a great excuse to eat cream cheese!
The cheese is actually a blend of cream, milk and both fresh and aged cheeses, including Comté. It’s a creamy, satisfying snack.
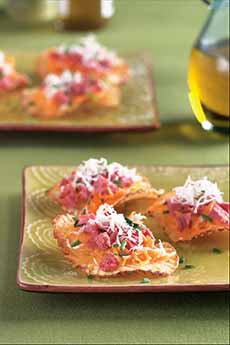
And it’s more than a snack, as you can see in photos #5 and #6.
The wedges can spend the day out of the fridge, in your bag or pocket for easy snacking.
In those days, the brand was known in the U.S. by its French name, La Vache Qui Rit (The Laughing Cow in French), later Americanized.
HAPPY 100TH ANNIVERSARY!
The spreadable wedges have been made by Fromageries Bel since 1921.
It’s their 100th anniversary!
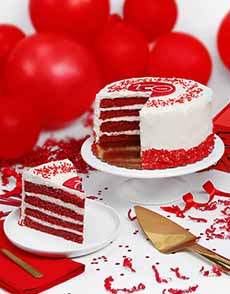
They sent us a red velvet anniversary cake (photo # 1) with cream cheese frosting made with The Laughing Cow Original cheese.
It was so good, that when when it arrived frozen, we cut a wedge and began the celebration.
(You may or may not be a frozen cake fan. Sometimes, we find that the frozen cake is even more delicious than in its natural state. We just love the frozen frosting!)
The cake is a limited-edition made in partnership with Daisy Cakes Bakery.
It’s available online at ILoveDaisyCakes.com.
And it’s only $19.21, a nod to The Laughing Cow’s founding year.
Plus, to celebrate the anniversary, there are new varieties of The Laughing Cow cheese.
THE LAUGHING COW CHEESE VARIETIES
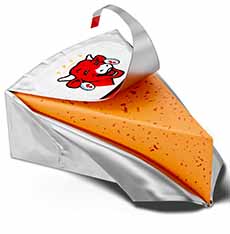
The Laughing Cow Blends are three new varieties of the cheese wedge that that blends creamy Laughing Cow cheese with nutritious legumes, nicely seasoned.
Each wedge delivers 2g of protein, plus calcium and vitamin E, fiber and antioxidants.
So welcome to the line:
Chickpea & Cheese with Herb (photos #2 and #4)
Lentil & Cheese with Curry
Red Bean & Cheese with Paprika (photo #3)
They join a line of wedges that includes:
Creamy Original
Creamy Light
Creamy Garlic & Herb
Creamy Spicy Pepper Jack
Creamy Asiago
Creamy Aged White Cheddar
Creamy Aged Cheddar & Bacon
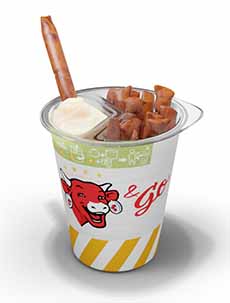
THE LAUGHING COW CHEESE DIPPERS
More nutrition has also been added to the snack cups, which were designed to fit perfectly into a car’s cup holders.
We don’t have a car (living in New York City), but we love snacking on Cheese Dippers, cups of dippable Laughing Cow cheese packaged with breadsticks (only 140 calories per cup with 5g of protein).
The three newcomers include:
Creamy Original paired with whole wheat breadsticks
Creamy White Cheddar paired with pretzel breadsticks
Creamy Herbs paired with multigrain breadsticks
They join:
Creamy Swiss Original With Classic Breadsticks
Cheesy Ranch & Herb With Whole Grain Breadsticks
Cheesy Pizza With Tomato & Herb Breadsticks
White Cheddar With Whole Grain Breadsticks
Thanks for all of the great cheese snacks, The Laughing Cow. We’ve got enough choices to celebrate your anniversary year and beyond.
> THE DIFFERENT TYPES OF CHEESE: A GLOSSARY
> THE HISTORY CHEESE
|