THE NIBBLE BLOG: Products, Recipes & Trends In Specialty Foods


Also visit our main website, TheNibble.com.


Halloween Cheeses For Lovers Of Fine Cheese: Part 1

Let the less sophisticated turophiles* make witches’ broomsticks out of string cheese. Here at The Nibble, we’re celebrating Halloween with sophisticated cheeses and…of course…pumpkin ales. If it’s fun you want, check out our article on Halloween fun with cheese. If it’s connoisseurship you want, keep reading.

These cheeses belong on a cheese board, but they also shine on a sandwich (including grilled cheese), on pasta and pizza, and in casseroles. Serve a thin wedge to a salad, or cube them for finger food skewers or snacks.

This is Part 1 of Halloween Cheeses; part 2 arrives tomorrow.

You can find most of these cheeses online. There are specialty cheese sites like iGourmet; and specialty cheese sites also sell on Amazon.
 
 
GOUDA

Basiron Pesto Rosso & Basiron Hot Sauce

Basiron is a Gouda-style cow’s milk cheese that is so popular when we first wrote about it 11 years ago there were a whopping 13 different flavors. Today, there double that: an even-more-whopping 26 flavors, including trending flavors like hot sauce, lavender and za’atar.

For Halloween, the new Basiron Hot Sauce and the classic Basiron Pesto Rosso are cheeseboard show-stoppers. Basiron is a Gouda-style cheese made in Holland. Basiron Pesto Rosso gets its harvest-red color from the addition of a pesto of red tomatoes, and its exciting flavor from the addition of basil (pesto) and garlic.

Basiron Hot Sauce gets its flaming hot flavor and color from Tabasco.

The cheesemaker, Veldhuyzen Kaas, also makes an emerald-green version without the tomatoes called Basiron Pesto and a lighter-green Basiron Wasabi which can be presented as “green cheese from the moon.”

Think ahead to a red and green cheese plate for Christmas! Basiron is so popular, the company makes thirteen different flavors, not all of which are available in the U.S. One which is, is the bright green pesto variety, perfect for St. Patrick’s Day.

Gouda: Extra Triple Aged

The longer a Gouda ages, the more golden-brown the paste becomes. You can find Goudas that are aged for a full five years and have intense and complex flavors.

One of the nuances in an aged Gouda is the crunchy white calcium lactate crystals, which precipitate from the lactic acid. Call them “creepy crunchies” for Halloween.

The color reminds us of a pale yellow—not orange—moon. Who knew that there were 48 different colors of the moon! Here they are, from NASA.

Here’s more about Gouda, Holland’s culinary prize.
 
 
CHEDDAR

Aged cheddars take on the color of a harvest moon. Any of them can grace a Halloween cheeseboard. Here are two of our favorites.

Harissa Cheddar

Take a sturdy English cheddar and add the spicy North African spice blend, harissa, and you’ve got a cheddar that packs some punch.

A harissa spice blend usually contains roasted chili peppers, toasted cumin seeds, coriander seeds, smoked paprika, chopped parsley, kosher salt, and garlic. Flakes of harissa provide bursts of heat and flavor.

This one isn’t easy to find, but we found it on Amazon.

Cahill’s Farm: Flavored Irish Cheddar

Cahill’s Farm Flavored Irish Cheddar comes from County Limerick in the Emerald Isle, where Marion Cahill developed a group of flavored Cheddars that are as fascinating to look at as they are exciting to taste (photo #4).

The red-marbled Elderberry and brown-marbled Porter flavors are ideal for Halloween. You can look at them as beautiful and marbled…or as creepy “blood Cheddar.”

Serve a pumpkin ale with the Elderberry, and a glass of porter with the Porter.

Here’s more about Cheddar cheese, the favorite of ancient monarchs.
 
As a cheese condiment, how about some pumpkin jam?

> Continue to Halloween Cheeses Part 2


[1] Two Gouda cheeses have this deep red color: Basiron Pesto Rosso and Basiron Hot Sauce (all photos © iGourmet).


[2] Gouda takes on more gold color as it ages. This 26-month-old Gouda takes on the color of a harvest moon.


[3] Not just any English Cheddar: This variety, flecked with red chiles is flavored with spicy harissa.


[4] These marbled Irish Cheddars are showstoppers, flavored with elderberry juice and porter.

 
________________

*A turophile is a connoisseur or lover of cheese. It’s a combination of the Greek word for cheese, tyros, plus the English -phile, meaning lover (which derives from the Greek -philos, meaning loving. You’d think it was an old word, but turophile first seems to appear in 1938 [source].


CHECK OUT WHAT’S HAPPENING ON OUR HOME PAGE, THENIBBLE.COM.


Comments off

Homemade Chocolate Bars For National Chocolate Day


[1] Semisweet chocolate bar with dried fruits and nuts (photos #1 and #2 © Pampered Chef).


[2] A white chocolate bar with rainbow sprinkles.


[3] Dulcey or blonde chocolate, created by Valrhona, is white chocolate that has been caramelized to a buttery, rich caramel flavor. These bars are sprinkled with cookie pearls at Nuchocolat (photo © Nuchocolat).


[4] Decorations typically don’t add flavor, but they contribute good looks. These gold sugar pearls are from Weraru).


October 18th is a holiday most Americans are happy to celebrate: National Chocolate Day. While it’s easy to pick up some of your favorites—bark, bars, bonbons, truffles, and more, in just 20 minutes you can have a batch of homemade chocolate bars. The best part: use the add-ons of your dreams to create your signature chocolate bar. Your chocolate bar, your way.

To make individual candy bars, you’ll need a special silicone tray with wells. Here’s one from Pampered Chef.

Use it for:

  • Bark, candy bars and chocolate bars.
  • Energy, granola and protein bars.
  •  
    Next, pick your chocolate type: blonde/dulcey (photo #3), dark, milk, or white.

    Finally, gather as many add-ons as you like. Some ideas:

  • Candies: candy corn, crushed peppermint, M&Ms, mini marshmallows, Reese’s Pieces, toffee chips, etc.
  • Decorations: confetti, edible glitter, sprinkles, sugar pearls, etc.
  • Dried fruit: banana chips, berries, coconut, diced apricots, etc.
  • Nuts
  • Plus: cacao nibs, cookie bits, crispy rice, fleur de sel, etc.
  •  
     
    RECIPE: HOMEMADE CHOCOLATE BARS

    Thanks to Pampered Chef for this easy recipe. Prep time is 5 minutes, cook time is 15 minutes.

    For a finer quality chocolate bar, use chocolate disks (a.k.a. wafers) instead of chocolate chips.
     
    Ingredients For 12 Small* Bars

  • 2½ cups (625 mL) chocolate chips
  • 1 teaspoon (5 mL) coconut oil
  • Add-ins
  •  
    Preparation

    1. MICROWAVE the chocolate and oil in a 3-cup heatproof bowl for 2–3 minutes, stirring every 30 seconds, or until smooth.

    2. PLACE an even layer of add-ins on the bottom of the bar mold wells. Pour the chocolate over the top and smooth out with a small spatula.

    3. CHILL the tray in the freezer for about 15 minutes, or in the refrigerator until the candy bars are set.
     
     
    MORE ABOUT CHOCOLATE

    > CHOCOLATE TYPES & TERMS

    > CHOCOLATE HISTORY

    > CHOCOLATE BARK HISTORY


    > CHOCOLATE TRUFFLES HISTORY

     
    ________________

    *Approximately 2″ wide x 4″ long. If you want larger bars, there are many molds available online. You’ll need to adjust the ingredients accordingly.


    Comments off

    Pumpkin Lasagna Recipe With Ricotta & Swiss Chard

    Here’s our last pumpkin pasta recipe of the season. October is National Pasta Month and National Pumpkin Month. National Pasta Day is October 17th; October 25th is World Pasta Day. October 26th is National Pumpkin Day. We’ve been partying with pasta: celebrating the harvest season and shortly, Halloween and Thanksgiving. Pumpkin recipes shouldn’t stop when Thanksgiving is over. Nutritious, colorful pumpkin makes comfort food recipes all through the bleak, cold winter, too.

    This recipe is courtesy of Frigo Cheese.
     
     
    RECIPE: PUMPKIN LASAGNA

    This recipe specifies Swiss chard, but you can use any variety of chard. Swiss chard is the white-stemmed variety. Golden (yellow)-stem and red-stem chard are also common. Rainbow chard is simply all three varieties packed together for maximum good looks.

    Chard is particularly popular in Italian food, where it’s added to pasta dishes, risotto, and even tops a pizza. Its flavor is similar to spinach, but more bitter when eaten raw.

    If you’re not familiar with chard, a member of the beet family, here’s more about it.

    If you need a chard substitute, look to black Tuscan kale (a.k.a. cavalo nero, dinosaur kale, and lacinato kale), mature (not baby) spinach, or mustard greens.

    Prep time is 40 minutes, cook time is 40 minutes.
     
    Ingredients For 8-10 Servings

  • 9 lasagna noodles
  • 1/4 cup butter
  • 1 white onion finely chopped
  • 2 garlic cloves, minced
  • 12 ounces Swiss chard, stems discarded, leaves chopped
  • 1-1/2 teaspoons salt
  • 1 teaspoon freshly ground black pepper
  • 1 teaspoon dried sage
  • 1/2 teaspoon ground nutmeg
  • 1 (15-ounce) can pumpkin purée
  • 2 cups ricotta cheese (whole milk or skim)/li>
  • 1 cup mozzarella cheese, shredded
  • 1 cup fresh grated Parmesan cheese, divided
  • 1/4 cup heavy cream
  • Optional garnish: fresh sage chiffonade, nutmeg
  •  
    Preparation

    1. PREHEAT the oven to 400°F. Cook the lasagna noodles in a large pot, as directed on the package. Drain slowly into a colander. See the notes* in the footnote below.

    2. MELT the butter in a large saucepan over medium-high heat. Add the onion and garlic and sauté until translucent, about 1 minute.

    3. ADD the Swiss chard, salt, pepper, sage, and nutmeg and sauté for about 6 minutes, or until wilted and no liquid remains.

    4. COMBINE in a medium bowl, combine the pumpkin purée, the ricotta and mozzarella cheeses, and half of the grated parmesan.

    5. LAYER 3 lasagna noodles in a buttered 9×13-inch baking dish (trim if necessary). Spread 1/2 of the pumpkin mixture over the noodles in an even layer. Top with 1/2 of the Swiss chard and layer with 3 more noodles. Cover with 1/3 pumpkin mixture.

    6. REPEAT the layering of lasagna noodles, pumpkin, Swiss chard, another layer of noodles and finish with the remaining ricotta cheese mixture. Layer with the remaining 3 noodles. Sprinkle with the remaining parmesan cheese.

    7. BAKE for 35-40 minutes until heated through and cheese is melted. Remove from the oven. Garnish with the optional sage and a sprinkle of nutmeg.
     
     
    MORE PUMPKIN PASTA RECIPES
    & SOME PUMPKIN PIZZA RECIPE, TOO

  • Dutch Oven Pumpkin Lasagna
  • Mac & Cheese Baked In A Pumpkin
  • Orecchiette With Pumpkin & Sausage
  • Pumpkin & Mushroom Lasagna
  • Pumpkin Fettuccine Alfredo
  • Pumpkin Gnocchi With Butter Sage Sauce
  • Pumpkin Mac & Cheese
  • Pumpkin Manicotti
  • Pumpkin Pasta Sauce
  • Pumpkin Pizza With Bacon, Apples & Sage
  • Pumpkin Pizza With Goat Cheese
  • Pumpkin Ravioli
  • Pumpkin Soup With Bacon, Sage & Gnocchi
  • Ravioli Lasagna With Pumpkin Sauce
  • Spicy Pappardelle With Pumpkin
  • Spicy Pumpkin Carbonara
  •  
     
    MORE ABOUT PASTA

    > THE DIFFERENT TYPES OF PASTA

    > THE HISTORY OF PASTA

    > THE HISTORY OF BAKED PASTA


    [1] This pumpkin lasagna adds a layer of nutritious, delicious chard (photos #1 and #4 © Frigo Cheese).


    [2] Rainbow chard is simply a bundling of white-stem (Swiss), golden and red chard (photo © Heather Barnes | Wesual | Unsplash).


    [3] We love the flavor of sage with pumpkin dishes. We’ve added it here as an optional garnish (photo © Good Eggs).


    [4] The Frigo lineup.


    [5] More pumpkin pasta: pumpkin manicotti. Here’s the recipe (photo © Taste Of Home).


    [6] Pumpkin gnocchi with butter-sage sauce. Here’s the recipe (photo © DeLallo).

     
    ________________

    *Here’s what we’ve learned the hard way: Stir the noodles continuously for the first two minutes so they don’t clump together or stick to the bottom of the pot. Separate the noodles with a chopstick. Continue to separate as needed during the boiling process. Drain them slowly into a colander so they don’t stick together. Do not rinse the noodles: The starch on their surface helps the sauce stick to the noodles. If you’re not ready to assemble the noodles in the baking dish, lay the noodles flat on a piece of foil, parchment, or wax paper, to keep the pieces from sticking together.


    Comments off

    A Venus Flytrap For Your Kitchen: It Eats Flying Insects


    [1] We couldn’t find a way to kill a kitchen insect, so we finally bought a Venus flytrap (photos #1 to #5 © Rocket Farms).


    [2] The inside of the traps are red, luring insects and making them more attractive houseplants.


    [3] Uh oh.


    [4] Gotcha!


    [5] Baby flytraps growing in a Rocket Farms greenhouse.


    [6] Maroon Monster, a special cultivar of Venus flytrap. You can purchase it from Carnivorous Plant Resource.


    Many people may be used to having insects in their homes. We’re not. We live on the thirty-third floor of a sterile apartment building. The windows may not be hermetically sealed, but there are good screens to keep out insects when we have the windows open. So when a flying insect appeared in our kitchen 9 months ago, we were outraged. “You don’t pay rent here,” we screamed. “Get out!”

    Alas, the bug was deaf to our entreaties.

    It was not a housefly; we can say nothing more than it was a “small flying insect.”

    Many times it flew past our face, flaunting itself. Our quick reaction, aiming to crush it between our palms, was not quick enough.

    So we headed to the hardware store, to purchase flypaper. Result: unsuccessful.

    Since the flypaper came in three rolls, we took the next two months to install a roll in a different room. But the bug did not stick to our plan.

    We knew that flying insects do not have long lifespans. Should we just wait for this one to die?

    Six months later, we were still waiting. We checked exterminator websites.

    “Most bugs have pretty short lifespans,” said one. “Mosquitoes and gnats live for about a week. Houseflies live about 28 days.”

    Fruit flies (which ours was not) live 40 to 50 days.

    Why was our tormentor still alive, month after month?

    We went back online and got this suggestion: Mix equal parts vinegar and dish soap in a bowl, then leave it out in a place where you see flies frequent the most. The vinegar will attract the flies while the dish soap will trap them.

    No such luck.

    Then we thought to lay out some honey. After all, you can catch more flies with honey than with vinegar, right?

    Wrong.

    We realized our good fortune: that the bug did not bite, it did not hatch any eggs in our apartment, and we had no other, even less desirable, insect residents. But we were still affronted by that flying so-and-so’s will to live in a space to which it had no entitlement. A winged squatter.

    One day, it hit us: a Venus flytrap.

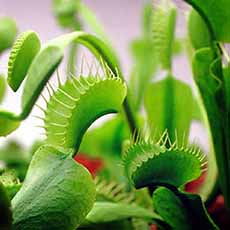
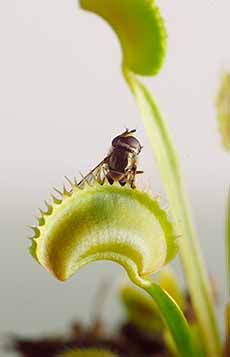
    “The world-renowned Venus Flytrap is the most spectacular example of carnivorous plants thanks to the dramatic manner in which it catches its prey,” we read on the website of Rocket Farms nursery. “Being one amongst the small number of plants capable of very rapid movement, it can snap shut to catch even the fastest of insects; a feat beyond even most people.”

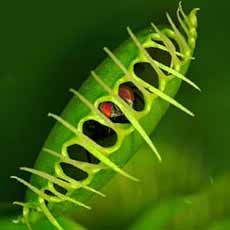
    The plant attracts small insects with its sweet-smelling nectar, then snaps shut on them and digests them.

    That must be our solution. But where does one purchase a Venus flytrap? Not at any flower shop in our town.

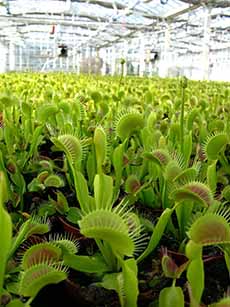
    We looked online and found some at Rocket Farms.

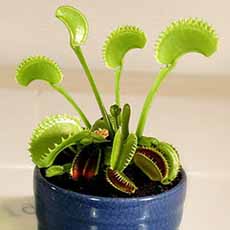
    Despite the imagination that might evoke Audrey II from Little Shop Of Horrors, Venus flytraps are attractive plants.

    The ones sold by Rocket Farms are baby flytraps: adorable when young, and no doubt beautiful when they grow larger. Assuming we can keep ours alive. We have the black thumb of death.

    Since we can’t even keep a basil plant alive, imagine our terror when dealing with a sensitive plant that needs:

  • Distilled water, to keep the plant moist at all times.
  • Lots of bright, indirect sunlight.
  • Fertilizer in the form of insects (or substitute a very mild amount of plant fertilizer).
  •  
    So, did the flytrap eat our insect?

    Alas, no. We had ideal light. We bought the distilled water, the fertilizer, and a little pan to fill with distilled water (the flytrap absorbs water through its roots).

    A month later, the little bugger was still flying around. Our guess is that our flytrap was still too small to work its magic. But there’s a happy ending.

    One day as we stood in the kitchen with our housekeeper and the insect flew past us, we lunged for it. As usual, it was too fast.

    But an hour later, the talented Fabiola came into my home office to show me her prize. She had killed pest! Huzzah!

    Don’t let that stop you from buying a Venus flytrap. If you have a green thumb, head to Rocket Farms and buy a few.

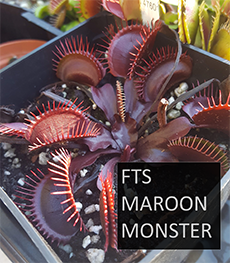
    There are more exotic color varieties, including Maroon Monster, Purple Ambush, and Red Dragon.

    Venus flytraps also eat crawling insects. In their native habitat, Venus flytraps don’t often capture flies, but feast upon many kinds of crawling insects, including beetles and ants.

    And they’re so much more interesting than succulents!

    Here’s more interesting information we dug up about Venus flytraps.

    TRIVIA: Venus flytraps are native to only a small area of the coastal plain in North and South Carolina. There are 66 species of carnivorous plants in the U.S., and an astounding 36 of them live in North Carolina. What’s up?

    Acidic soils, low nutrients, and a high water table provide excellent habitat for carnivorous plants to thrive [source].


    Comments off

    Grown-Up, Homemade SpaghettiOs Recipe For National Pasta Month

    We’ve been loading up on pasta recipes since October is National Pasta Month. It’s as good an excuse as any to try more recipes. We were charmed at the idea of Grown-Up SpaghettiOs in this recipe from DeLallo (yes, SpaghettiOs is the proper spelling—no hyphen, no apostrophe). SpaghettiOs was created to make dinner easier for parents, with cans of ring-shaped pasta pieces in tomato sauce. Just heat and eat! The brand markets it as “less messy” than regular spaghetti (and in fact, it is, scooping up the Os and sauce in a spoon, as opposed to twirling spaghetti and spattering or dripping the sauce).

    Television ads used the tagline, “the neat round spaghetti you can eat with a spoon.” And we still spontaneously break out into the jingle, “Uh-Oh! SpaghettiOs.

    More than 150 million cans of SpaghettiOs are sold each year. Current options include the original plus versions with alphabet letters, franks, meatballs, calcium-fortified spaghetti, and popular characters: Disney Princess, Marvel’s Spider-Man, and Super Mario, Bros. Here’s the brand’s website.

    A bit of history: Tinned spaghetti—cut into short lengths, in tomato sauce—was available long before rings were introduced. In fact, it was first produced in New Zealand in the 1930s, along with tinned macaroni. It was probably the only type of pasta regularly eaten by New Zealanders until the 1950s, when a greater variety of pasta started to be consumed [source].

    The ring-shaped SpaghettiOs were introduced in 1965 by the Campbell Soup Company, under its Franco-American brand. The Os were so popular with kids, that other companies rapidly produced their own spaghetti rings.
     
     
    RECIPES: GROWN-UP SPAGHETTIOS (DITALINI & MEATBALLS)

    Here’s a recipe that combines childhood nostalgia and a grown-up palate. The recipe uses ditalini, the smallest tubes pasta, often called thimble-sized. It is used in macaroni salad instead of elbows. Ditali were created in Apulia sometime during the industrial age (1760 to 1830), when developments in manufacturing engendered more short-cut pasta types.

    While DeLallo used ditalini instead of rings (photo #1), you can find ring-shaped pasta from Ronzoni (photo #3), or anelli (“rings” in Italian) imported from Italy (photo #4).

    Personally, for both nostalgia and food fun, we’d make the switch to rings (photo #2). And we’d buy imported anelli that’s cut with bronze die (photo #5).

    Why? Pasta makers can cut and shape their noodles old-style, with a traditional bronze die. It takes more time than a modern Teflon die.

    Bonze die-cut pasta creates noodles that have a slightly rough surface. This rough surface helps sauce and other ingredients stick to the noodles, so you get sauce and noodles in every bite.

    Pasta cut with a Teflon die, on the other hand, results in slick, nonstick noodles. The sauce and ingredients slide right off, into the bottom of the bowl or plate.

    Ingredients

  • 1 (1-pound) package ditalini rigati
  • 2 (28-ounce) cans San Marzano tomatoes
  • 1 package frozen mini meatballs, thawed
  • 2 tablespoons extra virgin olive oil
  • 1 small onion, diced
  • 2 cloves garlic, minced
  • 1 teaspoon salt
  • 1 teaspoon pepper
  • 2 tablespoons tomato paste
  • ½ teaspoon crushed red pepper
  • 2 teaspoons paprika
  • 1 tablespoon sugar
  • 1 teaspoon dried basil
  • Optional garnish: fresh basil chiffonade (or other herb), parmesan cheese
  •  
    Preparation

    1. COOK the pasta according to package instructions. Drain and set aside.

    2. PURÉE the tomatoes in a food processor and set them aside.

    3. HEAT the oil in a large sauté pan. Add the meatballs and cook until lightly browned on all sides, about 5 minutes. Transfer to a plate and set aside.

    4. ADD the onion and garlic to the pan. Cook until the onion is translucent, about 5 minutes. Season with salt and pepper.

    5. STIR in the tomato paste and cook for 1 minute. Add the paprika and pepper flakes and cook until fragrant.

    6. ADD the sugar, basil, and reserved tomato purée. Reduce the heat and simmer until the sauce is slightly reduced and flavors have melded, about 20 minutes.

    6. ADD the meatballs and excess juices to the tomato sauce. Cook for 5-10 minutes or until warmed through. Add pasta to the sauce and toss to coat. Serve.
     
     
    > THE DIFFERENT TYPES OF PASTA
     
    > THE HISTORY OF PASTA


    [1] Grown-up SpaghettiOs recipe from DeLallo (recipe and photo © DeLallo).


    [2] A recipe with anelli and passata (tomato purée). Here’s the recipe (photo © Cooking With Nonna).


    [3] Substitute ronzoni rings for the ditalini (photo © Ronzoni).


    [4] We prefer to spring for imported Italian pasta. You can buy these online (photo © La Molisana).


    [5] San Marzano tomatoes are the most delicious for sauces. If you can’t find them locally, their available online. These are from DeLallo (photo © DeLallo).


    CHECK OUT WHAT’S HAPPENING ON OUR HOME PAGE, THENIBBLE.COM.


    Comments off

    The Nibble Webzine Of Food Adventures
    RSS
    Follow by Email


    © Copyright 2005-2024 Lifestyle Direct, Inc. All rights reserved. All images are copyrighted to their respective owners.