THE NIBBLE BLOG: Products, Recipes & Trends In Specialty Foods


Also visit our main website, TheNibble.com.

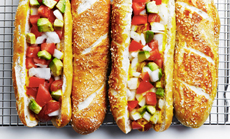
FOOD FUN: Beer & Pretzel Hot Dog Buns

Beer Pretzel Hot Dog Buns With A Stein Of Beer
[1] Split the roll, add the hot dog, and bite! Here’s the recipe for pretzel buns (photo © Domestic Gothess).

A Burger Sandwich On A Pretzel Burger Bun
[2] You can use pretzel hot dog and burger buns for sandwiches, too. You can make the buns or buy them at Eastern Standard Provisions (photo © Eastern Standard Provisions).


Want to be the hostess with the hostess or the host with the most?

Want to give friends and family a memorable hot dog experience?

Want to bring the best gift to a cookout?

Follow the path of the Domestic Gothess, who turned soft pretzel dough into hot dog buns. “They are surprisingly easy to make.” says the Gothess.

Yes, you can buy pretzel rolls at some stores, but these have much more pretzel flavor. They can also be used as sandwich rolls.

Don’t want beer in your bread? Just substitute water for the beer, like conventional soft pretzels.

Here’s the recipe. Ready, set, bake!
 
 
REASONS TO CELEBRATE

> April is National Soft Pretzel Month.

> April 26th is National Pretzel Day.

> July is National Hot Dog Month.

> July is National Pretzel Month per some sources.*

> October is National Pretzel Month per some sources.*

> The history of pretzels.
 
 
________________
 
*National Day Calendar cites April as National Pretzel Month. National Today cites October as National Pretzel Month. It is not uncommon for the same holiday to appear on two or more dates. The reason can be that the U.S. Congress, different states, and different municipalities all can pass a declaration for a holiday. In these lawless Internet times, any person or company can declare a holiday on social media, without any formal body passing a resolution.


CHECK OUT WHAT’S HAPPENING ON OUR HOME PAGE, THENIBBLE.COM.


Comments off

TIP OF THE DAY: Coconut Bowls

According to Chalkboard Magazine, a food trend this summer is Coconut Bowls: coconut halves filled with grains, fruits and/or vegetables. The concept was developed by Amazing Bowls, a Los Angeles food truck.
 
WHAT TO SERVE IN COCONUT BOWLS
We’ve been playing with the concept, and have used the bowls for a memorable presentation of conventional foods:

  • Breakfast/Brunch: Cereal, cottage cheese, fruit and/or yogurt
  • Lunch: Asian chicken/shrimp salad
  • Cocktails: Mai Tai, Piña Colada, Planters Punch and other tiki bar specials
  • Dinner Entrée: Curry: chicken, fish, lamb or vegetable
  • Soup: Indian (such as Mulligatawny), Thai (such as Tom Kha Gai) and Western cream of vegetable soups, from broccoli to vichyssoise
  • Dessert: Conventional fruit salad with sorbet or frozen yogurt, exotic* fruit salad, coconut ice cream, sorbet or pudding
  •  
    CREATE A DIY COCONUT BOWL BAR

    For a gathering, set out the coconut halves with the fillings. Aim for a rainbow of colors, from:

  • Cooked grains
  • Dried fruits (raisins, cherries, blueberries)
  • Edible flowers and/or shredded fresh basil for garnish
  • Fresh fruits
  • Fresh vegetables
  • Granola
  • Nuts and seeds
  • Nut butters (almond, peanut, etc.)
  • Poached fish or seafood
  • Salads: Asian noodles (with or without chicken or seafood), avocado and citrus, chicken with pineapple and Greek worked for us
  • Shredded/grated dried coconut
  • Yogurt, plain and flavored
  • Anything else that works for you
  •    
    Coconut Bowls

    /home/content/p3pnexwpnas01 data02/07/2891007/html/wp content/uploads/coconuts opened thehomegrowncollective 230r

    [1] Too pretty to eat…almost (photo courtesy Chalkboard Magazine). [2] Crack open the coconuts with a heavy kitchen knife (photo courtesy HomeGrownCollective.com).

    _____________________
    *Exotic fruits you can find in the U.S. include Asian pear, cactus pear, cherimoya, dragonfruit, gooseberry, kiwi, lychee, mango, mangosteen, passionfruit, prickly pear, rambutan and starfruit, among others.
     
    COCONUT 101

    All coconuts come from the same tree, the coconut palm tree (Cocos nucifera). It’s a member of the Arecaceae family, the Palm Family.

    The coconut is not a nut, but a fruit—a drupe, along with stone fruits.

  • Green coconuts are filled with coconut water (a.k.a. juice) and the meat is soft, translucent and scoopable. The off-white coconuts you can purchase, to drink the coconut water, have been carved to remove the green skin.
  • Mature coconuts are covered with a dried brown husk. There is less coconut water and the coconut meat is firm and an opaque white color.
  • Coconut milk is not the liquid inside the mature coconut. Coconut milk and coconut cream are made from pressing the coconut meat. Commercial coconut milk is thinned with water.
  •  

    Tropical Shrimp Salad

    Yogurt Coconut Bowl


    RECIPE: COCONUT BOWLS

    Ingredients For 2 Servings

  • 1 whole coconut
  • Food of choice (see the list above)
  •  
    TO MAKE A COCONUT BOWL

    1. PUNCTURE a small hole into one or two of the coconut eyes with an ice pick. Drain the coconut water into a container and refrigerate for another use.

    2. HOLD the coconut in your palm and rotate as you use the blunt side of a heavy kitchen knife to tap firmly along the midsection (the “waist”).

    3. CONTINUE to rotate and tap until a crack appears. After a few more rotations and taps, the coconut should break into two equal halves.

    4. WRAP and freeze the coconut bowls if you won’t be using them immediately, so the meat doesn’t dry out. You can serve cold foods in frozen bowls; they’ll defrost slowly while keeping the drink, ice cream, etc. cold.
     
    PHOTOS: [1] Rice noodles topped with shrimp, pineapple chunks and Chow Mein noodles. [2] A dessert bowl with strawberry yogurt and Oreo pieces (photos courtesy Alex Jollie | Britco.

     
    WHAT TO DO WITH THE COCONUT SHELLS?

    Check out how our colleague, Hannah Kaminsky, turned hers into beautiful bowls.


    Comments off

    TIP OF THE DAY: Red, White & Blue Cupcakes For Patriotic Occasions

    HAPPY MEMORIAL DAY! HAPPY INDEPENDENCE DAY!

    These red, white and blue cupcakes are an eye- and palate-pleaser for any patriotic occasion.

    And they’re easy to make, with just the added step of dividing cake mix into three bowls and coloring two of them. We chose a frosting of stabilized whipped cream, stiffened with gelatin (it won’t collapse) and topped the cupcakes with red, white and blue decorations.

    RECIPE: PATRIOTIC CUPCAKES

    Ingredients For The Cupcakes

  • 1 box white cake mix (or your own white cake recipe)
  • Red and blue gel food coloring (see notes in the last section)
  • Icing
  • Decorative sprinkles or stars
  •  
    Ingredients For 4 Cups Stabilized Whipped Cream

  • 2 teaspoons unflavored gelatin
  • 2 tablespoons cold water
  • 2 cups heavy whipping cream, chilled
  • 1/4 cup powdered sugar, sifted
  •  
    Plus

  • Cupcake pan
  • Cupcake liners
  •  
    Preparation

    1. PREPARE a cupcake pan with paper liners. Place the cream in the freezer for 20 minutes prior to whipping (it will whip better).

    2. PREPARE the cake batter and divide it into three bowls. Use blue and red gel food coloring in two of the bowls (see notes about gel-paste below.)

    3. ADD one tablespoon blue batter to the each cupcake liner and spread evenly (we used a plastic teaspoon). Follow with a tablespoon of white batter, and a red layer on top of that, taking care not to mix the colors as you spread them.

    4. BAKE per cake recipe instructions and cool. While the cupcakes cool…

    5. MAKE the stabilized whipped cream frosting. Place the cold water in a small pan and sprinkle the gelatin over it. Let it thicken; then place the pan over low heat, stirring constantly, just until the gelatin dissolves. Remove from the heat and cool, but do not allow it to set.

    6. WHIP the cream with the powdered sugar, until slightly thick. While slowly beating, add the gelatin to whipping cream. Whip at high speed until stiff peaks form, about 5-7 minutes.

    7. DECORATE and serve.

      Red, White & Blue Cupcakes

    July 4th Cupcakes

    American Flag Cupcakes
    [1] Red, white and blue layered cupcake (photo Elegant Affairs Caterers | Facebook). [2] Even easier options: red fruit atop white frosting (photo GoBoldWithButter.com) and [3] cupcake “flag” (photo Sprinkles Cupcakes).

     
    WANT A RED, WHITE & BLUE LAYER CAKE INSTEAD OF CUPCAKES?

  • White layer cake, filled with raspberry and blueberry preserves.
  • White-frosted stack cake with red and blue berry topping.
  • Lemon loaf layer cake with white filling and red and blueberry topping.
  •  
    WHY USE SOFT GEL INSTEAD OF LIQUID FOOD COLOR

    The typical food colors available in supermarkets are water-based liquids that work well for most purposes. In many recipes, you use so little of it that the teaspoon or so of water isn’t going to impact the outcome of the recipe.

    But if you are looking for intense color—such as in red velvet cake—you need to use a lot of liquid to get the vibrant color. Too much liquid will alter the consistency of cake, candies, donuts and deep-colored frostings.

  • Soft gel food coloring (sometimes called liquid gel, not to be confused with the conventional liquid food color) delivers a deep, rich color without thinning the batter or frosting.
  • Gel paste food coloring is very concentrated and provides even deeper, more vivid colors than soft gel. It should be used in very small quantities.
  • Powdered food coloring is another very concentrated option that is often used to decorate cookies.
  •  
    You can often find gel food colors in craft stores, as well as in baking supplies stores and online, where you can buy red only or the four basic food colors. Wilton sells a set of eight gel colors, as well as neon and pastel sets. Don’t substitute one for another, unless you have time to test the results.
     
    TIPS FOR COLORING ICING

  • If exact color is important, mix the color in daylight so you can see the true hue.
  • Start with less color and adjust as you go.
  • Note that the longer the icing sits, the stronger the color will be. Proceed accordingly.
  •   

    Comments off

    The Nibble Webzine Of Food Adventures


    © Copyright 2005-2026 Lifestyle Direct, Inc. All rights reserved. All images are copyrighted to their respective owners.