THE NIBBLE BLOG: Products, Recipes & Trends In Specialty Foods


Also visit our main website, TheNibble.com.


PRODUCT: Gimbal’s Jelly Beans

bowl-beauty-230
Gimbal’s Gourmet Jelly Beans. Photo by
Elvira Kalviste | THE NIBBLE.
 

We’ve been tasting lots of jelly bean brands over the past few weeks, and have decided that our favorites are Gimbal’s.

What makes them the best jelly beans? To our palate, there’s less sugar and fresh, bright, natural flavors, including real fruit juice.

We can focus on the flavor instead of cloying sugar.

There are 41 traditional flavors and 12 delightfully tart sour flavors.

We won’t say that jelly beans are health food, but the recipe includes vitamin C (ascorbic acid), a powerful antioxidant.

Gimbal’s Gourmet Jelly Beans are sold in 3- or 14-ounce bags and 40-ounce jars. You can buy them online at GimbalsCandy.com.

These are jelly beans to enjoy year-round—not just for Easter.


Comments off

TIP OF THE DAY: Purple Asparagus, White Asparagus

It’s spring, it’s asparagus season, and your specialty produce purveyor just may have wondrous, fresh asparagus in the non-traditional colors of purple and white.

Low in calories, asparagus is a good source of folic acid, potassium, amino acids and dietary fiber. But people who love their flavor don’t always concern themselves with these details: They just want their spears blanched, grilled, raw, sautéed, steamed or otherwise prepared.

All asparagus should be firm to the touch, with closed tips. The diameter of spear does not matter; the flavor remains the same.

Asparagus will keep for up to seven days in the refrigerator, wrapped in a damp paper towel; but serve them promptly after purchase for the best flavor.

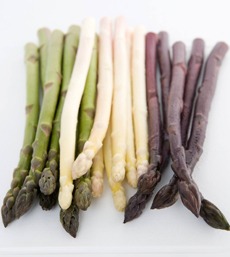
WHITE ASPARAGUS

White asparagus has always been considered a delicacy, not just for its color but because of the expense—often double that of green—which is a function of the extra effort required to grow it.


3-colors-australianasparagusgrowers-230

Asparagus lovers: look for fresh white and purple spears. Photo courtesy Australian Asparagus Growers.

 
The spears must be grown underground or in the dark, without exposure to sunlight. The sun engenders photosynthesis and the development of chlorophyll, which creates asparagus’ conventional green color.

To keep them white, asparagus were conventionally grown by “hilling” the soil into a mound, the earth creating a barrier to light. As soon as the spear poked its head up from the mound, specialist workers would cut deep into the mound to harvest it. But “blind harvesting” increased the risk of injuring the spears.

Modern growers now use black plastic “polyhouses” or “igloos” constructed over the crop to ensure that the spears are not exposed to sunlight. These white asparagus can be harvested above the ground cleanly and efficiently, without damaging the spears.

White asparagus have a thicker outer layer that can be easily removed, if needed, with a vegetable peeler.

Note that canned white asparagus are no more interesting than canned asparagus and most other canned vegetables. If you have a chance to purchase white asparagus, its wonderfully distinctive flavor will make the high price more palatable.


white-loose-australianasparagusgrowers-230
White asparagus can be double the price, but
connoisseurs don’t mind paying. Photo
courtesy Australian Asparagus Growers.


PURPLE ASPARAGUS

Purple asparagus are larger, sweeter and tastier than the conventional green types of asparagus.

The flesh is creamy white, like green asparagus. The purple skin color comes from the high levels of anthocyanins (potent antioxidants) in the spears.

Purple asparagus have a lower fiber content than green or white asparagus, making the spears more tender. Even though the spears are thicker than green or white asparagus, the very bottom of the spear can be eaten (more for your money!).

Alas, they turn a deep green-bronze color when cooked. So enjoy them raw in bean, green or grain salads; or as crudités with dip. Try blanching them or adding to stir-frys at the end of cooking, to see if you can maintain the color.

[Source: Asparagus.com.au]
 
PREPARING ASPARAGUS

To peel or not to peel? We’ve never had the need to peel asparagus, but some cooks do so to ensure extra tenderness.

Snap versus trim? Snapping off the white ends creates uneven spears. Use a knife to trim them.


Comments off

TOP PICK OF THE WEEK: Delicious, Nutritious, Better-For-You Bison

“Meet the better meat,” invites The Bison Council, and we agree.

Bison is a red meat lover’s dream come true. It provides all the flavor of beef (even more, we think!) without the negatives. You can enjoy succulent steaks without high cholesterol and juicy burgers without all the fat. Bison is lower in fat, cholesterol and calories than even chicken and turkey, and is a great source of iron.

Here’s how bison compares nutritionally with other proteins.

The one catch impacts those who like their meat cooked medium-well. Because it has very low fat content (less fat than turkey!), bison must be eaten rare to medium rare (just the way we like our meat!). Tender and juicy, good bison gets raves from every food lover we know.

If you’re concerned because you don’t like rare beef, we still urge you to try rare bison—in fact, how about bison filet mignon or tenderloin roast for Mother’s Day or Father’s Day?

Here’s how to cook bison.


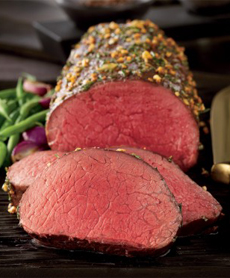
tenderloin-roast-green-beans-230

A bison tenderloin roast. Photo courtesy AllenBrothers.com.


OH GIVE ME A HOME WHERE THE BISON ROAM

Let us interject a quick lesson: Bison and buffalo are not the same animal. They are cousins in the same family and sub-family, but of different genuses—like the dog and the wolf. Here’s how the taxonomy compares among bison, buffalo and cattle, complete with photos.

Bison is a native American animal; buffalo are the water buffaloes of Africa and Asia. The first Europeans to see bison presumed the huge, shaggy beasts to be another type of buffalo, and the misnomer has lasted for centuries, aided and abetted by the U.S. government’s minting of the “buffalo” nickel. Here’s the difference between bison and buffalo.

And it doesn’t help that the unofficial anthem of the American West (and the official state song of Kansas) was/is “Home On The Range.” The poem, written in the early 1870s in Kansas, was set to music, and the rest is tuneful—if inaccurate—history.
 
THE BISON REVIVAL

Bison once ranged over most of the North American continent: from the Rockies all the way to the East Coast (hence the city of Buffalo, New York), from Mexico north to the Northwest Territories of Canada.

Most American students learn the tragedy of the bison: how the great natural herds were slaughtered to the brink of extinction in the 1870s and 1880s by commercial hunters and sports hunters. The near-extinction also caused the demise of many Native American tribes, who relied on the bison for food, clothing, coverings for their lodges, sinew for bow strings, tools and fuel.

By 1889, the few remaining animals were saved by the combined efforts of William Hornaday, Director of the New York Zoological Park (now the Bronx Zoo) and a small group of private ranchers. In 1905, the American Bison Society was formed to save the bison and provide protect rangeland for the animals. In 1907, some offspring of the bison saved by Hornaday became the nucleus of the present-day herd of 600 in the Wichita Mountains Wildlife Refuge.

Fast forward to the late 20th century: In the 1970s an 1980s, as the high cholesterol content of beef was raised as a health issue, the search for better meat options led to the bison.

Today, the estimated 75 million North American bison of the mid-1800s are greatly reduced but thriving, with an estimated 500,000 animals. They live on approximately 4,000 privately owned commercial ranches; about 15,000 wild bison are free-ranging on protected lands. [Source: Wikipedia]

The bison is the largest land mammal to roam North America since the end of the Ice Age. It is a descendant of ancient animals that crossed the Bering Strait land bridge some 300,000 years ago. Americans can once again see magnificent herds of this noble heritage beast.


bison-burger-gorgonzola-230r
A bison burger, with Gorgonzola blended into
the patty. Photo courtesy Wisconsin Milk
Marketing Board.
  BISON CUTS

Bison is available in cuts similar to those of beef. You’ll find:

  • Cooked & raw sausages: franks, brats and sausages in different styles
  • Deli meats: bison bacon, bologna, pepperoni, salami
  • Ground: ground meat and burger and slider patties
  • Ribs: back rib racks and short ribs
  • Roasts: brisket, chuck, pot roast, prime rib, rump, sirloin butt, tenderloin (Chateaubriand), tri-tip
  • Steaks: filet mignon, flank, flatiron, hanging tender, ribeye, sirloin, strip
  • Plus: center cut shank (osso buco), jerky, liver, snack sticks, stew meat
  •  

    You can can replace bison in any recipe, from chili and meat balls to kabobs and stir frys. Check out the wealth of beautiful bison recipes from The Bison Council.

    Always look for bison that is 100% USDA certified. Many cuts are also American Heart Association certified—it’s that good for you.


    THE BISON COUNCIL

    Just as some beef is tough and some is celestial, so it goes for bison. To have that heavenly bison experience, you need to buy from a good butcher, who buys from a top rancher.

    The Bison Council is dedicated to the promotion, preservation, and stewardship of the North American Bison. Members pledge to maintain the highest standards and ideals of animal care and husbandry, sustainability, food safety, purity of ingredients and quality of finished consumer products.

    Charter members include:

  • Carmen Creek Gourmet Bison
  • Chinook Bison Ranch
  • Double T Bison Ranch
  • High Plains Bison
  • Jackson Fork Ranch
  • Wild Rose Meats
  •  

    The website is a wealth of information about bison. Take a look!


    Comments off

    EASTER: Pink, White & Green Deviled Eggs

    Make these gorgeous pink deviled eggs ahead of time for easy holiday entertaining: They’re perfect for Easter brunch or snacking.

    You can make all of the eggs pink, half pink/half white, or tint some pickle brine light green for a tricolor selection.

    Mix and match your toppings from the list in the recipe or whatever else appeals to you.

    Prep time is 20 minutes.

    RECIPE: PICKLED PINK DEVILED EGGS

    Ingredients For 20 egg halves

  • 12 hard-boiled eggs
  • 1/4 cup mayonnaise
  • 1/4 cup sour cream
  • 1 tablespoon Dijon mustard
  • 1 tablespoon fresh lemon juice
  • 1/4 teaspoon salt
  • 1/4 teaspoon pepper
  • 2 tablespoons finely chopped fresh dill or chives
  •  

    Pickled deviled eggs in Easter colors. Photo and recipe courtesy American Egg Board.

     
    For The Marinade

  • 1 jar (16 ounces) beets
  • 1 cup water
  • 1 cup white vinegar
  •  
    Garnishes

  • Capers & chives
  • Crab meat & fresh dill
  • Diced red bell peppers and flat-leaf (Italian) parsley
  • Small cooked shrimp & chives
  • Smoked salmon
  • Steamed asparagus tips
  • Sweet pickles, sliced jalapeños or pickled jalapeños
  •  

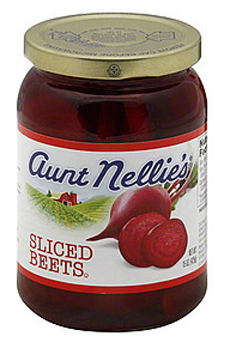
    aunt-nellies-beets-sliced-jar-230
    You only need the beet liquid, so enjoy the
    beets in a salad, on a sandwich (instead of
    tomato) or as a side. Photo courtesy Aunt
    Nellie’s.
     

    Preparation

    Deviled eggs can be made up to 12 hours ahead. Refrigerate them, covered.

    1. CUT eggs lengthwise in half. Remove yolks to medium bowl. Reserve 20 white halves; finely chop remaining 4 white halves.

    2. MASH yolks with fork. Add finely chopped whites, mayonnaise, sour cream, mustard, lemon juice, salt and pepper; mix well. Add dill; mix well. Cover and refrigerate.

    3. DRAIN beets, reserving juice (about 2/3 cup). Set beets aside for another use. Combine beet juice, water and vinegar. Arrange egg whites cut side down in shallow container. Pour beet mixture over eggs. Cover tightly. Refrigerate at least several hours or overnight, turning occasionally.

    If you want two or three colors, divide the eggs among the beet brine, plain pickle brine and tinted pickle brine. If using brine, you don’t need the water and vinegar.

    4. REMOVE purple egg whites from beet mixture, pat dry with paper towels. Spoon 1 heaping tablespoon of yolk mixture into each reserved egg white half. Garnish as desired.

     
    RECIPE TIPS

  • Don’t use the freshest eggs. Very fresh eggs can be difficult to peel. To ensure easily peeled eggs, buy and refrigerate them a week to 10 days in advance of cooking. This brief “breather” allows the eggs time to take in air, which helps separate the membranes from the shell.
  • Easier peeling technique. Hard-boiled eggs are easiest to peel right after cooling. Cooling causes the egg to contract slightly in the shell. To peel a hard-boiled egg, gently tap it on the countertop until shell is finely crackled all over. Roll the egg between your hands to loosen the shell. Starting peeling at the large end, holding the egg under cold running water to help ease the shell off.
  • Easy mixing and filling method. Combine the filling ingredients in a 1-quart plastic food-storage bag. Press out the air and seal the bag. Press and roll the bag with your hands until the mixture is well blended. Push the filling toward bottom corner of bag. Snip off about a 1/2-inch of corner. Squeeze the filling from bag into the egg whites.
  • Picnic or tailgate tip. Prepare the filling in a plastic bag, as above. Transport the whites and yolk mixture separately in a cooler. Fill the eggs on the spot, pressing filling out of snipped corner of bag.
      
  • Comments off

    TIP OF THE DAY: Make Wilted Greens

    If you’re looking for more ways to enjoy green vegetables, have you tried wilting?

    Wilted vegetables are served at some of the finest restaurants in the country, often with a filet of fish or a boned chicken breast on top.
     
    Wilting is a quick cooking technique that involves placing the greens in a hot butter or oil, until they’re barely cooked (i.e., wilted). We actually use a low-calorie technique, blanching the vegetables in simmering broth or stock.

    The Wilting List: Simply add delicate, leafy vegetables—arugula, beet greens, bok choy, chard, collards, dandelion greens, kale, mustard greens or turnip greens—to a pan of simmering liquid (broth or water) and they wilt in a minute. barely cook or just “wilt.” As you can see, wilting is also a great way to discover the joys of greens you never eat.

    You can also wilt a medley of three different greens, such as chard, mustard greens and spinach. See the recipe below.


    crispy-salmon-wilted-greens-2-SLT-230

    Crispy salmon atop wilted greens. Photo courtesy Sur La Table.

     
    Dark leafy greens are some of the most nutrient-dense foods on the planet, and wilting preserves nutrients and flavor. So why isn’t everybody wilting greens?

    To begin your journey here’s a recipe developed in the Sur La Table test kitchen; more wilting techniques follow.
    RECIPE: CRISPY SALMON ON LEMON-CAPER WILTED GREENS

    You can substitute another vegetable for the spinach and halibut or other firm-fleshed filet for the salmon.

    Ingredients For 4 Sservings

  • 2 tablespoons extra-virgin olive oil
  • 4 (5-ounce) salmon fillets with skin
  • 1 tablespoon unsalted butter
  • 1 shallot, minced
  • 1 clove garlic, minced
  • 2 zucchini, thinly sliced
  • ½ pound spinach, washed and patted dry
  • 2 teaspoons capers, drained
  • 2 teaspoons lemon zest
  • 2 tablespoons flat-leaf parsley leaves
  • ¼ cup heavy whipping cream
  • Kosher salt or sea salt, plus and freshly ground black pepper
  •  

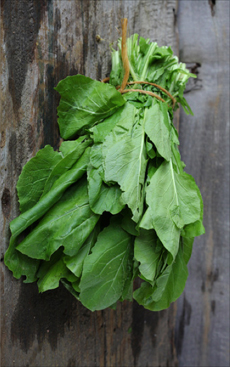
    mustard-tendergreens-beauty-goodeggs-230
    Wilt me! Have you had these greens before? They’re mustard greens. Photo courtesy GoodEggs.com.
      Preparation

    1. PREHEAT oven to 400°F and position the oven rack in the middle.

    2. PLACE a large oven-proof skillet on the stove over a medium-high heat, and add olive oil. When the oil is just starting to shimmer, add the salmon, presentation side first. Sear to a light-golden brown color, about 2 minutes. Turn the salmon over to the skin-side and transfer to the oven. Bake until the salmon is flaky and slightly pink inside, about 5 minutes. Transfer the salmon to a plate; reserving the skillet and set aside.

    3. PLACE the skillet back on the stove over a medium heat and add the butter. Once the butter begins to foam, add the shallot and garlic and sauté until soft, about 2 minutes. Add the zucchini, spinach, capers, lemon zest, parsley and cream. Cook until the spinach is wilted, about 2 minutes. Taste and season with salt and pepper.

    4. SERVE: Spoon the wilted greens mixture onto warmed dinner plates, and place the salmon on top. Serve immediately.


    BASIC WILTED GREENS

    Don’t worry if it seems like you have too many greens. Big bunches of leafy greens wilt down to flatness.

    Ingredients

  • 2 large bunches chard, kale, mustard greens or others (see list at top), rinsed
  • 1/4 cup olive oil
  • 1 medium yellow onion, thinly sliced
  • 1-1/2 teaspoons kosher salt or sea salt
  •  
    Preparation

    1. TEAR the greens into pieces; discard stems. (Note: We actually enjoy the stems, and keep them on. We also like to keep the leaves whole—we don’t mind cutting them on our plate with a knife and fork. Try it to see which you prefer.)

    2. HEAT the oil in a pot over medium heat. Add the onion and cook for 7 minutes. Add the greens and toss to coat. Cover and cook, stirring once, until wilted, about 2 minutes. Add the salt and serve.

    3. SEASON as you like with balsamic vinegar, chiles, honey, garlic, nutmeg or other favorites. As an option, garnish with toasted pecans or walnuts.
     
    Variations
     
    For breakfast, brunch or lunch, top with poached eggs.

    You can also add ham or bacon, Southern-style, as in this recipe.
     
    STOVE TOP WILTING

    This recipe uses a medley of greens, although you can use only one type or a different combination.

    Ingredients

  • 3 tablespoons butter or olive oil
  • 1 large bunch chard, stems removed*, leaves torn
  • 1 large bunch mustard greens, stems trimmed, leaves torn
  • 1 10-ounce bag spinach leaves
  • 1/3 cup chicken stock or canned low-salt chicken broth
  •  
    Preparation

    1. MELT butter in heavy large pot over medium-high heat. Add all greens and stock.

    2. COVER and cook until greens wilt, stirring occasionally, about 3 minutes. Uncover; cook until juices thicken slightly, about 4 minutes.

    3. SEASON with salt and pepper and any other seasonings you like (balsamic vinegar, chiles, garlic, nutmeg, etc.).
     

    SIMPLE MICROWAVE WILTING

    1. WASH the greens in cool water and place in a microwave-safe bowl.

    2. COVER with plastic wrap and punch several holes in the wrap to vent. Microwave on High until wilted, 2 to 3 minutes.

    3. SQUEEZE out any excess moisture from the greens before seasoning and serving, or adding to a recipe.


    Comments off

    The Nibble Webzine Of Food Adventures
    RSS
    Follow by Email


    © Copyright 2005-2024 Lifestyle Direct, Inc. All rights reserved. All images are copyrighted to their respective owners.