THE NIBBLE BLOG: Products, Recipes & Trends In Specialty Foods


Also visit our main website, TheNibble.com.


Moroccan Chicken Recipe For National Chicken Month

September is National Chicken Month. Here’s a tasty chicken recipe that’s off the beaten track—inspired by Morocco, to be precise.

The recipe is courtesy of the National Chicken Council, which features recipes for lunch and dinner on their consumer website, ChickenRoost.com.

We have to take exception with the given name of the recipe, which is Moroccan Chicken with Eggplant-Zucchini Ragout. That’s not accurate.

Ragout (rah-GOO) is not a dice of vegetables; it is a stew. Like stews, ragouts can be made from different meats, seafood, and vegetables, with different seasonings. They can be vegetables-only.

The key difference between a ragout and a stew:

  • The meat and vegetables in a ragout are cut into smaller pieces than in a typical stew.
  • Neither a stew nor a ragout would refer to a bed or a serving of diced vegetables.
  •  
    The lesson here is one you’ve heard before: Just because you read it in print doesn’t make it true.
     
     
    THE WORD “RAGOUT”

    The word “ragout” is the American spelling of the French ragoût. The English spelling drops the circumflex over the “u.”

    Ragoût, in turn, derives from the verb ragoûter, meaning “to revive the taste.”

    A similarly-sounding word in Italian is ragù, but it refers to a sauce, typically used to dress pasta.
     
     
    WHAT SHOULD THIS RECIPE BE CALLED?

    This is a chicken dish with diced vegetables (photo #1). In French cooking, there are four sizes of dice:

  • Large dice, 3/4″ square (carré in French—cah-RAY).
  • Medium dice, 1/2″ square (parmentier—par-men-TYAY).
  • Small dice, 1/4″ square (macédoine—MAH-suh-dwon) dice.
  • Very small dice, 1/8″ (brunoise—broon-WOZ), and there’s even extra-extra small, fine brunoise, 1/16″.
  •  
    See the chart showing the different sizes, below.

    This recipe calls for a 1/2 dice of the vegetables, or parmentier in the language of French-trained chefs. But doesn’t Moroccan Chicken With Parmentier Of Eggplant & Zucchini” sound more tempting than Moroccon Chicken With Diced Eggplant & Zucchini?

    If you agree, you have our permission to call the recipe as we have renamed it.

    > The history of chicken.

    > The different cuts of chicken.
     
     
    RECIPE: MOROCCAN CHICKEN WITH PARMENTIER OF EGGPLANT & ZUCCHINI

    The principal Moroccan seasoning, ras el hanout*, is a blend of ground spices: allspice, cinnamon, cloves, coriander, cumin, ginger, paprika, and turmeric.

    However, since most American kitchens don’t have ras el hanout, the recipe was developed with other flavors of Morocco that most of us keep in the pantry.
     
    Ingredients

  • 1 ½ – 2 pounds chicken leg quarters
  • 3 tablespoons olive oil, divided
  • 1 teaspoon salt, divided
  • 1 teaspoon freshly ground black pepper, divided
  • 1 small eggplant, cut into ½-inch dice
  • 1 medium zucchini, cut into ½-inch dice
  • 1 small onion, diced
  • 2 cloves garlic, minced
  • ¼ cup white wine or water
  • 1 (14.5 ounce) can diced tomatoes with juices
  • ¼ cup pimento-stuffed green olives, roughly chopped
  • 2 tablespoons capers, rinsed
  • 2 tablespoons red wine vinegar
  • 1 teaspoon sugar
  • 2 tablespoons fresh parsley, minced
  •  
    Preparation

    1. WARM 2 tablespoons of olive oil in a large skillet over medium-high heat. Season the leg quarters with ½ teaspoon salt and ½ teaspoon black pepper. Add the leg quarters to the pan, skin-side down. Brown the chicken, turning once, 8 to 10 minutes per side. Remove the chicken to a plate and drain off all but 2 tablespoons of oil.

    2. ADD the eggplant to the hot pan and cook, stirring for 5 minutes. Add the remaining tablespoon of olive oil, along with the zucchini, onion, and garlic. Cook for 5 minutes, stirring occasionally.

    3. RAISE the heat to high and add the white wine to the pan, stirring to scrape up any browned bits (the fond). Add all of the remaining ingredients, except the parsley, and place the chicken legs back in the pan.

    4. BRING to a boil, reduce the heat to medium-low, cover and simmer for 35 to 40 minutes or until the chicken is cooked through (an instant-read thermometer should read 170ºF).

    7. TO SERVE: Place some of the eggplant-zucchini mixture onto plates, top with a leg quarter, and sprinkle with parsley.


    Moroccan Chicken Recipe With Eggplant & Zucchini
    [1] Moroccan-style chicken with eggplant, zucchini, olives and capers (photo © Chicken Roost).

    Pimento Stuffed Green Olives
    [2] Chopped pimento-stuffed olives go into the eggplant-zucchini mix (photo © Recipeland).

    Capers On A Marble Surface
    [3] So do briny capers (photo © iGourmet).

    Can Of Diced San Marzano Tomatoes
    [4] Diced tomatoes contribute to the sauce. Our favorite brand: San Marzano (photo © DeLaurenti).

    Purple Eggplant
    [5] You need only one eggplant (photo © IT Delice).

    Zucchini
    [6] And one zucchini. The singular form in Italian is zucchini. In the U.S., the same word is used for the singular and plural forms (photo © Good Eggs).


    The Different Sizes Of Diced Vegetables
    [7] Head to YouTube to see how to make each of these cuts (photo © ).
     
     
    ________________

    *In Arabic, ra’s al-ḥānūt means “top of the shop,” referring to the highest quality spices sold in a shop.


    CHECK OUT WHAT’S HAPPENING ON OUR HOME PAGE, THENIBBLE.COM.


    Comments off

    Meatless Beef Samosas Recipe For World Samosa Day

    Samosas Recipe
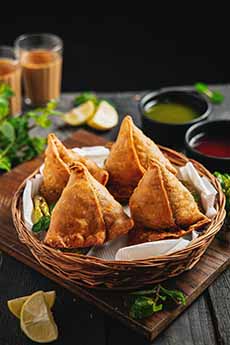
    [1] Classic samosas are triangular in shape (photo© Satyam Verma | Pexels).


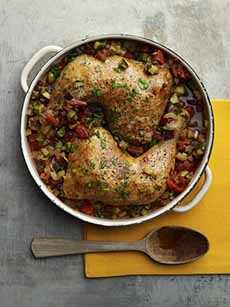
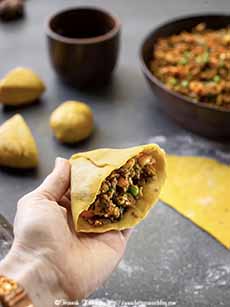
    [2] The most popular filling combines potatoes, onions, and green peas with a variety of spices, including black mustard seeds, coriander, cumin, curry powder, garlic, ginger, and jalapeño. Here’s the recipe (photo © Oona Settembre | David & Busters | Dallas | Idaho Potato Commission).

    Half-Moon Samosas Recipe
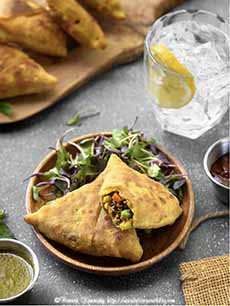
    [3] Notice the half-moon shape on these cauliflower and cabbage samosas. Here’s the recipe (photo © Rich Vellante | Legal Seafoods | Idaho Potato Commission).

    Triangular Samosas Recipe
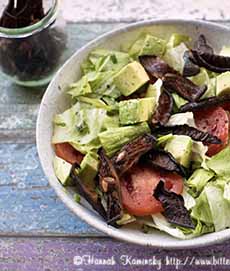
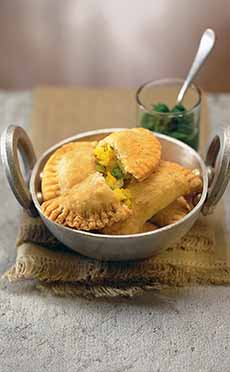
    [4] Here’s the recipe at right for Meatless Beef Samosas. You can serve a couple of samosas with a small salad as a snack or first course (photos #4, #5, and #6 © Hannah Kaminsky | Bittersweet Blog).

    Samosa Recipe Ingredients
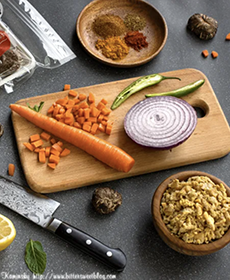
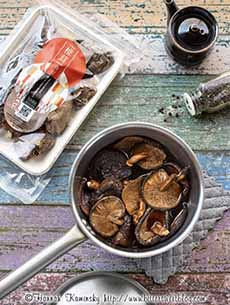
    [5] Prepping for the Meatless Beef Samosas.

    Samosa Filling Recipe
    [6] The delicious Meatless Beef filling.

    Samosas With Mint Chutney
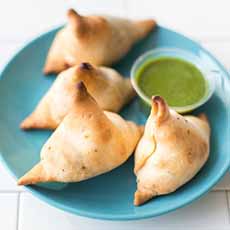
    [7] Baked samosas with mint chutney (photo © Good Eggs).

    Samosas With Hot Sauce
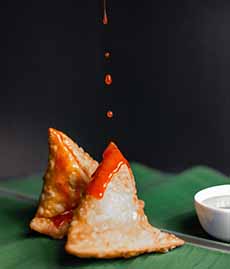
    [8] A fusion approach: Samosas with hot sauce instead of chutney—although some chutneys are pretty hot (photo © Shreyak Singh | Unsplash).(

    Samosa Filling In An Egg Roll Wrapper
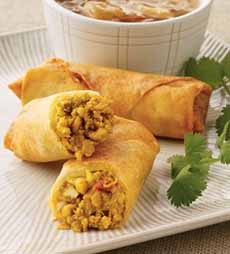
    [9] Samosa filling in an egg roll wrapper (photo © Allen Brothers).

    Samosas
    [10] Sweet potato samosas with raisin chutney (photo © The Fry Family Food Co. | Unsplash).


    Ah, crispy samosas! September 5th is World Samosa Day. Is there a food holiday for everything? Sadly, some of our favorite foods have been overlooked in the holiday department. We have a running list that’s nearing 100, from A (arugula) to Y (yogurt—there’s no Z). Overlooked are everything from the basics (Greek salad, potato salad, sorbet) to the specialty (Dirty Martini, rugelach, steak tartare).

    Thankfully our colleague Hannah Kaminsky, a wonderful vegan recipe developer, provided us with this delicious way to celebrate samosas.

    Her recipe is meatless, but you can substitute meat. Although if you’ve never tried meatless alternatives, you’re missing out. And…no one will realize this hearty recipe is completely meatless!

    For fried food fans, samosas are a welcome snack, appetizer, or entrée. They’re great with a beer or a glass of wine. Or that overlooked Dirty Martini.

    If you don’t want fried food, there are instructions for air-frying and oven-baking.

    If you’d like to create a well-rounded plated meal with samosa as the centerpiece, just add one or more sides:

  • Basmati rice
  • Chopped cucumbers and tomatoes
  • Leafy green salad
  • Lentil dal
  • Rasam (spicy tomato soup)
  •  
    Samosas are meant for dipping. Popular choices:

  • Coconut chutney
  • Mint chutney (photo #7)
  • Raita (yogurt-cucumber dip, recipe)
  • Tamarind chutney
  •  
    You can make these or purchase them. Greek tzatziki is an excellent substitute for raita.

    > The history of samosas is below.
     
     
    RECIPE: MEATLESS BEEF SAMOSAS (VEGAN)

    Hannah calls this recipe “Love Triangles” (photo #4). Prep time is 45 minutes, and cook time is 15 minutes. You’ll need an additional 30 minutes of waiting time for the dough to rise.

    Although samosas are traditionally deep-fried, you can pan-fry or shallow-fry them. Instructions for air-frying and baking are below.

    Extra filling (photo #6) can be turned into a chip dip (you can mix it with yogurt), hamburger bun samosa, pizza topping, or vegan Bolognese sauce.
     
    Ingredients For The Pastry Dough

  • 2 cups all-purpose flour
  • 1/2 teaspoon baking powder
  • 1/2 teaspoon salt
  • 1/4 teaspoon ground turmeric
  • 1/4 teaspoon ground black pepper
  • 1/4 cup coconut oil, melted
  • 1/2 cup warm water
  •  
    Ingredients For The Meatless Filling

  • 3 tablespoons coconut oil
  • 2 carrots, peeled and finely diced
  • 1/2 large red onion, diced
  • 1-2 Jalapeño or serrano chile peppers, seeded and minced
  • 3 cloves garlic, minced
  • 1/2 teaspoon whole cumin Seeds
  • 1/2 teaspoon ground ginger
  • 1/2 teaspoon Kashmiri chili powder or paprika
  • 1/2 teaspoon ground turmeric
  • 1/2 teaspoon salt
  • 1 (8-Ounce) package tempeh, crumbled
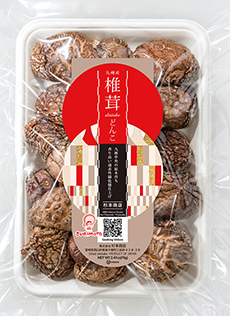
  • 1 cup soaked shiitake mushroom stems and/or caps, minced
  • 2 tablespoons soy sauce
  • 1 tablespoon lemon juice
  • 1 tablespoon garam masala
  • 1/4 teaspoon ground cinnamon
  • 1/2 cup frozen green peas
  • 1/4 cup fresh mint, minced
  • For frying: neutral vegetable oil
  •  
    Preparation

    1. MAKE the pastry dough. Combine the flour, baking powder, salt, turmeric, and pepper in a large bowl. Slowly pour in the oil and water while mixing with a sturdy wooden spoon. Once it becomes too stiff to stir easily, knead by hand until the dough is smooth. If the air is very dry, you may need to add another splash of water. Cover with a clean kitchen towel and let rest at room temperature for 30 minutes. Meanwhile…

    If you don’t want to make pastry dough, there are quick-fix solutions you can purchase for the outer wrapping such as burrito-sized flour tortillas, phyllo dough, pie dough, puff pastry, and spring roll or egg roll wrappers (photo #9).

    2. PREPARE the filling by placing the coconut oil in a medium saucepan over medium heat. Once melted, add the carrots, onion, peppers, and garlic, sautéing them into a softened aromatic, for 5-8 minutes. Add the cumin seeds, ginger, chili powder, turmeric, and salt, and cook for another minute.

    3. TURN DOWN the heat and add the tempeh, using a spatula to break up any remaining large pieces. Incorporate the minced shiitakes, soy sauce, and lemon juice, stirring well. Sauté for another 10 minutes, until lightly browned around the edges.

    4. ADD the garam masala and cinnamon, mixing well, then immediately remove from the heat. Stir in the peas, allowing them to thaw from the residual heat, followed by the mint. Transfer the filling to a separate bowl and let it cool to room temperature. When you’re ready to assemble the samosas…

    5. LIGHTLY DUST a clean surface with flour. Take the rested dough and cut it into 6 equal pieces. Working with one piece at a time, roll it into a ball and then use a rolling pin to flatten it into an even circle, about 7-8 inches in diameter. Use a sharp knife to cut it into half; you now have two half moons.

    6. TAKE one half and roll it into a cone, lightly moistening the edge with water and pressing the edges to seal. Stuff with 3-4 tablespoons of the filling, pressing down gently. Moisten the bottom edges and fold them over, pressing them together to create a neat little pyramid. Repeat with the remaining dough and filling. Cover the finished samosas with a clean kitchen towel to prevent them from drying out.

    7. COOK. Heat at least 1 inch of oil to shallow fry, or 2-3 inches of oil to deep fry, using a heavy, high-sided pan set over medium heat. Add 2-3 samosas at a time, being careful not to crowd the pan. Fry for 3-5 minutes on each side, flipping as needed, until golden brown all over. Remove with a slotted spoon and drain on paper towels.

    To air-fry: Lightly spray the samosas with a thin coating of oil and air fry at 370°F for 15 minutes, flipping after 10 minutes, until crispy and browned on both sides.

    To bake: Preheat a conventional oven to 400°F. Bake for 20-30 minutes, flipping halfway through, until golden brown.

    Serve hot!
     
     
    THE HISTORY OF SAMOSAS

    Samosas, the quintessential street food of India, did not originate there but thousands of miles away on the Iranian plateau*. The origins of its name are Persian: sanbosag.

    We don’t know when the first cooks shaped pastry into triangles, filled them with meats and vegetables, and fried them. We do know that The first known mention of the sanbosag is by the Persian historian Abul-Fazl Beyhaqi, writing in the 11th century (although typically, dishes have been in existence known much longer than their first-known notation).

    Beyhaqi describes a fine pastry, a dainty delicacy served as a snack in the great courts of the Ghaznavid dynasty which ruled large parts of Persia, Khorasan, much of Transoxiana† and the northwest Indian subcontinent from 977 to 1186.

    There, the triangular pastry was filled with minced meats, nuts, and dried fruits and then fried until crisp.
     
     
    The Sambosag Migrates East

    The dainty sambosag was transformed into the robust samosa by waves of migration from the Middle East to India. Traders and other travelers brought the recipe through Central Asia, and then over the mountains in what is now Afghanistan. Some descended down the mountains onto the plains of India (more about that in a minute).

    By the time the recipe reached what is now Tajikistan and Uzbekistan it was no longer a fine pastry, but a crude peasant dish—much larger and heartier, the type of food a shepherd would take out into the pastures for his midday meal.

    The samosa retained its triangular shape and was still fried, but the nuts and fruits were gone, replaced with the simple fillings available: coarsely chopped goat or lamb with chopped onions and some salt.
     
     
    The Samosa Arrives In India

    Over the following centuries, the samosa made its way over the icy passes of the Hindu Kush mountain range and into the Indian subcontinent.

    Once in India, the samosa was tailored to local tastes, incorporating Indian spices: caraway seeds, coriander, ginger, pepper, and numerous others.

    The filling changed, too, with vegetables often replacing meat.

    Even the shapes evolved beyond the triangle. There are now cone and half-moon-shaped samosas (photo #3), depending on the region. We’ve even seen egg roll-shaped samosas (photo #9).

    These days most samosas are filled with ingredients that came all the way from the New World: chiles, peas, and potatoes, for example. New World ingredients came to India by way of Portuguese traders in the 16th century.

    Onions, another key ingredient, are believed to have originated more than 5,000 years ago in Central Asia. They’re one of the most ancient of cultivatedfood sources.

     
    The Recipes Proliferate

    Not surprisingly, each region and town put its own favorite ingredients in its samosas.

    Today, as then, samosas can even vary from shop to shop as samosa-makers compete for customers.

    Samosas are now a worldwide treat. The British carried the recipe across their vast empire. The Indian diaspora—Indians who are living abroad and those who can trace their ancestry to India—did the same.

    Thus, the fried tidbit of ancient Persian rulers is now enjoyed in virtually every country on Earth [source].

  • They can be jumbo-sized to serve as an entire meal, or bite-sized for cocktail canapés.
  • In Punjab samosas include paneer, the fresh Indian cheese, among their ingredients. Cheese is not used elsewhere.
  • Most samosas are still fried, but baked samosas have appeared for the calorie-conscious.
  • There even are dessert samosas, filled with chocolate, cheesecake, fruits, and Nutella.
  •  
    A mixture of potatoes, onions, peas or lentils, and spices remain the most popular filling. It is typically served with different varieties of chutney.

    You can check out the different types of samosas—from the Middle East, the Indian subcontinant, and Africa—here.
     
     
    ________________

    *The Iranian Plateau extends from East Azerbaijan Province in the northwest of Iran (ancient Persia) all the way to Afghanistan and Pakistan west of the Indus River. It also includes smaller parts of the Republic of Azerbaijan, Iraqi Kurdistan, and Turkmenistan.

    Transoxiana or Transoxania (“Land beyond the Oxus”) is the Latin name for a region and civilization located in lower Central Asia. It roughly corresponds to modern-day eastern Uzbekistan, western Tajikistan, parts of southern Kazakhstan, parts of Turkmenistan, and southern Kyrgyzstan. Geographically, it is the region between the Amu Darya River to its south and the Syr Darya River to its north. Here’s more about it.


    CHECK OUT WHAT’S HAPPENING ON OUR HOME PAGE, THENIBBLE.COM.


    Comments off

    A Detroit Pizza Recipe For National Cheese Pizza Day

    September 5th is National Cheese Pizza Day. How about going beyond mozzarella with this Detroit Pizza recipe?

    The classic Detroit pizza uses mozzarella plus brick cheese.
     
     
    WHAT IS BRICK CHEESE?

    Brick cheese is a specialty of Wisconsin, made in a brick-shaped form, a medium-hard cheese like Cheddar or Limburger. The mild and earthy flavor of the young cheese matures into a strong, ripe cheese with nutty, tangy flavors.

    The color of brick cheese ranges from pale yellow (achieved with the addition of annatto vegetable dye) to white (the color of the milk used to make it). The rind is pale orange (photo #2).

    Brick cheese is a good melter and slices well: perfect for pizza and grilled cheese sandwiches.

    If there’s no brick cheese in your area, just substitute Cheddar or Limburger.

    Food Trivia: Why is brick cheese spelled in all lower case but Cheddar, Limburger, and Parmesan begin with capital letters?

    Because the latter three reflect the proper names of the towns where they originated (Cheddar, England; Limburg, The Netherlands; and Parma, Italy). Brick, like cream cheese, blue cheese, mozzarella, and others, are generic terms.
     
     
    A SPECIAL PAN IS NEEDED

    Another feature of Detroit Pizza is that it’s made in a rectangular pan with high sides.

    The standard Detroit pizza pan is 8 x 10 x 2.25 inches. The depth enables the special crust (photos #3 and #4). You can get one on Amazon.

    While you might demur at purchasing a specialty pan, the pan is equally good for baking, casseroles, roasting, etc.

    In this recipe from Colavita, the brick cheese goes between the dough and the sides of the pan, so you get a crispy, cheesy outer pizza crust.

    > The history of Detroit Pizza.

    > The history of pizza.

    > Another Detroit Pizza recipe with provolone and brick cheeses.
     
     
    RECIPE: DETROIT PIZZA

    See photo #1. You can add as many other toppings as you like.
     
    Ingredients

  • Extra virgin olive oil (Colavita or other favorite)
  • 8 ounces mozzarella cheese, shredded
  • 8 ounces brick or white cheddar cheese, shredded
  • 2 ounces Pecorino Romano cheese, grated
  • 1 can or tetrapak (around 14 ounces) crushed tomatoes
  • 2 tablespoons fresh or dried oregano
  • 2 rounds of pizza dough
  • Optional garnishes: julienne of basil, oregano, grated Parmesan cheese
  • Optional garnish: a drizzle of flavored olive oil, such as Colavita Roasted Garlic Extra Virgin Olive Oil
  •  
    Preparation

    1. PREHEAT the oven to 450°F. Allow the pizza dough to come to room temperature (if it’s been in the refrigerator, this will take about an hour).

    2. DRIZZLE the pizza pan with olive oil, spreading it over the bottom and sides. Place the pizza dough into the pan and stretch it to the outer corners of the pan, creating a rectangle. If the dough stretches back, let it rest for 5 to 10 minutes and stretch again. Once you’ve stretched the dough, allow it to rest for 10 minutes until slightly puffed.

    3. DRIZZLE the top of the dough with a little olive oil and place the pan with the dough in the oven. Bake for 6 minutes. This is called par-baking and will ensure a non-soggy pizza crust.

    4. REMOVE the pan from the oven. Place the brick cheese in between the sides of the pizza and the sides of the pan. Don’t be afraid to really fill the spaces with cheese. This will give your pizza a truly crispy and cheesy edge. Sprinkle any remaining cheese over the top of the pizza.

    5. SPRINKLE the mozzarella cheese on top of the pizza. Put the pan back in the oven and bake for 15 minutes, rotating the pan halfway through the baking process. The cheese should be bubbling and golden brown. Remove the pan from the oven.

    6. SPOON the crushed tomatoes over the top of the cheese. Sprinkle the Pecorino Romano cheese and the oregano over the top of the tomatoes. Return the pan to the oven and bake for just 2 more minutes

    7. REMOVE the pan from the oven and allow it to rest for 2-5 minutes. Chisel the pizza from the pan using a spatula, and slide it onto a cutting board.

    8. DRIZZLE with garlic EVOO, if desired, cut into squares and serve.

     
    THE YEAR IN PIZZA HOLIDAYS

    Whether you get takeout pizza or make your own, mark your calendars for:

  • JANUARY: National Pizza Week, beginning the second Sunday in January
  • FEBRUARY: Great American Pizza Bake, beginning the second week in February, a week where you’re encouraged to not only consume pizza, but to try your hand in making it
  • FEBRUARY: National Pizza Day(a.k.a. National Pizza Pie Day), February 9th
  • APRIL: National Deep Dish Pizza Day, April 5th
  • MAY: National Pizza Party Day, third Wednesday
  • JUNE: Pizza Margherita Day, June 11th
  • SEPTEMBER: National Cheese Pizza Day>, September 5th
  • SEPTEMBER: National Pepperoni Pizza Day, September 20th
  • OCTOBER: National Pizza Month
  • OCTOBER: International Beer and Pizza Day, October 9th
  • OCTOBER: National Sausage Pizza Day, October 11th
  • NOVEMBER: National Pizza With Everything Except Anchovies Day, November 12th
  •  


    Detroit Style Pizza Recipe
    [1] Detroit Pizza. The recipe is below (photo © Colavita).

    A Brick Of Brick Cheese
    [2] Brick cheese (photo © Wisconsin Dairy).

    Detroit Pizza Side View Of The High Crust
    [3] A key feature of Detroit Pizza is the high, crunchy crust (photo © Joyride Pizza).

    Detroit Style Pizza Recipe With Bacon & Onions
    [4] Detroit Pizza with bacon and onions (photo © Detroit Style Pizza Co.).

    Detroit Pizza With Vegetable Toppings
    [5] Detroit Pizza with lots of veggies (photos #5 and #6 © Joyride Pizza).

    Detroit Pizza With Peppadews
    [6] Peppadews, fennel, red onion, and lots of grated Parmesan?

    Detroit Pizza With Pepperoni
    [7] America’s most popular pizza topping: pepperoni (photo © Jet’s Detroit Style Pizza)


    CHECK OUT WHAT’S HAPPENING ON OUR HOME PAGE, THENIBBLE.COM.


    Comments off

    Macadamia Nut Fudge Recipe For National Macadamia Nut Day

    Macadamia Nut Fudge Recipe
    [1] Easy-to-make chocolate macadamia fudge (photo © Taste of Home).

    Macadamia Nuts In Bowl
    [2] Macadamia nuts shelled.

    Macadamia Nuts In Shell
    [3] Macadamia nuts in the shell.

    Bar Of Baker's German's Chocolate
    [4] Baker’s German’s Sweet Chocolate. This sweeter variety of baking chocolate was created in 1852 by Sam German, an Englishman who worked in the U.S. for Walter Baker & Company. The sweet chocolate gave its name to German Chocolate Cake. German’s Sweet Chocolate has nothing to do with Germany (photo © Kraft Heinz Foods).


    We just whipped up an easy batch of macadamia nut fudge for National Macadamia Nut Day, September 4th. The recipe is from Vicki Fioranelli of Cleveland, Mississippi, with thanks to Taste Of Home which shared the recipe with us.

    > The history of macadamia nuts.

    > The history of fudge.
     
     
    RECIPE: EASY MACADAMIA NUT FUDGE RECIPE

     
    Ingredients

  • 2 teaspoons plus 1/2 cup butter, divided
  • 4-1/2 cups sugar
  • 1 can (12 ounces) evaporated milk
  • 3 cups chopped macadamia nuts, divided
  • 12 ounces German sweet chocolate, chopped
  • 1 package (12 ounces) semisweet chocolate chips
  • 1 jar (7 ounces) marshmallow creme
  • 2 teaspoons vanilla extract
  • Optional: 1/2 teaspoon salt*
  •  
    Preparation

    1. LINE two 9-inch-square pans with foil; drape some of the foil over two opposite sides to use as “handles” later. Butter the foil with 2 teaspoons of butter. Set aside.

    2. COMBINE the sugar, milk, and remaining butter in a large, heavy saucepan. Bring to a gentle boil. Cook for 5 minutes, stirring constantly.

    3. REMOVE from the heat; stir in 2 cups of the nuts, the chopped chocolate, chocolate chips, marshmallow creme, vanilla extract, and, if desired, the salt.

    4. POUR the fudge into the prepared pans. Sprinkle the remaining nuts over the top and press in lightly. Refrigerate until firm.

    5. TO REMOVE: Using the foil, lift the fudge out of the pans. Discard the foil. Cut the fudge into 1-inch squares. Store in an airtight container.

    Nutrition Facts For 1 Piece: 72 calories, 4g fat (1g saturated fat), 2mg cholesterol, 14mg sodium, 10g carbohydrate (9g sugars, 0 fiber), 1g protein.
     
     
    20 MORE MACADAMIA NUT RECIPES

    Savory Recipes

  • Cheesecake Factory Luau Salad
  • Dukkah Australian Spice Blend For Dip
  • Fish Fillets With Macadamia Butter
  • Fish Teriyaki Bowl
  • Hawaiian Salsa
  • Macadamia Cilantro Pesto
  • Macadamia-Crusted Fish
  • Macadamia Pesto Mix & Match
  • Pineapple Mango Chicken With Macadamia Rice
  • Poached Pears On Frisée With Macadamia Crusted Buttermilk Blue Affinée
  •  
     
    Sweet Recipes

  • Brown Sugar Macadamia Chocolate Chunk Cookies
  • Chocolate Caramel Shortbread With Sea Salt
  • Chocolate-Covered Nuts
  • Chunky Oatmeal Macadamia Chocolate Chip Cookies With Coconut
  • Cranberry-Macadamia Bars
  • Grilled Pineapple Ice Cream Sundae
  • Hummingbird Coffee Cake
  • Island Sea Turtles
  • Piña Colada Mousse
  • Piña Colada Pizza
  •  
    ________________

    *Salt accentuates sweetness and suppresses bitterness. Just a touch brings out the flavor of chocolate and other foods.


    CHECK OUT WHAT’S HAPPENING ON OUR HOME PAGE, THENIBBLE.COM.


    Comments off

    Vegan Bacon Recipe, Made From Shiitake Mushrooms

    We love bacon, but not the nitrates and nitrates*, salts commonly used to cure meat. So we tried vegan bacon, which doesn’t include either.

    We’ve enjoyed some tasty vegan bacon like Hooray Bacon, which is based on shiitake mushrooms.

    But our colleague Hannah Kaminsky created her own recipe for shiitake-based bacon and has shared it with us.

    “Crispy, caramelized shiitake caps retain a hearty, chewy bite after slowly roasting the oven,” she says. “Infused with richly savory, smoky flavors, shiitake mushrooms make even better bacon than meat.”

    “Unlike conventional options, there’s no cholesterol, very little fat, plenty of fiber, and zero cruelty.”

    The first Saturday in September is International Bacon Day, and we spent just 10 minutes prepping the ingredients.

    Then comes the soak: The dehydrated shiitakes soak in the broth for 8 hours to 24 hours or longer (the longer the soak, the better the flavor).

    So if you want shiitake bacon and eggs or a lunch of SBLT (shiitake bacon, lettuce, and tomato) or a “bacon cheeseburger,” start the night before.

    > The different types of mushrooms.

    > The history of mushrooms.
     
     
    RECIPE: VEGAN SHIITAKE MUSHROOM BACON

    Hannah prefers the Sugimoto brand of dried shiitake mushrooms, which are naturally grown in Japan’s forests (you can see a video on the website). You can find the brand in Asian markets or online.
     
    Ingredients

  • 2 cups water
  • 1/4 cup soy sauce
  • 2 tablespoons olive oil
  • 1 tablespoon liquid smoke
  • 1 tablespoon maple syrup
  • 1/2 teaspoon smoked paprika
  • 1/4 teaspoon instant coffee powder
  • 1/4 teaspoon freshly ground black pepper
  • 1 (2.47-Ounce) package dried Sugimoto koshin† shiitake mushrooms (or substitute)
  •  
    Preparation

    1. WHISK together the water, soy sauce, olive oil, liquid smoke, maple syrup, paprika, instant coffee, and black pepper in a medium bowl. Add the dried shiitakes and stir thoroughly to combine.

    2. TAMP down a piece of plastic wrap directly on the surface, to cover and keep all the mushrooms submerged in the liquid. Refrigerate and let them soak for at least 8 hours. Longer is better; 24 hours would be ideal.

    3. REMOVE the plastic and transfer the contents—mushrooms and liquid together—to a small saucepan (photo #3). Warm over medium heat until just boiling. Let rest until cool. Once the mushrooms are fully hydrated and cool enough to handle…

    4. PREHEAT the oven to 300°F and line a sheet pan with parchment paper. Remove the shiitakes from the brine, remove the stems and save them for another recipe. You can also save the brine as a poaching liquid. Or heat it as hot broth.

    5. SLICE the caps into 1-cm wide strips. Spread them into as even a layer as possible on the baking sheet, without any pieces overlapping. Bake for about 1 hour and 15 minutes, carefully flipping the strips every 15 minutes or so to keep the entire batch cooking evenly.

    6. COOK until the mushrooms are dry to the touch and highly aromatic. Straight out of the oven, the mushrooms will still be slightly soft to the touch but will crisp up nicely once cool. Let cool completely.

    7. STORE at room temperature in an airtight container, for up to two weeks.
     
     
    HOW TO USE SHIITAKE BACON

    You can keep them in short strips, roughly chop them into bacon bits, or grind them into a fine powder to use as a savory sprinkle. Just a few of Hannah’s favorite ways to use shiitake bacon include:

  • Avocado toast (photo #1)
  • Baked potatoes
  • Bloody Marys
  • BLT and other sandwiches
  • Broccoli and cheese soup
  • Burgers
  • Charcuterie boards
  • Cheese balls
  • Eggs and tofu scrambles
  • Mac and cheese
  • Nibbling
  • Pizza
  • Popcorn
  • Salads (photo #2)
  •  

    Vegan Shiitake Bacon On Avocado Toast
    [1] (recipe and photos #1 through #4 © Hannah Kaminsky | Bittersweet Blog).

    Vegan Shiitake Bacon On A Salad
    [2] Toss on a salad, top a burger or sandwich..

    Rehydrated Shiitake Mushrooms
    [3] The dried mushrooms are reconstituted in a flavorful broth that imparts the taste of bacon.

    Vegan Shiitake Bacon, Baked
    [4] Right out of the oven.

    Sugimoto Brand Dried Shiitake Mushrooms
    [5] Sugimoto brand dried shiitake mushrooms. You can find them on Amazon (photo © Sugimoto).

     
    ________________

    *While nitrates and nitrites are not themselves carcinogenic, they have the potential to react with other compounds to form carcinogens, during the processing of food [source].

    †This particular shiitake mushroom is called “koshin” and is picked after the cap of the mushroom blooms into the umbrella.


    CHECK OUT WHAT’S HAPPENING ON OUR HOME PAGE, THENIBBLE.COM.


    Comments off

    The Nibble Webzine Of Food Adventures
    RSS
    Follow by Email


    © Copyright 2005-2024 Lifestyle Direct, Inc. All rights reserved. All images are copyrighted to their respective owners.