THE NIBBLE BLOG: Products, Recipes & Trends In Specialty Foods


Also visit our main website, TheNibble.com.


RECIPE: Slow Cooked Pork Tacos

Celebrate National taco Day, October 4th, with this recipe from Melissa’s The Great Pepper Cookbook.

Prep time is 30 minutes, total time is 3 hours, 50 minutes.

The recipe is made in a Dutch oven, but you can easily make it in a slow cooker.

RECIPE: SLOW-COOKED PORK TACOS

Ingredients For 12 One-Cup Servings

  • 3 dried pasilla negro chile peppers, stems and seeds removed
  • 5 dried New Mexico chile peppers, stems and seeds removed
  • 5 dried de arbol chile peppers, stems and seeds removed
  • 1 tablespoon canola oil
  • ¼ onion, thinly sliced (about ¼ cup)
  • 2 garlic cloves, coarsely chopped
  • ½ cup beef broth
  • 1 teaspoon lemon juice
  • 4 teaspoons ground cayenne
  • 2 teaspoons chili powder
  • 1 teaspoon salt
  • ½ teaspoon ground cumin
  • 6 pounds bone-in pork butt roast
  •  
    Basic Garnishes

  • Avocado slices
  • Chopped fresh cilantro
  • Fresh salsa
  • Shredded lettuce
  • Red onion, chopped
  • Sour cream
  • Tortillas and/or taco shells
  •  
    More Garnishes
     

  • Jalapeno, sliced
  • Jicama, shredded
  • Lime wedges
  • Radishes, sliced
  •  
    Preparation

      Slow_Roasted_Pork_tacos-melissas-230r
    [1] Slow-cooked pork tacos (photo courtesy Melissa’s).

    Pork Butt
    [2] Pork butt, also called Boston butt (photo courtesy Good Eggs).

    Pork Shoulder
    [3] Pork shoulder, also called picnic shoulder (photo courtesy Good Eggs).

     
    1. BRING 6 cups water just to boiling in a large saucepan. Add the dried chiles and cook, stirring often, for 5 minutes. Drain the chiles over a bowl and discard 2 cups of the chile water. Retain the remaining water and chiles.

    2. HEAT the oil in a large straight-sided sauté pan over medium-high heat. Add the onion and garlic; cook, stirring often, for 5 minutes.

    3. COMBINE the chiles and their water in a large bowl with the onion mixture, broth and next 5 ingredients (through cumin). Place half of chile mixture in a blender, taking special care: The hot food expands rapidly, causing a risk of scalding.

    To be safe, before blending remove the center piece of the blender lid to allow the steam to escape, secure the lid on the blender, and place a towel over opening in the lid to avoid splatters. Process until smooth. Repeat the procedure with the remaining chile mixture.

    4. HEAT a Dutch oven over high heat. Add the pork, fat side down; cook until browned, turning several times, about 10 minutes. Stir in the chile mixture, and bring just to boiling. Reduce the heat and partially cover. Simmer until the pork easily pulls apart with a fork, about 3 to 4 hours.

    5. REMOVE the pork from the heat and let it cool until it can be handled, about 30 minutes. Shred the pork and serve with the fixings with warm tortillas.
     
     
    Here’s the history of tacos.
     
     
    WHAT IS PORK BUTT?

    Pork butt has nothing to do with the butt—the rear end or behind—of the pig. The rear of the pig becomes ham (including prosciutto and serrano hams).

    Instead, pork butt is a cut from the shoulder of the pig. But it isn’t the same as pork shoulder.

  • Pork butt, also called Boston butt [photo #2], comes from the thicker section of the shoulder. The meat is more intensely marbled, giving it a richer mouthfeel. It is easy to shred when slowly-cooked, and is popular for barbecue and shredded pork.
  • Pork Butt got its name in Colonial times. As less popular cuts of the pig, the butt and shoulder were packed into casks or barrels, also called butts, to ship out. The name “Boston butt” caught on.
  • Pork shoulder, also called picnic shoulder [photo #3], is from the thinner end of the shoulder. The cut is used for meat that is cooked to hold its shape, and will be sliced or chopped.
  •   

    Comments off

    FOOD HOLIDAY: National Taco Day

    Lorena Garcia's New Taco Classics
    Mexican food lovers who like to cook should pick up a copy of Chef Garcia’s book. You can read an excerpt of it at Google Books.
     

    On October 4th, National Taco Day, you can:

  • Buy some tacos.
  • Make some tacos.
  • Expand your taco horizons with a book on tacos.
  •  
    In Lorena Garcia’s New Taco Classics, the Latin American chef covers approaches to tacos and other street foods of her native region: arepa, empanadas, tamales.

    “While I take inspiration from classic renditions of favorite Latin American dishes,” says Chef Garcia, “I make them my own by experimenting with savory and sweet notes, with contrasting elements, with flavors that brazenly cross culinary and geographical borders.”

    She inspires you to think outside the taco shell—and inside, too.

    You can see a partial galley of the book here.

    Here’s the history of the taco—invented by silver miners in the 18th century—plus THE NIBBLE’s own suggestions for thinking outside the shell.


    Comments off

    RECIPE: Pumpkin Dinner Rolls

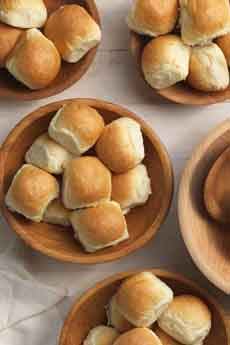
    Got rolls? Here’s the recipe for these typical soft, white dinner rolls from King Arthur Flour.

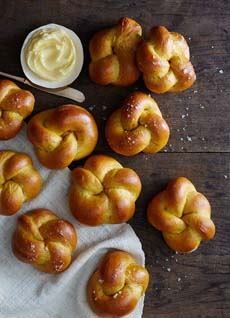
    For harvest season, add these slightly sweet, light-gold rolls from King Arthur Flour to your bread basket for a tasty change of pace

    And why just dinner? Enjoy them at breakfast and lunch, too.

    WHAT’S A DINNER ROLL?

    There are many different types of rolls, based on regional, national and other preferences–from the crisp French roll with a crisp crust like a baguette, to the hero roll, long and relatively soft for sandwiches.

    The textbook dinner roll is a yeast roll with a soft, pull-apart interior and browned and a crisped exterior. The soft crumb enables sauces and gravies to be sopped up readily. Others enjoy them with butter.

    Here’s an explanation of the differences, and recipes for nine types of dinner rolls, from King Arthur Flour.

    RECIPE: PUMPKIN DINNER ROLLS

    Prep time is 15 minutes to 25 minutes. Bake time is 24-26 minutes.

    Ingredients For 24 Rolls

  • 2-1/2 teaspoons instant yeast
  • 1/4 cup brown sugar
  • 1/2 cup lukewarm milk
  • 4 tablespoons softened butter
  • 2 teaspoons salt
  • 2 teaspoons pumpkin pie spice; or substitute 1-1/4 teaspoons ground cinnamon + 3/8 teaspoon ground cloves + 3/8 teaspoon ground ginger
  • 2 large eggs
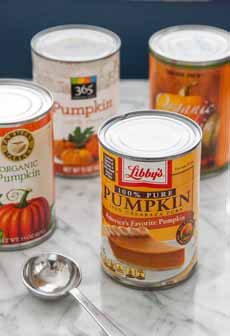
  • 3/4 cup canned pumpkin purée
  • 4 cups unbleached all-purpose flour
  •  
    Preparation

    1. COMBINE all dough ingredients in a large bowl, mix and knead into a soft, smooth dough. You can use your hands, a stand mixer or a bread machine set on the dough cycle.

    2. PLACE the dough in a lightly greased bowl and allow it to rise for 60 to 75 minutes, until it’s puffy (though not necessarily doubled in bulk). Gently deflate the dough, and transfer it to a lightly greased work surface.

    3. DIVIDE the dough into 24 equal pieces. Round each piece into a smooth ball.

    4. LIGHTLY GREASE two 9-inch round cake pans. Space 12 rolls in each pan. Alternatively, you can place all 24 rolls on a 9″ x 13″ sheet or baking pan.

    5. COVER the pans and allow the rolls to rise until they’re crowded against one another and quite puffy, about 1-1/2 to 2 hours. Towards the end of the rising time, preheat the oven to 350°F.

    6. UNCOVER the rolls and bake them for about 20 minutes. Tent lightly with aluminum foil and bake an additional 5 minutes or so, until the edges of the center bun spring back lightly when you touch it. A digital thermometer inserted into the middle of a center roll should register at least 190°F.

    7. REMOVE the rolls from the oven; brush with melted butter if desired. After a couple of minutes, turn the rolls out of the pan onto a cooling rack.

    8. SERVE warm. Store completely cooled rolls, well-wrapped, at room temperature for several days; freeze for longer storage.

      Pumpkin Dinner Rolls
    [1] For pumpkin season: pumpkin dinner rolls (photo courtesy King Arthur Flour).

    Classic Dinner Rolls
    [2] Classic dinner rolls. Do you know the 9 different types of dinner rolls? (photo courtesy King Arthur Flour).

    Pumpkin Puree

    [3] Stock up on pumpkin purée: We have a month’s worth of non-pie recipes for it. Here’s more about pumpkin purée from The Kitchn.


    Comments off

    RECIPE: For Taco Tuesdays, A Taco Ring

    Taco Ring Recipe
    [1] Make a taco ring for Taco Tuesdays (photo courtesy Pampered Chef).

    Tex-Mex Seasoning

    [2] Buy Tex-Mex or taco seasoning, or make your own (recipe below—photo courtesy Pampered Chef.


    October 4th is National Taco Day, but here’s some added fun for any Taco Tuesday: a taco ring, developed by Pampered Chef. You can save time with store-bought salsa fresca or pico de gallo.

    For those who will miss a crispy corn taco shell: Serve a few tortilla chips with the salsa.
     
     
    RECIPE #1: TURKEY TACO RING

    Ingredients For 8 Servings (2 Rolls Per Person)

  • 1 small red onion, divided
  • 1-1/4 pounds 93% lean ground turkey
  • 2-1/2 tablespoons Tex-Mex rub (substitute taco seasoning or use the recipe below)
  • 6 ounces cheddar cheese (1-1/4 cups), grated
  • 2 packages (8 ounces each) reduced-fat refrigerated crescent rolls
  • 1 egg white, lightly beaten
  •  
    For The Salsa & Toppings

  • 1 small jalapeño pepper, seeded
  • 1/2 cup loosely packed fresh cilantro
  • 1 tablespoon fresh lime juice
  • 1 garlic clove, pressed
  • 1/4 teaspoon salt
  • 1 cup grape tomatoes
  • 2 cups thinly sliced romaine lettuce
  • Optional
  • Optional: bell pepper to hold the salsa, or for decoration (we used it to hold the sour cream, which is neater to scoop out than salsa)
  •  

     
    Preparation

    1. PREHEAT the oven to 375°F (190°C). Cut the onion in half and chop half of it (Pampered Chef used its Food Chopper). Set aside the remaining onion for the salsa.

    2. COOK the onion, turkey and spice rub in a 12-inch skillet over medium heat, for 10-12 minutes or until the turkey is no longer pink. Break the turkey into crumbles. Drain, if necessary, and transfer the turkey mixture to a bowl. Meanwhile…

    3. GRATE cheese. Stir 1 cup of the cheese into the turkey mixture.

    4. UNROLL the crescent dough and separate it into 16 triangles. Arrange the triangles, slightly overlapping, in a circle in a round baking pan (Pampered Chef used its White Large Round Stone with Handles. The wide ends of the crescents should be 4 inches from the edge of the stone or pan; the points will extend off of the edge of the stone/pan. Roll the wide ends of the dough toward the center to create a 5-inch opening. To create the opening, place the storage container for the Biscuit Cutters in the center of the stone.

    5. SCOOP the filling evenly over the dough. Bring the points of the triangles up over the filling and tuck them under the dough at the center, to form a ring. Brush the dough with the egg white. Sprinkle with the remaining cheese. Bake for 20-25 minutes or until golden brown.

    6. MAKE the salsa while the ring cooks. Cut the onion and jalapeño into chunks. Chop the remaining onion, jalapeño, cilantro, lime juice, garlic, and salt until coarsely chopped (Pampered Chef used its Manual Food Processor; we used a wooden bowl and a mezzaluna). Add the tomatoes; process until the mixture reaches the consistency of salsa.

    7. PREPARE the bell pepper if using it as a container. Otherwise, leave it whole as a decorative element, and use it in a subsequent meal. To prepare: Slice off the top, remove the seeds and white ribs and, if you like, use a paring knife to create the V-shaped rim.

    8. REMOVE the stone/pan from the oven when the ring is golden brown. Serve with salsa, shredded lettuce, and optional sour cream.

    Serve salsa in a bell pepper cup! Cut the top off of the pepper with V-Shape Cutter; scoop out seeds and veins with Scoop Loop™. Fill with salsa. Place in the center of Taco Ring and surround with lettuce
     
     
    RECIPE #2: TEX-MEX RUB & SEASONING

    Pampered Chef and other brands sell pre-mixed rubs and taco seasonings, but you can make your own by combining:

  • 1/2 teaspoon chili powder
  • 1-1/2 teaspoons ground cumin (or toast and grind the seeds from scratch)
  • 1-1/2 teaspoons minced garlic
  • 3/4 teaspoons salt
  • 1-1/2 teaspoons oregano
  • 1/8 teaspoon cayenne
  • Dash cinnamon
  •  
    Any extra will keep in a tightly-closed jar for a few weeks.


    CHECK OUT WHAT’S HAPPENING ON OUR HOME PAGE, THENIBBLE.COM.


    Comments off

    TIP OF THE DAY: A Perfect Fish Dinner

    We’re big fans of one-pan dinners: protein and veggies baked together in a 13” x 8” sheet pan*.

    Sheet pan dinners mean you don’t have to worry about coordinating the cooking of sides and main: They all bake together. For people who are timid about cooking fish, baking is as sure-fire as it gets.

    Here’s an easy recipe from Good Eggs.

    Dinner is ready in 15-20 minutes. And the fish comes out perfectly moist and tender, every time.

    Pick a fish and two vegetables, and a seasoning of choice. Vary the elements and you can use the recipe template over and over again.

    Good Eggs recommends a milder white fish like cod or halibut with this recipe. It will take on the flavors of what you cook the condiment.

    Varieties that are widely available include

  • Bass
  • Catfish
  • Cod
  • Grouper
  • Halibut
  • Seabass
  • Sole
  • Snapper
  • Tilapia
  • Trout
  •  
    Although it’s pink, we’d add Arctic char to this group. The flavor is mild enough for the recipe.

    We subscribe to the axiom that the best fish is the freshest fish. Plan to cook the fish the night or night after you buy it.

    Pick a peak-season vegetable that doesn’t take too long to roast: broccolini or leafy greens like chard, collards, kale, mustard greens. Make one veg green, and add another vegetable if you like.

    If you want root vegetables, cut them into thin slices, or roast thicker slices for an extra 10 minutes before putting the fish in the pan. You can also mix the vegetables.
     
     
    RECIPE: ONE-PAN DINNER WITH BAKED FISH FILLETS

    Ingredients Per Serving

  • 4 to 6 ounces fish fillets
  • Salt
  • 6+ ounces vegetable(s)
  • Condiment of choice: Dijon mustard, mayonnaise (plain or flavored*), teriyaki sauce – or-
  • Lemon, lime or orange slices to cover the tops of the fish
  •  
    Preparation

    1. PREHEAT the oven to 500°F, Coat a sheet pan or baking dish with some oil. Sprinkle the fillets with a pinch of salt on both sides, and arrange on the baking sheet.

    2. ARRANGE the vegetables around the fish fillets, drizzle with a bit of oil and sprinkle with salt and pepper.

    3. SPREAD the condiment or citrus over the fillets and place the pan in the oven.

    4. BAKE 8–10 minutes, or until the fish is tender, and breaks easily when you flake with a fork. If the fish finishes before the vegetables, transfer the fish to a plate until the vegetables are done.
     
    TIP: You don’t need to rinse fish, chicken or any other protein before cooking. Not only does does rising fail to get rid of all the bacteria; it spreads bacteria into the sink. The heat of cooking kills the bacteria.

      Raw Cod Fillets Sheet Pan Dinner
    [1] Ready to bake: a one-pan cod dinner with carrots and chard (photo courtesy Good Eggs).

    One Pan Baked Salmon Dinner
    [2] For salmon lovers: salmon teriyaki with green beans and carrots. Here’s the recipe from Damn Delicious.

    One Pan Baked Chicken Dinner
    [3] Prefer chicken? Try this rosemary chicken recipe with green beans and potatoes, from Eat Yourself Skinny .

     
    Just be sure to thoroughly wash the cutting board and utensils that come into contact with the raw protein.
    ________________

    *You can make your own flavored mayonnaise, simply by adding a spoonful (to taste) of whatever you like: chipotle, curry, garlic, horseradish, tomato paste, etc.
    ________________
     
     
    ABOUT SHEET PANS

    A sheet pan, also called a baking sheet or baking tray, is a flat, rectangular metal baking pan. It is usually aluminum or stainless steel.

    It is typically used for baking rolls, pastries and flat baked goods such as cookies, sheet cakes, swiss rolls (jelly rolls) and pizzas.

    Sheet pans comprise a group of baking pans with a variety of edge styles—curled rim (lip), rimless and professional variations like open bead and wire in rim. Professional chefs can further choose from non-perforated, fully perforated and partially perforated, which help make the baked good doughy or crispy.

    Some sheet pans have handles to aid in placing the pan in the oven and removing it.

  • A full-sheet pan is 18”x26”
  • A half-sheet pan is 18” x 13”
  • A quarter-sheet pan is 13” x 9.5”
  • Am eighth-sheet pan is 9.5” x 6.5”
  •  
    Rims are 1″ high.

    The half sheet is the pan most commonly available in supermarkets. There is also a two-thirds sheet or home ovens that is 16” x 22” or 15” X 21”.

    While rimless pans are fine for cookies, pizza and rolls, a rim is needed for recipes like the one above, so that juices from the food don’t drip into the oven.

    Buy a light-colored pan with a dull finish: It will absorb and conduct heat evenly. Dark metal pans (with coating) or glass pans necessitate reducing the oven temperature by 25° and checking for doneness early.

    If you’re tempted to buy a dark pan for its nonstick surface and easy clean-up, use parchment paper on a light pan instead.
      

    Comments off

    The Nibble Webzine Of Food Adventures
    RSS
    Follow by Email


    © Copyright 2005-2024 Lifestyle Direct, Inc. All rights reserved. All images are copyrighted to their respective owners.