THE NIBBLE BLOG: Products, Recipes & Trends In Specialty Foods


Also visit our main website, TheNibble.com.


TIP OF THE DAY: Easy Ice Cream Or Frozen Yogurt Pie

It’s easy to scoop out ice cream or frozen yogurt for a quick dessert. But it’s almost as easy to turn that frozen pint into a dazzling pie (photo #1).

It’s as easy as buying a cookie crust and a couple of pints of your frozen dessert of choice.

In the recipe below, we provide a simple way to make your own crust: It’s just cookies and butter.

If you want to make your own ice cream or frozen yogurt, we applaud you. We haven’t yet dragged our ice cream maker out of the closet.

National Ice Cream Pie Day is August 18th. National Ice Cream Day is the third Sunday in July. National pie day is January 23rd.
 
> The history of ice cream.

> The history of pie.
 
 
ICE CREAM PIE VARIATIONS

What makes this frozen pie special is the garnish of berries. You can use stone fruits (nectarines, peaches, etc.) but the berries provide more color and easier slicing.

  • Fruit: The recipe in the photo added the fruit before freezing, and a white frost dusts the fruits. We prefer the look and taste of adding the fruit before serving, but that requires extra work at the last moment. The choice is yours.
  • Layers: We created a “surprise” pie by creating two layers: vanilla on the top (to better show off the fruit); strawberry on the bottom.
  • Rim: You can create a nut or seed rim, similar to the one in the photo. Or, you can substitute more cookie crumbs or anything else. We once used Corn Flakes!
  •  
     
    RECIPE: ICE CREAM OR FROZEN YOGURT PIE

    Ingredients For The Crust

  • 1-1/2 cups graham cracker or cookie crumbs
  • 1/4 cup butter*, melted
  •  
    For The Filling

  • 2 pints of ice cream or frozen yogurt, flavors divided if desired
  •  
    For The Garnish

  • Berries of choice (the photo shows blackberries, blueberries, strawberries, and raspberries)
  • Optional: 1/3 cup chopped nuts for rim
  •  
    Preparation

    1. PREPARE the crust. Crush the graham crackers or other cookies in a plastic bag with a rolling pin. Mix the crumbs with the melted butter and press onto the bottom of the pie plate.

      Ice Cream Pie
    [1] The photo shows a nutritious pie crust made of brown rice (photo © Bos Kitchen). You can also use seeds: Here’s a recipe. We went with a cookie crumb crust.

    Graham Crackers Box
    [2] Our favorite graham crackers are from Trader Joe’s. They’re so superior in flavor to supermarket brands. One bite will convince you (photo © The New Lighter Life).

    Mixed Berries
    [3] A bounty of juicy summer berries (photo © Green Giant Fresh).

     
    2. SOFTEN the ice cream or frozen yogurt on the counter, while the pie crust is hardening, for 10-15 minutes.

    3. SPREAD the ice cream/yogurt with a spatula into the pie crust. If using two different flavors, let the bottom layer harden in the freezer for 10 minutes or more. It will prevent the top flavor from “swirling in” when you add it.

    4. ADD the nut rim. Use a dinner knife blade or a small spoon to place the nuts evenly.

    5. ADD the fruit to freeze with the pie; or reserve it until you are ready to serve, for a fresh fruit garnish. Either way, freeze the pie until ready to serve.
     
    ________________

    *Unsalted butter is the norm, but you can use salted butter if you like the sweet-and-salty flavor profile.


    CHECK OUT WHAT’S HAPPENING ON OUR HOME PAGE, THENIBBLE.COM.


    Comments off

    Homemade Bubble Tea & Bubble Coffee Recipe

    Bubble Tea
    [1] Bubble tea; bubble coffee looks pretty much the same (photo © Twinings).

    Strawberry Bubble Tea
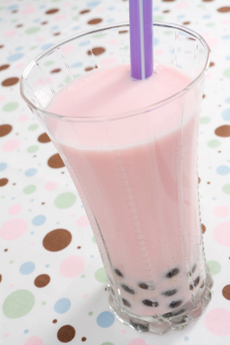
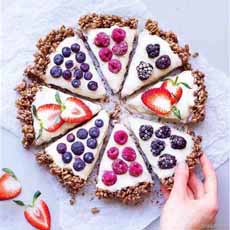
    [2] Strawberry “bubble tea.” The fruit drinks are a “freeze” made in a blender with tea, fresh fruit, simple syrup, ice and tapioca balls (photo © Dream Big Photos | IST).

    Matcha Bubble Tea
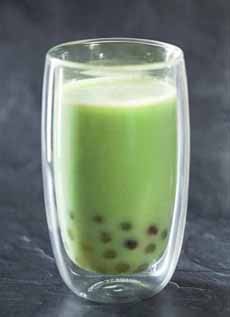
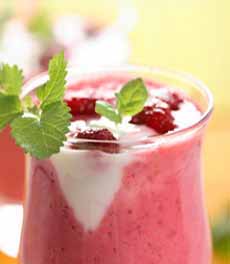
    [3] Matcha bubble tea. Here’s the recipe from Two Sleevers (photo © Two Sleevers).

    Boba Pearls[/caption]
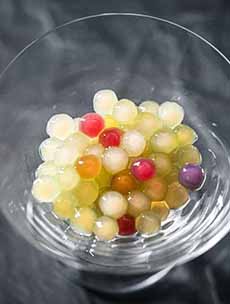
    [4] Tapioca pearls, called boba in Japan (photo © Two Sleevers).


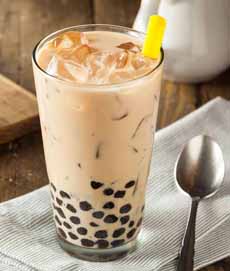
    [5] Cold brew coffee with boba. Here’s the recipe from The Movement Menu (photo © The Movement Menu).


    [6] Birthday bubble tea with boba—and cake! Here’s the recipe (photo © Bubblehead 17 | Food.com).


    Originally found only in Asia and in Chinatowns in some cities in the U.S. (and elsewhere), bubble tea emporiums have been popping up nationwide over the past decade (photo #1).

    They sell variations of sweet, milky black, or green tea made with milk, non-dairy creamer, or plant-based milk, in “original” or a choice of flavors.

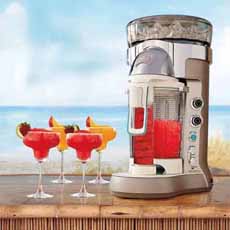
    There are also fruit teas, which blend fruit and tea into a colorful drink (photo #2).

    And now, there’s bubble coffee, too.

    > The history of bubble tea is below.
     
     
    THE FUN OF BUBBLE TEA & BUBBLE COFFEE

    At the bottom of each are large, chewy tapioca boba or “bubbles.” There are also alternative choices, popular in Asia, that include agar jelly, fruit jelly and grass jelly (like Jell-O).

    The customer can choose a regular, looking like iced tea or coffee, or an ice-blended version that is frozen and then put into a blender, creating a slush.

    The bubbles/boba/pearls are sucked up through tapioca pearls through a wide straw.

    And now, today’s tip: You don’t have to seek out a bubble tea shop. You can make your own “original” version at home.

    A benefit for those cutting back on sugar: You can use noncaloric sweetener or drink it without sweetener; although sweetness is part of the fun.

    You can buy the boba and the straws in Asian markets or on Amazon. The boba are available in black, white, and colors.

    If you can’t find fat straws, you can scoop out the pearls with an iced tea [long] spoon.

    And…you can also make bubble coffee! The recipes follow, along with the history of bubble tea.

    April 30th is National Bubble Tea Day.
     
     
    RECIPE: BUBBLE TEA OR COFFEE

    Ingredients For 2 Servings

  • 1 cup tapioca pearls
  • 4 cups freshly brewed strong black or green tea, or coffee
  • 1 tablespoon sugar or honey, equivalent noncaloric sweetener, or 1/2 tablespoon agave
  • Ice cubes, for shaking
  • 1/2 cup whole milk or milk of choice
  •  
    Preparation

    1. SOAK the tapioca pearls to reconstitute, according to the package instructions. Once fully softened, drain them and set aside. Tapioca pearls are best used within a few hours of reconstituting.

    2. BREW the tea or coffee. is still hot, add the sugar and stir to dissolve completely. Let cool and then refrigerate until completely chilled, about 2 hours.

    3. TO SERVE: Place the tapioca pearls at the bottom of 2 glasses. Use a cocktail shaker to shake together the ice, milk, and tea. Strain into the cups and serve with a straw or spoon.

    Variations

  • Add a splash of pure vanilla extract to the milk (or use vanilla almond or soy milk).
  • Add a splash of dark rum, Irish cream or vanilla liqueur; for bubble coffee only, chocolate or coffee liqueur.
  • INSTANT POT FANS: Here’s the technique for Instant Pot Bubble Tea.
  •  
     
    THE HISTORY OF BUBBLE TEA

    Bubble tea is a sweet, cold, black, or green tea drink created in 1983. The history of bubble tea says that Mr. Liu Han-Chieh, proprietor of the Chun Shui Tang teahouse in Taichung, Taiwan, introduced tapioca pearls.

    Prior to then, tea was not served cold in Taiwan. Liu Han-Chieh actually got the idea when visiting Japan, where he saw coffee served cold. He began to serve iced tea.

    In 1988, his product development manager, Ms. Lin Hsiu Hui, was sitting in a staff meeting with a glass of iced Assam tea and a bowl of sweetened tapioca pudding called fen yuan. For fun, she poured the tapioca balls into her iced tea, and the rest is history.

    The new food fad was especially popular among school children, who liked the boba in cold, milky, flavored tea drinks. The teas became available in many flavors, made with flavored powders that give color to the drink.

    The large, chewy pearls are now made in gray-black, beige-white, and colors. The tapioca pearls look like bubbles, and earned the drink the name, “bubble tea.”

    Other names include black pearl tea, boba, boba drink, boba ice tea, boba nai cha, pearl ice tea, pearl milk tea, pearl shake, pearl tea drink, tapioca ball drink, zhen zhou nai cha, plus initials: BBT, PT and QQ (which means “chewy” in Chinese).

    When you make your own, you can pick a signature name (e.g., TBT for Tad’s Bubble Tea).

    Today, bubble tea shops serve a choice of tea (e.g., classic milk tea, jasmine milk tea, matcha, Mexican horchata, made of ground raw rice spiced with cinnamon), a choice of toppings (boba—tapioca balls), almond jelly or grass jelly (a gelatin similar in texture to Jell-O), sweet red beans and others.

    Customers can specify the sweetness level.

    Some shops even offer organic, soy, and almond milk, plus lactose-free cow’s milk. Some companies used powdered teas and milk, others fresh-brewed tea and whole milk.

    They all taste good!
     
     
    FOR MORE TYPES OF TEA, VISIT OUR TEA GLOSSARY.


    CHECK OUT WHAT’S HAPPENING ON OUR HOME PAGE, THENIBBLE.COM.


    Comments off

    RECIPE: Fortune Cookie Cocktail

    For National Fortune Cookie Day, July 20th, the perfect drink.

    Make it with vodka or rum: The choice is yours. Ganbei!
     
    RECIPE: FORTUNE COOKIE COCKTAIL

    Ingredients Per Drink

  • 2 tablespoons/1 ounce vanilla vodka (substitute plain vodka), rum or spiced rum
  • 2 tablespoons/1 ounce amaretto liqueur
  • 2 tablespoons/1 ounce Irish cream liqueur
  • 1/2 cup ice
  • Garnish: 1 fortune cookie
  • Optional garnish or rim: crushed fortune cookie crumbs
  •  
    Preparation

      Fortune Cookie Cocktail

    Good luck come with a Fortune Cookie Cocktail? (photo courtesy R A Sushi)

     
    1. PREPARE the rim, if using. You can use a small Martini glass, a Champagne coupe or whatever you have. Finely crush the crumbs and place in a saucer. Moisten the glass rim 1/4″ deep in a saucer or bowl of water; then twist in the crumbs to coat.

    2. PLACE all ingredients except garnish in a cocktail shaker. Shake for 60 seconds.

    3. POUR into the glass.

    4. GARNISH with the fortune cookie on the rim. If the cookie doesn’t lie well on the rim, serve it on the side. If you have extra fortune cookies, you can break them into smaller pieces and add a few to the center of the top as a garnish.


    Comments off

    FOOD HISTORY: The Lollipop

    Lollipops
    [1] Artisan lollipops from Quevanna.
    Fruit Design Lollipops
    [2] European lollipop art (photo courtesy Williams-Sonoma).

    Artisan Lollipops
    [3] Taking lollipops to the next level: art. From MolassesCandy.Blogspot.


    July 20th is National Lollipop Day.

    According to the National Confectioners Association, eating sugar from a stick likely dates to prehistoric man, who licked honey off the stick he used to scrape it from the beehive.

    The ancient Arabs, Chinese and Egyptians made fruit and nut confections candied in honey, which may also have been eaten from sticks, owing to the stickiness of the confection.

    What we think of as a lollipop may date to Europe in the Middle Ages, when sugar was boiled—creating hard candy—and formed onto sticks as treats for the wealthy. They were the only people who could afford sugar. For that reason, the confection didn’t cross over to the mainstream.

    By the 17th century, sugar was plentiful and affordable. In England, boiled sugar (hard candy) treats were popular. The word “lollipop” (originally spelled lollypop) first appears in print in 1784, although it did not always apply to hard candy on a stick.
     
    YANKEE INGENUITY: PATENTING THE NAME

    It took a while, but in the U.S., on October 13, 1931, the name “Lolly Pop” was officially registered by the U.S. Patent and Trademark Office to the Bradley Smith Company of New Haven.

    The company began to produce Lolly Pops in 1908, but it took years to convince the Patent Office to grant an exclusive right to the name.

    Though lollipop is a generic term today, George Smith of the Bradley Smith Company was the first to apply it to hard candy on a stick. He was inspired by the success of a local confection being produced in West Haven called Reynolds Taffy, a chocolate caramel taffy on a stick (the type now made by See’s Candies). The name itself, Lolly Pop, was reportedly inspired by that of a racehorse Smith had seen at a local fair.

    Unfortunately, the Patent Office uncovered the old English term, lollipop, from 1784, where it was described as “a hard sweetmeat, sometimes on a stick.” They refused Bradley Smith’s initial registration.

    The trademark was finally granted after the company proved that Lolly Pop was an original spelling and its first use. During the long registration battle, other producers used the name freely until the Bradley Smith Company won its patent.

    Over the years the term Lolly Pop, and its variant spelling Lollipop, became interchangeable; and so universally used that the trademark could not be maintained (source). (Now you understand “Kleenex Brand Tissues” and “Sanka Brand Coffee” (italics ours).
     
    HOW LOLLY POPS WERE MADE

    At the Bradley Smith Company, Lolly Pops were produced by cutting off a chunk of warm hard candy and pushing in a stick. This was all done by hand. In the process of inserting the stick, the candy was formed and slightly flattened out by the palm.

    Later, Max Buchmuller, a foreman at the company, invented and patented a machine to insert the sticks. The machine featured a continuous chain of split molds, which, when filled and closed, shaped the Lolly Pop. An automated plunger pushed the sticks into the candy.

     
    The Industrial Revolution had come to lollipops! The machines allowed the company to produce 125 pieces a minute. Mechanical improvements were made to keep up with demand, and pushed the production capacity to 750 Lolly Pops per minute.

    The first Lolly Pops sold for a penny. Bradley Smith distributed the sweets and around the world, shipping them everywhere from England to China (source).

    As lollipops evolved, they were made in shapes, embedded with flower designs (photo #3) or actual flowers, accented with gold leaf, inscribed with endearing expressions, and merged with other candies, like Tootsie Pops. Some artisan lollipops are raised to the level of art (photo #2).

    Whether you reach for art or a give-away lolly from the doctor’s office, enjoy National Lollipop Day!
     
     
    Watch the Chordettes sing the 1958 hit, “Lollipop.”
      

    Comments off

    RECIPE: Frozen Daiquirí For Dessert

    July 19th is National Daiquirí Day, honoring a rum drink conceived by a mining engineer on a hot Cuban evening in 1898.

    Here’s the history of the Daiquirí—named after the town in which it was created—as well as the original Daiquirí recipe.

    The Frozen Daiquirí never took off the way the Frozen Margarita has. While it can be made in a blender with ice like any frozen drink, it is more like granita than the velvety-smooth purée that pours forth from a frozen drink machine.

    Nor, do we have room in our small apartment to store a frozen drink machine. (But if you do, you can have one for a few hundred dollars—photo #1.)

    While there’s nothing like a frozen drink poolside, we also like it as a light summer dessert.

    Lacking said frozen drink machine, we’ve had to take the “granita” approach, crushing ice in a blender.

    But Ciao Bella suggests another approach: Mix sorbet into your drink. The result: splendid!

    You can use any flavor of sorbet. While the most popular frozen drink flavors might be mango or strawberry, we’re particularly fond of Ciao Bella’s Blueberry Passionfruit, Blood Orange (photo #3), and Peach Sangria. (O.K., the mango and strawberry are also great.)

    Here’s Ciao Bella’s recipe. If you want a different flavor, e.g. blueberry or mango, use the corresponding fresh fruit and sorbetto.

    If you want more sorbet than the recipe calls for, go ahead!
     
     
    RECIPE: FROZEN STRAWBERRY DAIQUIRÍ

    Ingredients Per Drink

  • 2 ounces rum
  • .75 ounce lime juice
  • .5 ounce simple syrup (recipe)
  • 2 large strawberries, muddled
  • 1.5 large spoonfuls of strawberry sorbetto/sorbet
  • Garnish: notched strawberry on the rim
  •  
    Preparation

    1. WHISK the ingredients together inn a chilled mixing glass (we kept ours in the freezer until ready to mix).

    2. POUR into a serving glass, garnish and serve. If you prefer to use a blender, chill the pitcher in the freezer.
     
     
    Variations

      Frozen Strawberry Daiquiri
    [1] No swimming pool? Enjoy a frozen drink for dessert (photo courtesy Pierre’s Ice Cream).

    Frozen Margarita Machine
    [2] If your heart’s desire is a frozen drink machine, you can have one for $329 from Margaritaville Cargo.

    Ciao Bella Blood Orange Sorbet
    [3] Make whatever flavor you like, matching the sorbet to the fresh fruit for muddling and garnish (photo courtesy Ciao Bella Gelato).

  • Make the drink non-alcoholic by replacing the rum with the equivalent amount of club soda, lemon-lime soda or fresh fruit juice.
  • For another layer of flavor, use a flavored rum.
  • Add a sorbet “garnish” using a second flavor of sorbet (photo #1).
  • For a “Deconstructed Daiquirí,” soak the fruit in the rum, then pour the rum and fruit over a scoop of sorbet. Serve in a Martini glass for more pizzazz.
  • Or, serve “Daiquirí shots”: serve the rum in a shot glass with a rim of lime zest, along with a dish of sorbet.
     
    Have fun with it!
     
     
    TOP RUM COCKTAILS

    Have a rum cocktail party! Construct the menu with the top rum cocktails


  • Comments off

    The Nibble Webzine Of Food Adventures
    RSS
    Follow by Email


    © Copyright 2005-2024 Lifestyle Direct, Inc. All rights reserved. All images are copyrighted to their respective owners.