|
Nature gives us much fresh produce in the summer, but selecting perfectly ripe fruits and vegetables isn’t always second nature to us.
There is no uniform rule for choosing the best.
Some produce should be stored in the fridge, others not.
Sometimes a bit of stem attached is a good sign, sometimes not.
And so on.
To help, Stop & Shop Produce Merchandising Manager, Steve Stalter, has provided his tips and tricks to ensure that every fruit and vegetable you pick and serve this summer is a winner.
BLUEBERRIES
Blueberries should have a deep blue color with hints of purple or black. There shouldn’t be any red color, as that indicates they may not be ripe.
Turn the carton upside down. If berries are mashed or bleeding juice, find another pint.
Try to smell the berries. A sweet smell indicates ripe, sweet berries.
Wash any type of berries just before eating. Store leftovers in their original container in the fridge, or in a bowl.
Depending on when they were harvested, blueberries can be stored for up to 10 days. But don’t buy more than you plan to eat in a couple of days.
If the berries have dried out (are wrinkled), taste one. If the flavor is good, purée them into a sauce, mix the purée into a cocktail, or mix into softened vanilla ice cream (and refreeze).
CANTALOUPE & HONEYDEW
Smell the melon near the small round circular spot on the bottom: It should smell sweet.
The stem should no longer be attached. A ripe melon will naturally detach its stem. Any bit of a stem attached means that the melon was harvested too soon.
A good melon should feel firm but never rock hard, nor should it ever be soft and squishy.
The melon should have a yellowish spot where it was resting, showing that it is ripe.
A ripe melon will feel heavier than it looks.
When ready to cut and eat, the stem end will be easy to press in, and the melon will smell sweet.
A ripe melon can be kept in the fridge.
CORN
The tassel (the corn silk that extends up beyond the end of the husk) will tell you about the freshness of the corn. They should be mustard-colored, not dark brown.
The husk should be bright green, not dried out.
Leave the husk on to keep the corn hydrated and sweet, until you’re ready to use it.
Similarly, don’t peel down the husk to see if the corn “looks good.” The tassel and husk color will tell you that.
If you’re not going to cook corn the same day it is purchased, keep it refrigerated.
PEACHES
Peaches should smell sweet and floral.
Ripe peaches will be soft to the touch, not hard nor too squishy.
Store in a cool, dry place; not in the refrigerator.
If the peaches become over-ripe, purée them into a sauce, use the purée in a cocktail, or mix it into softened vanilla ice cream (and refreeze).
PLUMS
A plum should feel heavy and a little firm.
Plums will have a deep, even color when ripe.
Store plums in the refrigerator and make sure they are not in a sealed bag—they need air.
If the plums become over-ripe, follow the tip for peaches.
TOMATOES
Tomatoes don’t have to be perfectly shaped. While they have been bred this way to appeal to supermarket buyers, tomato lovers know that the best-tasting tomatoes are the heirloom breeds, which are typically misshapen.
When ripe, the skin of the tomato should be smooth and slightly shiny, free of bruising and dark spots.
The tomato should still be slightly firm when ripe, but should yield slightly when pressed with your fingers.
Another way to tell if a tomato is ripe is to smell it in the stem area. It will have an earthy, sweet smell when it is ripe, and either a sour smell or no smell if it is not yet ripe.
Once picked, tomatoes should be kept at room temperature away from sunlight—and never in the fridge, where the cold air will sap its flavor.
WATERMELON
Find the “field spot” on the bottom. A watermelon will develop a yellow blemish where it rests on the ground. A ripe watermelon will have a rich, yellow-orange field spot.
A ripe watermelon should feel heavy for its size.
When tapped on the underbelly, should have a hollow sound.
Check for webbing. If the melon has web-like brown streaks, it means bees touched the pollinating parts of the flower many times, making it sweeter.
Store an uncut watermelon in a cool, dry place for up to four days.
ZUCCHINI & YELLOW SQUASH (A.K.A. SUMMER SQUASH)
Bigger is not always better. Larger zucchini and yellow squash often have less flavor due to more water. Smaller ones are better.
Look for a zucchini/yellow squash with a vibrant green or yellow skin.
Look for zucchini/yellow squash with a portion of its stem attached. It will likely last longer.
Store zucchini/yellow squash in a brown paper bag or with no bag, in the refrigerator for up to one week. Do not use a plastic bag.
A FINAL NOTE
Don’t store produce in plastic bags, unless they are ventilated (with holes.
Plastic bags deprive some varieties of the air they need.
|
|
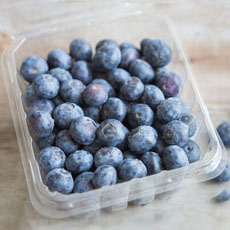
[1] Blueberries. Don’t wash any type of berry until just before you’re ready to eat them (all photos © Good Eggs, a great supplier of fine produce in the San Francisco Bay area).
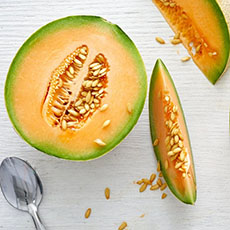
[2] Cantaloupe. Don’t buy a cantaloupe, honeydew or other melon that still has some stem attached.

[3] Corn. While supermarkets typically cut off the tassels for visual presentation, a golden tassel indicates freshness.
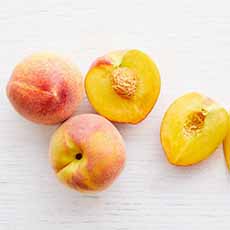
[4] Don’t store peaches in the fridge.
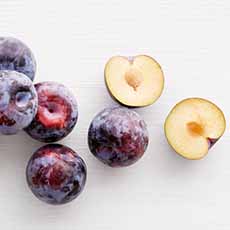
[5] As opposed to peaches, plums should be stored in the fridge.

[6] Any tomatoes, including these organic heirloom tomatoes, should be kept on the counter—never in the fridge.

[7] Web-like brown streaks on a watermelon are a good sign of a sweeter melon.
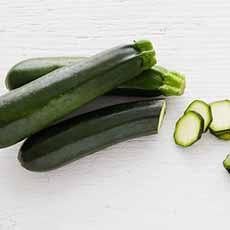
[8] Zucchini with some stem attached will last longer.
|