|

Samuel Adams’ Winter Lager is available on
tap, in bottles and cans. Photo courtesy
Samuel Adams.
|
|
December 10th is National Lager Day. If you’re like most, you people can’t articulate the difference between lager and ale.
So we’ll start with five fun lager facts from our friends at Samuel Adams, and then go on to an overview of the differences between lager and ale. (Note that “beer” is the overall category that includes ale, lager, lambic, porter, stout and other styles. Check out our Beer Glossary.)
FIVE FACTS FOR NATIONAL LAGER DAY
1. The term “lager” is derived from the German verb lager, which means “to store.” Lager beer is stored (“lagered”) after fermentation. Before modern refrigeration, lager beers were stored in caves or in cellars dug into hillsides.
2. Lager is not a single beer recipe; there are different styles of lager. Examples include Bock beers like Maibock and Helles Bocks, Dunkelweizens, Marzen and Oktoberfest beers, Pilsners, Rauchbiers and Schwarzbiers, to name a few (here are more types of lager).
3. Lagers are relatively new to the beer scene, first appearing in Bavaria in the early 16th century. Ales, on the other hand, have been brewed for more than 7,000 years. Ales are easier to ferment.
|
|
4. Due in part to their clean, crisp character, lagers are sometimes [incorrectly] called plain and boring by connoisseurs. That might be true with some mass-market brands, but craft lagers are flavorful and complex.
5. Today, lager is the beer of choice.The biggest brands of countries worldwide are lagers, including America’s Budweiser, China’s Tsing Tao, Germany’s Heineken, India’s Kingfisher and Japan’s Sapporo.
THE FUNDAMENTAL DIFFERENCES BETWEEN LAGER & ALE
It’s all about the yeast. Lager and ale use entirely different types of yeast for fermentation. The yeasts act in different ways and generate different flavors and aromas.
Ales tend to be fruity and estery. An ester is an organic compound formed when an acid and an alcohol combine and release water. “Estery” refers to an aroma or flavor suggestive of flowers or fruits. The compounds that generate these flavors and aromas are created naturally in the fermentation process. Familiar fruity/estery flavors and aromas include apples, bananas, strawberries and other fruits.
Lagers do not generate fruity and estery components. Instead, they are clean-tasting and frequently described as “crisp.”
Yes, there are other ingredients that impact the flavor and aroma of the beer, from the hops, grains and malts to the hardness of the local water. But it’s fundamentally all about the yeast.
Lager yeast, as opposed to ale yeast, ferments (eats sugar to produce carbonation and alcohol) at cooler temperatures (so cool that ale yeast would go dormant). When it is done fermenting, the yeast settles to the bottom of the fermentation tank, so are called bottom-fermenting yeast. Lager yeast also takes a longer time to condition the beer than ale yeast.
Bock, Pilsner and Oktoberfest are examples of lager.
Lager ages in refrigerator units (previously, in caves) for weeks or months at temperatures in the 40-degrees-Fahrenheit range. This low-and-slow fermentation provide the clean, crisp taste.
Ale yeast, on the other hand, ferment at warmer temperatures and are rise to the top of the tank. Brown Ale. ESB (Extra Strong Bitter), IPA (India Pale Ale) and other Pale Ales, Porter, Stout, Wheat Beer/Weissbier are all ales.
|
|
WHY WEREN’T LAGERS BREWED UNTIL THE 16TH
CENTURY?
Thanks to Todd Detwiler, writing in Popular Science, for the answer.
The lager yeast, Saccharomyces pastorianus first appeared in Europe in the 1500s—thousands of years after man began to brew ale with S. cerevisiae, which thrived on oak trees in Europe.
In 2011, researchers studying yeast samples from forests all over the world isolated two cold-tolerant yeast strains from the forests of Patagonia in Argentina. They were members of an entirely new species of Saccharomyces yeast. This enabled the scientists to discover that the lager yeast, S. pastorianus, is a hybrid of S. cerevisiae and one of the wild Pagagonian yeasts, S. eubayanus.
That Patagonian yeast provides the characteristics that manifest in the distinctive flavor and character of lager beer.
How did the Patagonian yeast get to Europe so long ago? It could have hitched a ride on a fruit fly that in turn hitched a ride on a ship during the early years of trans-Atlantic trade. Yeasts are easily blown in the wind. S. eubayanus eventually made its way into the fermenting vats of Bavaria. There it formed a hybrid strain with the ale yeast, S. cerevisiae to create the modern lager yeast, S. pastorianus.
|
|

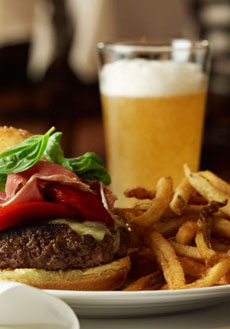
Lager and burger: a great combination. Photo courtesy The Palm | NYC.
|
As with ale yeast, each time S. pastorianus arrived at a new brewery, it quickly adapted to its environment, forming another of the various lager strains available today.
Lager yeast, Saccharomyces pastorianus, was first isolated in 1904 at the Carlsberg brewery in Denmark.
If you’ve read this far, you’ve learned a lot. You’re now entitled to your lager. Perhaps a Samuel Adams Winter Lager, available through the end of this month? It’d brewed with a touch of holiday spices—cinnamon, ginger and orange peel.
|
|