THE NIBBLE BLOG: Products, Recipes & Trends In Specialty Foods


Also visit our main website, TheNibble.com.

RECIPE: Fried Feta Cheese With Olives

Fried Feta Cheese
Warm, crispy cubes of feta cheese, with a
side of spicy marinated olives. Photo courtesy
Wisconsin Milk Marketing Board.
 

We really enjoyed this dish last night, served with beer and hard cider. Four of us polished off the 18 pieces of cheese and the spicy olives in 10 minutes, and we look forward to making it again.

The recipe was sent to us by the Wisconsin Milk Marketing Board. Find many great cheese recipes at EatWisconsinCheese.com.

FRIED FETA CHEESE WITH SPICY MARINATED OLIVES

Ingredients For 18 Pieces
 
For The Fried Feta

  • 1 8-ounce block feta cheese
  • 1 egg
  • 2 tablespoons flour
  • 1 tablespoon water
  • 3/4 cup panko breadcrumbs
  • Grapeseed oil or canola oil, for frying
  • Sea salt
  •  
    For The Olives

  • 2 tablespoons olive oil
  • 4 cloves garlic, peeled and crushed
  • Zest of 1 orange
  • 1 teaspoon fennel seeds
  • 1 cup mixed olives
  • Pinch red pepper flakes
  •  
    Preparation

    1. HALVE the feta horizontally to create two 1/2-inch-thick blocks (or as many as can be cut from your piece). Cut each block roughly into 1-inch cubes to yield about 18 pieces total.

    2. WHISK the egg with the flour and water in shallow bowl. Place the breadcrumbs in a shallow, rimmed dish. Working with a few pieces at a time, dip the feta cubes in the egg mixture, coat with the breadcrumbs and place on a plate. Refrigerate while preparing the olives.

    3. HEAT the olive oil on low in a medium sauté pan. Add the garlic, orange zest and fennel. Sauté for 2 minutes, taking care not to the brown garlic. Add the olives and pepper flakes; toss to coat. Sauté for 1 minute. Transfer the olives to a serving bowl. Wipe the pan with a paper towel.

    4. REMOVE the feta from the refrigerator. Pour a thin layer of oil in the bottom of the same sauté pan and heat over medium until hot. Test by adding a few breadcrumbs to pan; they should sizzle. Gently place 8 to 10 feta cubes in the pan. When the cubes begin to brown, about 1 to 2 minutes, use a fork to turn each cube to brown the other side. Continue to cook 1 to 2 minutes.

    5. REMOVE the cubes with a spatula; place on a seving plate. Sprinkle lightly with sea salt. Repeat with the remaining feta cubes, adding additional oil if necessary. Serve immediately with the olives.


    WHAT IS FETA CHEESE

    Feta is Greece’s most famous cheese*, a pure white, aged curd cheese that crumbles easily. While the cheese has been made since antiquity, the modern name came into the Greek language in the 17th century, from the Italian word fetta, slice, referring to slicing the cheese from the brick.

    Authentic feta is a sheep’s milk cheese, or a mixture of sheep’s and goat’s milks. Outside of the European Union, where it is protected designation of origin (PDO) product, it can also be made of cow’s milk. The cheese is semi-hard, with a flavor that can range from mild and milky to salty with a very tangy acidity.
     
    *Here are other Greek cheeses.

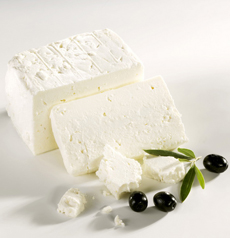
      Feta & Olives
    Quality feta cheese is never over-salted. Photo courtesy Aragec.com.
     

    Authentic feta is formed into bricks and salted and cured in a brine solution. It is aged in wood barrels for 60 days, creating a creamy, tangy cheese with citric notes.

    Only 2% of the feta consumed in the U.S. actually comes from Greece. Much of it is saltier feta from Bulgaria and other countries. Some feta is simply too salty. You can soak oversalted pieces it in water or milk to remove some of the saltiness.

    Find more favorite types of cheese in our Cheese Glossary.
     
    WHAT TO DO WITH THE OLIVE PITS

    We don’t know what we’d do without our olive pit “ashtray.” It makes the ugly olive pits disappear. We got it at the Museum of Modern Art decades ago, and can’t find anything like it online.

    But we did find this one and this one, made from ceramic. It’s great gift for the olive lover who entertains.


    Comments off

    TIP OF THE DAY: Skillet Fondue

    Skillet Fondue
    Skillet fondue is easy and fun. Photo
    courtesy La Brea Bakery.
     

    Skillet fondue enables you to serve a warm, gooey cheese treat very easily, for brunch, lunch, a dinner first course or snacking. It’s also a good way to use up smaller pieces of cheese leftover from a cheese tray. We cribbed the idea from La Brea Bakery; this photo appeared in an ad celebrating the bakery’s 25th anniversary.

    Skillet fondue requires no fondue pot, although if you have a hot plate or warming tray, or the base of a fondue set with a heat source, you can use it to both raise the hot skillet from the table and keep the cheese warm.

    This isn’t a fondue in the classic sense, where melted cheese is blended with white wine, lemon juice and garlic. It’s mostly cheese melted in a skillet, although you add seasonings of choice, and can top the melted cheese with all sorts of goodies instead of using the goodies as dippers.

    We made this recipe in a broiler, although you can as easily use the oven. We used a cast iron skillet for “atmosphere”; you can use anything heatproof with a handle.

     
    We happened to have Cheddar and Gruyère on hand. You can use whatever melting cheeses you have, including any of the Swiss cheeses, the Hispanic melting cheeses, Fontina, Gouda, Havarti and others. Don’t hesitate to blend multiple cheeses.

    While regular fondue uses cubes of day-old bread speared with fondue forks, skillet fondue uses crostini, toasted baguette slices, which we sliced and toasted in the oven (or you can grill them). Instead of dipping and swirling cubes with a fondue fork, you scoop up the cheese with crostini. If you’re short on bread, you can use crackers.

    RECIPE: SKILLET FONDUE RECIPE

    Ingredients

  • 1-1/2 to 2 pounds cheese
  • 4 garlic cloves, thinly sliced
  • 1 teaspoon fresh thyme leaves, finely chopped (substitute dried oregano)
  • 1 teaspoon fresh rosemary leaves, finely chopped (substitute dried sage or savory)
  • 1/4 cup extra virgin olive oil (flavored oil is O.K.)
  • Salt and freshly-ground black pepper to taste (or substitute red chili flakes for the pepper)
  • Toppings: apple or fig slices, dates, grapes, cornichons, piquillo chiles, cubed ham, sliced sausage, raw or cooked veggies (bell pepper strips, broccoli and cauliflower florets, cherry tomatoes, sliced boiled or roasted potatoes, zucchini or whatever you have
  • Crostini
  •  

    Preparation

    1. TOAST the baguette slices. To toast in the oven, preheat it to 400°F. Slice the baguette diagonally into 1/4-inch slices and place in a single layer on a baking sheet. Brush each slice with olive oil and sprinkle with salt and pepper. Bake for 15 to 20 minutes or until the crostini are crisp and browned. Let cool.

    2. REMOVE any rind and dice the cheese. Prepare the toppings and place them on the table in individual ramekins or bowls. (Instead, you can place some of each on individual dinner plates for each diner.) Preheat the broiler.

    3. PLACE the cheese in an even layer in a 9-inch cast-iron skillet. Scatter with the herbs plus salt and pepper to taste; drizzle with olive oil.

    4. PLACE under the broiler, ideally five inches from the heating element, for 5-6 minutes. The cheese should be melted, bubbling and starting to brown. Remove with silicone pot holders or oven mitts, onto a brazier on the table (or other heat-resistant base).

      La Brea Loaves
    Three of the loaves you may find at your supermarket. Photo courtesy La Brea Bakery.
     
    5. SERVE immediately, passing the toppings (an old-fashioned lazy susan or any type of kitchen turntable is great here).
     
    The History Of Cheese Fondue

    The history of fondue and a classic cheese fondue recipe

    28 Fondue Recipes

     
    LA BREA BAKERY

    Twenty-five years ago, Los Angeles was a bread wasteland. When Nancy Silverton and her then-husband Mark Peel were preparing to open their restaurant, Campanile, they found a location with room to open a bakery next door, to make their own sourdough bread.

    The bread became a sensation, and retail loaves sold out early each day.

    In 2001 the bakery was acquired by an investment group, enabling expansion throughout Southern California; and now, to quality food stores nationwide.

    Is there La Brea sourdough near you? Check out the store locator on the company’s website.


    Comments off

    TIP OF THE DAY: Homemade Marshmallow Fluff

    Marshmallow Cream Garnish

    /home/content/p3pnexwpnas01_data02/07/2891007/html/wp content/uploads/Chocolate Marshmallow Fluff cinnamonspiceandeverythingnice 230
    TOP PHOTO: Elegant drops of homemade
    marshmallow cream at Guard and Grace
    Restaurant
    | Denver. BOTTOM PHOTO:
    Chocolate “Fluff” from Sugar and Spice and
    Everything Nice
    .

      For the upcoming holiday season, something special is the name of the game. Today’s tip was inspired by Guard and Grace in Denver, where dessert plates are garnished with their own version of Marshmallow Fluff, instead of whipped cream.

    Homemade Marshmallow Fluff, it seems, is a popular undertaking. This first recipe is from Kimberly Reiner of Momma Reiner’s Fudge.

    You’ll need a candy thermometer, ideally a clip-on thermometer or an all-purpose thermometer with a good range; as well as a stand mixer. A simple hand mixer and a bowl won’t do because you’re working with boiling syrup, and need guaranteed stability. We also recommend thick clothing and a vinyl (waterproof) apron to guard against spatters.

    You can vary the flavors of the marshmallow creme beyond vanilla; for example, with lemon extract or maple extract, or a tablespoon of instant coffee or cocoa powder. A recipe for gingerbread marshmallow creme is below.

    RECIPE: HOMEMADE MARSHMALLOW FLUFF

    Ingredients

  • 3 large egg whites
  • 2/3 cup plus 2 tablespoons sugar
  • 1/3 cup water
  • 3/4 cup light corn syrup
  • 1 teaspoon pure vanilla extract
  •  
    Preparation

    1. BEAT the egg whites with an electric beater or an electric stand mixer with the whisk attachments, until light and frothy. With the mixer running, slowly incorporate 2 tablespoons of sugar. Beat until soft peaks form.

    2. COMBINE 1/3 cup water, the corn syrup and 2/3 cup sugar in a large saucepan. Cook over medium heat until the mixture boils, watching constantly and stirring occasionally. Raise the heat to medium high and cook until the mixture reaches the soft-ball stage, 240°F on a candy thermometer (10-15 minutes). If the hot syrup bubbles up the sides, briefly lower the heat or remove the pan from the heat. When the syrup goes back down to level, raise the heat and continue cooking.

     
    The next step requires care, since the hot mixture can spatter and burn you. In addition to long sleeves and an apron, drape a kitchen towel over the front and side of the mixing bowl, leaving an open side to pour in the syrup.

    3. WITH the mixer on low, slowly add the hot syrup to the beaten egg whites. Increase the mixer speed to high and continue beating for 6-8 minutes. Add the vanilla and continue to beat until mixture looks like marshmallow creme, 2-4 minutes more.

    4. COOL and store in an airtight jar. It will keep in the fridge for up to a month. We particularly like it atop a cup of hot chocolate.


    GINGERBREAD MARSHMALLOW CREAM

    Here’s a holiday-flavored version of marshmallow creme, from Reeni of Cinnamon Spice and Everything Nice. She has also created a strawberry marshmallow cream.

    Renni advises: “Please keep children and pets clear of the kitchen while making this. The sugar syrup reaches temperatures that can burn should an accident occur.”

    Ingredients For 2-1/2 Cups

  • 3/4 cup sugar
  • 1/4 cup light corn syrup
  • 1/4 cup unsulphured molasses
  • 1/4 cup water
  • 1/8 teaspoon salt
  • 2 large egg whites, at room temperature
  • 1/4 teaspoon cream of tartar
  • 3/4 teaspoon ground ginger
  • 1/3 teaspoon ground cinnamon
  • 1/8 teaspoon ground nutmeg
  • 1/8 teaspoon ground cloves
  • 1-1/2 teaspoons vanilla extract
  •   Gingerbread-Marshmallow-fluff-cinnamonspiceandeverythingnice-230
    Photo © CinnamonSpiceandEverythingNice.com, which has also created strawberry marshmallow cream.
     
    Preparation

    1. STIR together the sugar, corn syrup, molasses, water and salt in a medium saucepan over medium-high heat, with a clip candy thermometer attached to the side. Bring to a boil stirring occasionally, until it reaches 240°F. Meanwhile…

    2. ADD the egg whites and cream of tartar to the bowl of an electric mixer fitted with the whisk attachment. Start whipping the egg whites to soft peaks on medium speed.

    3. MEASURE the spices into a small bowl or ramekin. When the syrup reaches 240°F, set the mixer to low speed. Slowly drizzle in a couple of tablespoons of the hot syrup to warm the mixture (if you add too much hot syrup at once, the egg whites may scramble.). On low speed, slowly drizzle in the rest of the syrup, the vanilla and all the spices; then increase the speed to medium-high. Beat until the marshmallow creme is stiff and glossy, 8-10 minutes.

    4. COOL and use immediately, or store in an airtight container in the refrigerator for up to 2 weeks.
     
     
    THE HISTORY OF MARSHMALLOW FLUFF

    Marshmallow dates back to ancient Egypt. The marsh mallow plant that was plentiful along the banks of the Nile has a slippery sap that forms a gel when mixed with water. The Egyptians mixed the “juice” with honey to make a confection, reserved for the wealthy and the gods.

    The Roman scholar Pliny the Elder credited the sap with curing all sorts of diseases, and encouraged people to drink the juice daily, although it wasn’t very palatable (what happened to the honey?). Still, for centuries the sap was used to treat sore throats, skin conditions and other maladies.

    In the mid-19th century, a pharmacist in Paris came up with the idea of whipping the sap with sugar and egg whites into a light, sweet, fluffy throat remedy. A variation soon became popular as marshmallow candy.

    By the late 19th century, confectioners had determined how to mass-produce marshmallows, which included eliminating the sap entirely and replacing it with gelatin. (Prepared gelatin was patented in 1845; prior to then it was laborious to render and clarify gelatin from cattle and pig bones, skin, tendons and ligaments; and in addition to setting aspics, it was desirable as glue, a use that dates back to ancient Egypt.).

    Marshmallow sauces were popular in the early 20th century (see Marshmallow History). But to make marshmallow sauce or frosting required that the cook first make marshmallow creme. It was a two-step process: make a sugar syrup, melt marshmallow candy in a double boiler, and combine them with the syrup.

    In 1910 a marshmallow creme called Marshmallow Fluff was sold to ice cream parlors by Limpert Brothers, a company that still exists in New Jersey. You can see the original packaging on their website.

    Snowflake Marshmallow Creme was available around 1914. The first commercially successful, shelf-stable marshmallow creme, it was produced by the Curtis Marshmallow Factory of Melrose, Massachusetts.

    They ultimately bought the Marshmallow Fluff brand from the Lippert Brothers (details). Marshmallow Fluff wasn’t the first marshmallow creme, but it’s the one that endured: 94 years later, the brand is still around.

    Unlike conventional marshmallows, which require gelatin (an animal product) or a seaweed equivalent to set, marshmallow creme is a kosher product made from corn syrup, sugar, water, egg whites, artificial flavor, cream of tartar, xanthan gum and artificial color.

    Marshmallow Fluff is OU Kosher, Kraft Jet-Puffed Marshmallow Creme is OK Kosher. Ricemellow Creme, manufactured by Suzanne’s Specialties, Inc., is a vegan equivalent.
      

    Comments off


    © Copyright 2005-2026 Lifestyle Direct, Inc. All rights reserved. All images are copyrighted to their respective owners.