THE NIBBLE BLOG: Products, Recipes & Trends In Specialty Foods


Also visit our main website, TheNibble.com.

TIP OF THE DAY: Prep Eggs The Night Before To Save Time

Scrambled Eggs In Tortilla Cups

Pepperjack Cheese
Top: Mexican Scrambled Eggs In Tortilla Cups (photo Land O’Lakes). Bottom: Add more heat with Pepperjack cheese (photo Paoli Cheese).


We often make a vegetable scramble for breakfast, to a proportion of half egg, half veggie. Bell peppers, mushrooms and onions are our basic mix, along with fresh herbs and halved cherry tomatoes.

It’s easy to prep the night before. You can dice the vegetables and beat the eggs in just a few minutes. If you want to add cheese, you can dice, grate or shred it the night before, too.

Then, while the coffee brews, heat the pan, combine the ingredients, and voilà.

When we have extra time, we make something more elaborate, like these Mexican-inspired scrambled eggs in tortilla cups—a crowd pleaser.

RECIPE: MEXICAN SCRAMBLED EGGS IN TORTILLA CUPS

Ingredients For 4 Servings

  • 4 seven-to-eight-inch tortillas (try whole wheat!)
  • Nonstick cooking spray
  • 8 eggs (or 2 cups/16 ounces egg substitute)*
  • 1 teaspoon chili powder
  • 1/2 teaspoon ground cumin
  • 1/2 cup shredded Cheddar, Jack or Pepperjack† cheese
  • 1/3 cup chopped onion
  • 1/3 cup diced red bell pepper
  • Optional: minced jalapeño or chili flakes to taste
  • Optional garnish: 1/4 cup sour cream (or substitute nonfat Greek yogurt)
  • Optional garnish: 4 teaspoons salsa
  • 2 tablespoons chopped green onions
  • Optional: fresh cilantro or parsley, chopped
  •  

    Preparation

    1. HEAT the oven to 400°F. Place four 6-ounce custard cups upside down on a cookie sheet. Lightly spray both sides of the tortillas with nonstick cooking spray. Place the tortillas over the custard cups, pressing down lightly to shape.

    2. BAKE 8 to 10 minutes, or until the tortillas are light golden brown. Remove from the oven and place the cups upright on a cooling rack. Meanwhile…

    3. SPRAY a 10-inch nonstick skillet with cooking spray. Scramble the eggs with the vegetables and seasonings and cook over medium heat. As the eggs begin to set, sprinkle on the cheese. Alternatively, you can sprinkle on the cheese after the eggs are in the tortilla cups. Cook until the eggs are set but still moist.

    4. PLACE the tortilla cups on plates and fill them with the eggs. Top each with sour cream and salsa. Sprinkle with green onions and the herbs.
     
    ______________
    *Most recipes assume large eggs; it is the size of the egg that makes the difference: 2 medium eggs =1/3 cup, 2 large eggs = ½ cup, 3 medium eggs + ½ cup, 3 large eggs = 2/3 cup. 4 large eggs = 1 cup.

    †If you use Pepperjack, you don’t need the added chiles.
      

    Comments off

    TIP OF THE DAY: Crostini For Brunch

    Most people think of crostini as nibbles to be served with wine or beer—“cocktail food.”

    Crostini the Italian word for “croutons,” which refers to any toast breads. They can be medium or large slices, plain or garnished.

    They are not the miniature bread cubes that garnish green salads and bowls of soup. Instead, medium or large crostini, plain or garnished, would be served with the salad or soup.

    In fact, Italy’s crostini are appetizer size, for with drinks, soup, and snacking. Cheese crostini are Italy’s “grilled cheese sandwich.” A topping of olive oil and garlic is Italy’s “garlic bread.”

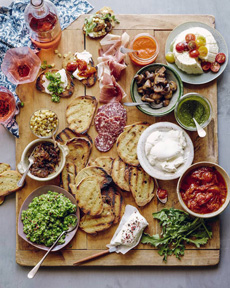
    Crostini are a scrumptious breakfast choice, too. We especially like DIY crostini, where we put out toasted bread along with bowls of toppings, and let each person construct his or her own.

    First, plan your toppings from the list below, or add your own.

    Next, get the best bread you can find. We like thick slices of a crusty rustic sourdough loaf for breakfast crostini. It makes a nicely crunchy toast.

    Remember that this is a do-it-yourself recipe, so you can serve sweet ingredients (fresh cheeses, fruits and honey, for example), savory ingredients (bacon, eggs, hummus, sautéed spinach), or some of each.
     
    TOPPING SUGGESTIONS

  • Breakfast fish: gravlax, marinated herring, smoked salmon, taramasalata
  • Breakfast meats: bacon, ham, sliced sausage or sausage patties
  • Breakfast spreads: avocado, hummus, spreadable cheese, yogurt, etc.
  • Cooked vegetables: sautéed or steamed kale, spinach, zucchini
  • Eggs: boiled, fried, poached
  • Fresh cheeses: burrata, cottage cheese, cream cheese, farmer’s cheese, fromage blanc, goat cheese, labné, Neufchatel, ricotta, quark (anything spreadable)
  • Fresh fruits: berries, citrus sections, diced pears, sliced figs, sliced stone fruits
  • Fresh vegetables: breakfast radishes, chopped green onions, sliced cucumbers, sliced tomatoes, sundried tomatoes marinated in olive oil
  •  
    PLUS CONDIMENTS

  • Balsamic vinegar
  • Butter
  • Chili flakes
  • Fresh herbs
  • Lemon or lime wedges
  • Olive oil
  • Salt (especially flake salt or seasoned salt) and pepper
  • Lemon or lime wedges
  • Sweet condiments: honey, marmalade, preserves
  •  
    PREPARATION

    1. SET OUT the toppings.

    2. TOAST the bread; cook the eggs and breakfast meats. That’s it!
     
    ____________________
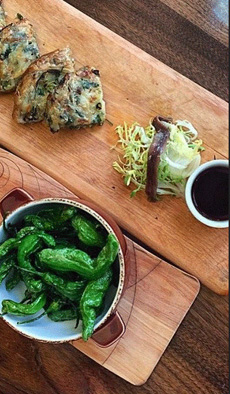
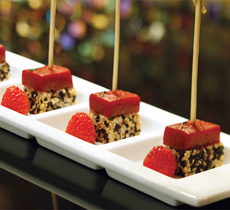
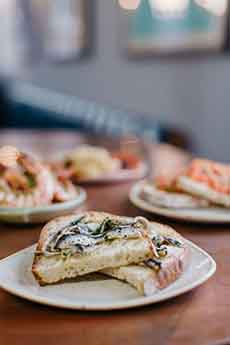
    Photo credits: Top, Fig & Olive restaurant. Second, Safest Choice Eggs. Third: Mixed Greens Blog. Bottom: Locanda Verde Restaurant.

      Fig Crostini

    Egg Avocado Crostini

    Sundried Tomato Crostini

    Ricotta Crostini

    Top: Fresh figs, goat cheese and a drizzle of honey. Second: Mashed avocado and boiled egg with a drizzle of EVOO. Third: Ricotta topped with sundried tomatoes marinated in olive oil and herbs. Bottom: Serve plates of toast and ricotta, and let people top their own.


    Comments off

    TIP OF THE DAY: The New Jell-O Mold Is A Mason Jar

    Red White & Blue Jell-O

    Red, White & Blue Jell-O Squares
    Top: Red, white and blue Jell-O mold in Mason jars (photo Victoria Belanger | eHow). Bottom: No spoon is needed with these Jell-O fingers. They’re gummy, like Jell-O shots without alcohol. Here’s the recipe from CommunityTable.Parade.com.


    Call them Ball Jars, Kerr Jars or Mason Jars, these 19th century inventions enabled the preserving foods for years, while avoiding spoilage and the growth of harmful bacteria.

    The original “canning” took place in hermetically sealed glass jars, invented to carry food for Napoleon’s army. Here’s the history of canning and the jars.

    The invention created an opportunity for civilians, too: to “put up” foods at harvest time to eat during the winter. But then came tin cans, and

    The growth of the artisan foods movement, small producers added charm to their jams and dilly beans by packaging them in Mason jars.

    Today, we’re presenting an idea adapted from Victoria Belanger. You can see step-by-step photos on eHow.com.

    RECIPE: RED, WHITE & BLUE JELL-O FOR MEMORIAL DAY & JULY 4TH

    Ingredients For 6 Servings
     
    For The Red Layer

  • 1 package ((3 ounces) strawberry Jell-O
  • 1 cup of boiling water
  • ½ cup cold water
  • 1 cup chopped strawberries
  •  
    For The White Layer

  • ¼ cup cold water
  • 1 envelope unflavored gelatin powder
  • ½ cup boiling water
  • ½ cup sugar
  • 1 cup vanilla ice cream, liquefied
  •  
    For The Blue Layer

  • ¼ cup cold water
  • 1 envelope unflavored gelatin powder
  • ½ cup boiling water
  • ½ cup sugar
  • 1½ cups blueberries
  •  
    Plus

  • 6 half pint sized Mason jars
  • Garnish: whipped cream (Reddi-Whip is perfect here)
  •  
    Preparation

    1. MAKE the red layer. Combine the water and the Jell-O in a bowl, stirring to fully dissolve. Add the cold water and the strawberries. Stir and divide the mixture among the Mason jars. We used a wide-mouth funnel (so the strawberries would fit through) to keep the sides of the jars clean for the other colored layers. Victoria used a different technique.

    2. CREATE the “wave” effect by setting the jars at an angle in a muffin tin. First place uncooked rice in the muffin wells to hold the jars at an angle, then refrigerate for 30 to 45 minutes. When the red layer is nearly firm…

    3. MAKE the white layer. In a medium bowl, evenly sprinkle a packet of unflavored gelatin over the cold water. Allow the gelatin to set for 2 minutes, then add the boiling water and stir until the gelatin is completely dissolved. Add the sugar, stirring to dissolve, and then the melted ice cream. Spoon into the jars, taking careful to keep the inside walls clean for the blueberry layer. Refrigerate until firm, 20 to 30 minutes. When firm, you can remove the jars from the tin and keep them upright in the fridge.

    4. MAKE the blue layer. In a medium bowl, evenly sprinkle 1 packet of unflavored gelatin over the cold water. Allow the gelatin to set for 2 minutes, then add the boiling water and stir until the gelatin is completely dissolved. Stir in the sugar, then the blueberries. Do not add to the jars yet, but first refrigerate the blue mixture until it thickens to the consistency of a gel (otherwise, the blueberries will float to the top of the jar).

    5. SPOON the blueberry mixture into the jars and refrigerate until firm. When ready to serve, garnish with whipped cream.
     
    MORE USES FOR MASON JARS.


    Comments off


    © Copyright 2005-2026 Lifestyle Direct, Inc. All rights reserved. All images are copyrighted to their respective owners.