THE NIBBLE BLOG: Products, Recipes & Trends In Specialty Foods


Also visit our main website, TheNibble.com.

TIP OF THE DAY: Stabilized Whipped Cream

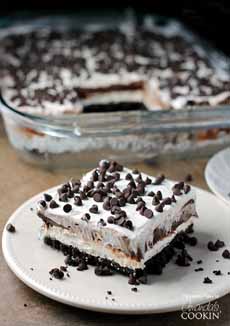
Chocolate Lasagna

[1] Chocolate lasagna: a happy Valentine Dessert (photo © Persnickety Plates | Amanda’s Cookin’.

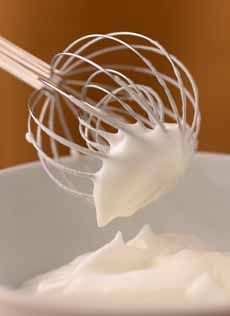
Whipped Cream
[2] Stabilized whipped cream doesn’t collapse (photo © Kuhn Rikon).


We love whipped cream, and we don’t care for Cool Whip.

(Sure, we ate it in college from the container, like the other girls in the dorm. But not since.)

We come across many fetching recipes, like this Chocolate Lasagna from Amanda’s Cookin’. It uses Cool Whip.

We’d like to introduce you to the alternative: stabilized whipped cream, actual whipped cream that can replace Cool Whip in any recipe.

Stabilized whipped cream added gelatin to regular whipped cream. The gelatin stiffens the whipped cream and keeps it from collapsing—for days!

Stabilized whipped cream is our go-to frosting for cakes and cupcakes (we prefer it to buttercream), and is a hero in layered desserts like this Chocolate Lasagna.

Once you try it, you’ll wonder how you’ve gone without it.
 
 
RECIPE: STABILIZED WHIPPED CREAM

Ingredients

  • 2 teaspoons unflavored gelatin
  • 2 tablespoons cold water
  • 2 cups heavy whipping cream, chilled
  • 1/4 cup powdered sugar, sifted
  • Optional flavor as desired (e.g. cocoa powder for chocolate or instant coffee for whipped cream, to taste)
  •  
    Preparation

    1. MAKE the stabilized whipped cream. Place the cold water in a small pan and sprinkle the gelatin over it. Let it thicken; then place the pan over low heat, stirring constantly, just until the gelatin dissolves. Remove from the heat and cool, but do not allow it to set.

    2. WHIP the cream with the powdered sugar, until slightly thick. While slowly beating, add the gelatin to whipping cream. Whip at high speed until stiff peaks form, about 5-7 minutes.

    You’re ready to frost, layer, or whatever you like.


    RECIPE: CHOCOLATE LASAGNA

    This recipe, from Amanda’s Cookin’, is a no-bake layered dessert. Cookies substitute for lasagna noodles, cream cheese and whipped cream for the mozzarella, and chocolate pudding for the sauce. Says Amanda, “It’s a chocolate dessert dream!”

    Prep time is 30 minutes, set time is 30 minutes, plus 1 hour in the freezer or 4 hours in the fridge.

    Ingredients

  • 1 package Oreo cookies (36 cookies)
  • 6 tablespoons butter, melted
  • 1 brick (8 ounces) cream cheese, room temperature
  • 1/4 cup sugar
  • 3-1/4 cups whole milk plus 2 Tablespoons, divided
  • 12 ounces stabilized whipped cream (the original recipes uses 1 tub Cool Whip)
  • 2 packages (3.9 ounces each) instant chocolate pudding
  • Mini chocolate chips or shaved 70% chocolate bar
  •  
    Preparation

    1. CRUSH the cookies into fine crumbs using a food processor or a rolling pin and a zip-top bag.

    2. COMBINE the crumbs and butter in a medium bowl until thoroughly mixed. Pour into a 9 x 13 baking dish. Use a spatula to evenly press the crumbs into the bottom of the dish.

    NOTE: Since you’ll be serving from the dish, use an attractive one. We have both glass and red ceramic baking dishes.

    3. WIPE the bowl, add the cream cheese and beat with a hand mixer until fluffy. Add 2 tablespoons of milk and the 1/4 cup sugar; mix well. Fold half the whipped cream into the mixture, spread it over the cookie crust and place into the fridge for 10 minutes. As the filling sets…

    4. ADD the pudding mixes to a large bowl with 3-1/4 cups milk; beat on medium until it starts to thicken. Spread the pudding mixture over the cream cheese layer and place the dish back into the fridge or another 10 minutes. Once set…

    5. GENTLY SPREAD the remaining whipped cream over the top and sprinkle with mini chocolate chips or shavings. Cover with plastic wrap and let chill for at least 4 hours in the fridge (or 1 hour in the freezer) before slicing.

    Save us a big piece!


    Comments off

    VALENTINE’S DAY: Heart Fruit Skewers

    There’s no need to pack on the calories for Valentine’s Day. Make these Valentine Fruit Skewers.

    You can serve them at breakfast, or for snacking.

    Or, enjoy them as a filling dessert before you dig into the box of chocolate.
     
    RECIPE: VALENTINE HEART FRUIT SKEWERS

    Ingredients

    Use whatever fruit appeals to you as you head down the produce aisle.

    While February isn’t the height of fruit options, we found very good:

  • Cantaloupe
  • Kiwi
  • Pineapple
  • Strawberries
  • Watermelon
  •  
    Plus

  • Blueberries for “spacers” (see photo)
  • Heart-shaped cookie cutter
  • Skewers, 10-12 inches long
  • Optional: mint leaves
  • Optional dip: yogurt of choice
  •   Valentine Fruit Skewers Kabobs

    For breakfast, snack or dessert: hearts of cantaloupe, kiwi, pineapple, strawberries and watermelon (photo courtesy My Morning Moxie).

     
    Preparation

    1. SLICE all the fruit except strawberries into half-inch or thicker slices. Use the cookie cutter to stamp out heart shapes. Save the trimmings for yogurt or cottage cheese.

    2. SLICE the strawberries in half; they make natural heart shapes.

    3. ARRANGE the fruit on skewers with a blueberry spacer in between. If you want a fancier appearance, thread two small mint leaves on each skewer. Serve plain or with ramekins of yogurt.
      

    Comments off

    RECIPE: A Grilled Cheese Sandwich For La Poutine Week

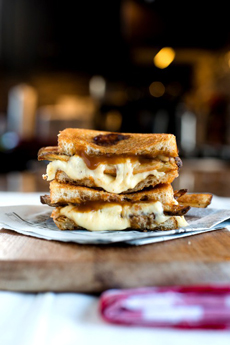
    Poutine Grilled Cheese
    [1] The B & S Poutine Grilled Cheese Sandwich (photo and recipe © BSInTheKitchen.com).


    [2] Classic poutine: fries, cheese curds, gravy (photo © Wendy’s Canada).

    Beecher's Cheese Curds
    [3] Cheese curds are made plain or flavored. Beecher’s Handmade Cheese makes different flavors, including the Chipotle Curds in the photo (photo courtesy Beecher’s).


    La Poutine Week (poo-TEEN) is here!

    Celebrated from February 1st to the 7th, it’s an opportunity for Canadians and American fans to indulge in the Canadian national dish:

    French fries with cheese curds, topped with brown gravy.

    Poutine is the Canadian version of cheese fries, with a different type of cheese and brown gravy instead of ketchup.

    Here’s more about poutine, including the history of poutine.
     
     
    HOW SHOULD YOU CELEBRATE POUTINE?

    Recently we recommended hosting a poutine party.

    But for a much smaller effort, you can enjoy a simple lunch at home.

    In Canada, restaurants make creative versions of poutine, from poutine nachos, pizza and ribs to Japanese and Middle Eastern variations.

    Take a look to see if any inspires you. One thing strangely absent from the list—easy to make at home—is a poutine burger, topped with cheese curds and fries, and drizzled with gravy.

    Below, we present another favorite American comfort food—the grilled cheese sandwich—given the poutine treatment.

    This Poutine Grilled Cheese Sandwich recipe is from a delicious Canadian website, BSInTheKitchen (written by a brother and sister, Bob and Carrie Deutscher, of Saskatchewan).

    In addition to this recipe, check out their Mac & Cheese Grilled Cheese Sandwich (no poutine).
     
     
    RECIPE: POUTINE GRILLED CHEESE SANDWICH

    Prep time is 40 minutes, cook time is 10 minutes.

    Ingredients Per Sandwich

  • 2 slices rustic or French bread
  • 6-8 baked French fries
  • 1 package instant brown gravy (or homemade)
  • ½ cup cheese curds
  • Butter, room temperature
  •  
    Preparation

    1. MAKE the gravy according to package instructions; prepare the French fries.

    2. PLACE a pan over medium heat, add the cheese curds and let them get a head start on melting.

    3. BUTTER the outside of each slice of bread. Spread a generous amount of gravy on the inside of each slice. Add the French fries (pick the crispest ones). Place the cheese curds on top of fries, and add the top slice of bread to form the sandwich.

    4. FRY in butter until golden brown on each side.


    WANT MORE POUTINE?

    Here’s a recipe from French’s for BBQ Beef Poutine: French fries, beef, cheese curds and scallions, topped with a fried egg.


    Comments off


    © Copyright 2005-2026 Lifestyle Direct, Inc. All rights reserved. All images are copyrighted to their respective owners.