THE NIBBLE BLOG: Products, Recipes & Trends In Specialty Foods


Also visit our main website, TheNibble.com.


TIP OF THE DAY: Food Plating For A Great Presentation

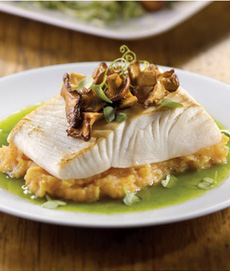
It’s easy to make your dinners look
this good. Photo courtesy SeaBear.com.

  We’ve suggested this before, but are returning to this tip because food plating is an effortless way to make your meals look more exciting.

Instead of placing food in three separate piles on a plate, do what some fine restaurants do: create a “skyscraper” of food, topping each item with another.

The process is easy:

  • Plate the base. Start with rice, beans, mashed potatoes or mashed squash, vegetables or a chunky vegetable purée.
  • Top it with the protein.
  • Crown it with a third component: a complementary garnish that can be anything from sautéed mushrooms, spiced apple slices, crisped leeks, asparagus, pickled vegetables—whatever.
  •  

  • Add an optional sauce. The dish above features “maître d’hôtel” sauce made of butter, lemon juice or vinegar, chopped parsley and seasonings. In France, it’s a popular accompaniment to fish, poultry and meat.
  • Snip fresh herbs over the dish: basil, chives, parsley, etc. (not shown in photo). We use kitchen scissors to snip them finely. They’ll add color, flavor and visual appeal.
  •  

    Let us know your favorite combinations.


    Comments off

    HALLOWEEN: Festive Chocolate-Covered Strawberries

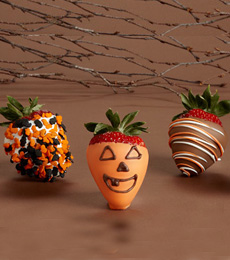
    Show of hands: Are these Halloween strawberries cuter than yesterday’s meringue ghost cookies? Not as cute? A tie?

    You can send them as a gift, via SharisBerries.com.

    Or you can make your own.

    You can even plan a strawberry-decorating get-together this weekend. Ask a friend or two if they want to bring their own ingredients and join you. (They’ll also need to bring a baking pan to carry home the decorated berries.)

    Ingredients

  • 1 quart of fresh strawberries (1-1/2 pounds—you may wish to go for large or jumbo berries)
  • 8 ounces white chocolate (chocolate chips work fine), plus dark chocolate morsels if you want to make dark strawberries as well
  • Red and yellow food coloring (to create orange)
  •  

    Who said boo? Photo of chocolate-covered berries courtesy SharisBerries.com.


  • Halloween-colored sprinkles, confetti or other embellishments (check the cake-decorating aisle of your grocery store)
  • Parchment paper
  • Chocolate tempering machine or substitute (if you find that you enjoy making chocolate-covered berries and want to do it regularly, you can pick up an inexpensive electric melting pot)
  •  
    Preparation

    1. Cover a baking sheet with parchment paper. Wash and completely dry the strawberries so the chocolate will adhere properly. You may wish to do this a couple of hours in advance.

    2. If you own one or can borrow a chocolate tempering machine, great! If not, simply melt the chocolate in a microwave oven or double boiler. For the microwave, melt at half power for 1 minute in a microwave-safe bowl; stir, then heat at 30-second intervals until completely melted.

    4. For orange chocolate, whisk two drops of yellow and one drop of red food coloring into melted white chocolate; stir and continue to add color until you get the right shade of orange.

    5. Holding each strawberry by the stem, dip about half of it in chocolate. Give it a quick twist, shake off the excess and point it at the ceiling for a second, bottom side up, to be sure the chocolate adheres.

    Decorating The Berries

  • Confetti Design: Before chocolate dries, roll the berries in sprinkles or confetti. Place on parchment paper to set. You can also set the chocolate by putting the tray in the fridge for 5 minutes.
  • Jack O’ Lantern Design: Melt dark chocolate morsels or a plain chocolate candy bar. Pipe on the face using a pastry bag and a fine tip.
  • Swirl Design: Use the tines of a fork dipped into melted chocolate of contrasting color(s). Your swirls won’t be as thin and perfectly circular as in the photo, but a thicker swirl is just as good.
  • Ghost Design (not shown): Dip berries in white chocolate. With the tip of the strawberry as the top of the ghost’s head, pipe eyes in dark chocolate.
  •   

    Comments off

    TOP PICK OF THE WEEK: The Amazing Rice Cube

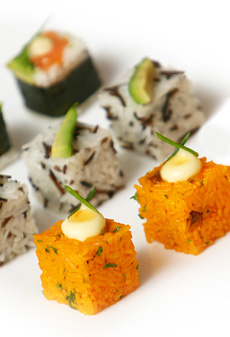
    From hors d’oeuvre to sushi to snacks,
    Rice Cube turns out dazzling food in minutes.

      Faster than most recipes. More powerful than many kitchen utensils. Able to turn out dazzling foods in a single bound.

    It’s our latest super gadget find, the Rice Cube.

    This handy gadget will help you turn out impressive foods for just about any purpose—from hors d’oeuvre and sides to snacks and desserts.

    And it’s so easy, even the kids can help out, or create their own kid-flavored snacks: carrots and peas rice cubes, peanut butter and raisin rice cubes…the combinations are infinite, and include everything from BBQ pork to smoked salmon to a “rice pudding” cube.

    Rice Cube also helps you make sushi at home without having to master the rolling mat.

    Check out this amazing little gadget.

    Good things come in small packages. Consider the Rice Cube for holiday gifts for friends who love to cook and entertain.

    Perhaps your first social event of the new year can be a cube-off competition.

     
    Rice Cube can “cube” other foods, as well. Read the full review.

    RICE 101

    There’s more to rice than “white” and “brown.” Take a look at our glamorous Rice Glossary for gourmet rices that are begging to be cubed.


    Comments off

    TIP OF THE DAY: The Sugar To Agave Conversion

    Agave nectar, also called agave syrup, is a wonder food. It has a natural sweetness that’s more elegant than table sugar—never cloying or “sugary.”

    Its glycemic index is 32, half that of sugar (GI 60-65) and more than 40% less than honey (GI 58) and pure maple syrup (GI 54). It’s diabetes-friendly.

    A teaspoon of agave has 20 calories; sugar has 16 calories and honey has 22 calories. But since agave is 1.4 to 1.5 times sweeter than sugar, you don’t need to use as much.

    It follows that when you’re cooking or baking with agave, you need to use less. Agave is also 20% moisture, so you also have to reduce the moisture when baking.

  • Substitute 2/3 cup agave per 1 cup sugar.
  • Reduce other liquids by 1 fluid ounce per 2/3 cup agave nectar.
  • Reduce oven temperature by 25°F and baking time by 5%.
  •  
    The best conversion, of course, would be to have a book of favorite recipes converted and tested with agave.

    Alas, there’s no one great book of agave recipes (publishers take note!). Those that exist have as many critics as fans. Here’s one to take a look at: Baking with Agave Nectar: Over 100 Recipes Using Nature’s Ultimate Sweetener.


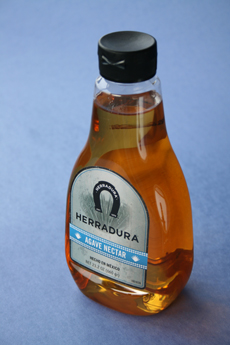
    [1] Agave nectar is one of our favorite products (photo Hannah Kaminsky | THE NIBBLE).

     
    MORE AGAVE-TO-SUGAR CONVERSIONS

  • Brown Sugar: For each cup of brown sugar, substitute 2/3 cup agave; reduce other liquids by 1/4 cup. Because the moisture content of brown sugar is higher than that of white sugar, liquids may not have to be reduced as much.
  • Brown Rice Syrup: Use 1/2 to 1/3 as much agave; increase other liquids in the recipe by up to 1/2 cup.
  • Corn Syrup: Use 1/2 as much agave; increase other liquids by up to 1/3 cup.
  • Honey: Replace each cup of honey with 1 cup of agave syrup.
  • Maple Syrup: Replace each cup of maple syrup with 1 cup of agave syrup.
  • White Table Sugar: For each cup of white sugar, substitute 2/3 cup agave; reduce other liquids by 1/4 to 1/3 cup. This substitution also works for demerara sugar, evaporated cane juice, Sucanat and turbinado sugar.
  •  
    Find more information at AllAboutAgave.com.
     
     
    MORE ABOUT AGAVE NECTAR/SYRUP

    Agave syrup is made from the sap of several different succulents grown commercially in Mexico. One, the blue agave, is also used to make tequila.

    Agave is about 25% sweeter than sugar, and because of its composition, 90% fructose/10% sucrose, it has a low glycemic index score, about half that of sugar.

    This means that it affects blood sugar levels less dramatically than regular sugar (or honey or maple syrup). It also contains trace minerals such as calcium, iron, magnesium and potassium.

    Here’s everything you need to know about agave nectar.
      

    Comments off

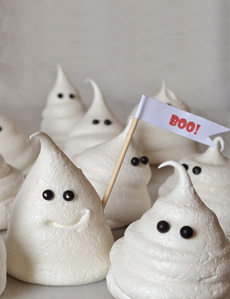
    HALLOWEEN: Make These Meringue Ghost Cookies

    Melt-in-your-mouth meringue ghosts.
    Photo © Michael Klashman |
    ButterFlourEggs.com.

      We loved this idea from Michael Klashman of ButterFlourEggs.com so much that we signed up for all of his blog feeds.

    Meringues are gluten-free, cholesterol-free airy bites. Airy ghosts are perfect Halloween fare.

    This recipe makes about 24 ghosts, each 2- to 3-inches: crunchy on the outside and slightly gooey on the inside.

    Serve them on a tray, use them as cake or cupcake toppers or make a ghostly sundae.

    MERINGUE GHOST COOKIES RECIPE

    Ingredients

  • 5 egg whites
  • 1½ cup superfine sugar (you can grind regular
    table sugar into superfine)
  • Pinch salt
  • ¼ teaspoon cream of tartar
  • 1 teaspoon real vanilla extract
  • Small black or silver dragées* for the eyes
  •  
    Preparation

    1. PREHEAT the oven to 225°F. (Always use an oven thermometer—you can’t trust the calibration, even on the finest oven.) Prepare two cookie sheets by lining with parchment paper.

    2. BEAT the egg whites in the bowl of a stand mixer fitted with the whisk attachment, at medium-high speed just until frothy (about a minute).

    3. ADD the salt and cream of tartar. Continue beating and very slowly add the sugar. Continue beating until the whites have become very thick (although not dry) and glossy. The whites should hold their peak when the beater is pulled out of the bowl.

    4. ADD the vanilla extract, and continue beating for another fifteen or twenty seconds, just until it has been absorbed into the meringue.

    5. TRANSFER the meringue to a large piping bag fitted with a plain, wide tip (for example, Ateco #808). Pipe ghost shapes onto the lined cookie sheets. Using a pair of tweezers, set the dragée “eyes” into the ghosts. This is the painstaking part of recipe, so be patient and have fun. You can use the back of the tweezers or other implement to draw an optional smile. (We used an straightened-out paper clip.)

    6. BAKE for fifteen minutes, checking frequently to make sure the meringues do not brown. After fifteen minutes, turn the oven off and leave the meringues inside for 3-4 hours to dry.

    Then, WATCH those ghosts disappear!

    *Dragée, pronounced drah-ZHAY in French, refers to various types of hard, sugar-based confections. Jordan almonds, for example, are called dragées in France. In the U.S., the term most often refers to a tiny ball of colored sugar, commonly 3-4 millimeters in diameter, used to decorate cookies and cakes. In comparison, the dragées on nonpareils candies are 2 millimeters in diameter. The word derives from the Greek tragêmata, meaning sweets or treats. According to Wikipedia, the dragée was originally a spiced lump of sugar eaten after meals as a digestive.
      

    Comments off

    The Nibble Webzine Of Food Adventures
    RSS
    Follow by Email


    © Copyright 2005-2024 Lifestyle Direct, Inc. All rights reserved. All images are copyrighted to their respective owners.